 rss
rss
The Floppy-Disk Archiving Machine, Mark II
Four and a half years ago, I built a machine to archive 3.5" floppy disks. By the time I finished doing the archiving of the 443 floppies, I realized that it fell short of what I wanted. There were a couple of problems:
- many 3.5" floppy disk labels wrap around to the back of the disk
- disks were dumped into a single bin
- the machine was sensitive to any shifts to the platform, which consisted of two cardboard boxes
- the structure of the frame was cobbled together and did not use parts efficiently
- lighting was ad-hoc and significantly affected by the room's ambient light
- the index of the disks was cumbersome
I recently had an opportunity to dust off the old machine (quite literally), and do a complete rebuild of it. That allowed me to address the above issues. Thus, I present:
The Floppy-Disk Archiving Machine, Mark II

The Mark II addresses the shortcomings of the first machine.
Under the photography stage, an angled mirror provides the camera (an Android Dev Phone 1) a view of the label on the back of the disk. That image needs perspective correction, and has to be mirrored and cropped to extract a useful image of the rear label. OpenCV serves this purpose well enough, and is straight forward to use with the Python bindings.
The addition of lights and tracing-paper diffusers improved the quality of the photos and reduced the glare. It also made the machine usable whether the room lights were on or off.
The baffle under disk drive allows the machine to divert the ejected disks into either of two bins. I labeled those bins "BAD" and "GOOD". I wrote the control software (also Python) to accept a number of options to allow sorting the disks by different criteria. For instance, sometimes OpenCV's object matching selects a portion of a disk or its label instead of the photography stage's arrows. When that happens, the extraction of the label will fail. That can happen for either the front or back disk labels. The machine can treat such a disk as 'BAD'. When a disk is processed, and bad bytes are found, the machine can treat the disk as bad. The data extraction tool supports different levels of effort for extracting data from around bad bytes on a disk.
This allows for a multiple-pass approach to processing a large number of disks.
In the first pass, if there is a problem with either picture, or if there are bad bytes detected, sort the disk as bad. That first pass can configure the data extraction to not try very hard to get the data, and thus not spend much time per disk. At the end of the first pass, all the 'GOOD' disks have been successfully read with no bad bytes, and labels successfully extracted. The 'BAD' disks however, may have failed for a mix of different reasons.
The second pass can then expend more effort extracting data from disks with read errors. Disks which encounter problems with the label pictures would still be sorted as 'BAD', but disks with bad bytes would be sorted as 'GOOD' since we've extracted all the data we can from them, and we have good pictures of them.
That leaves us with disks that have failed label extraction at least once, and probably twice. At this point, it makes sense to run the disks through the machine and treat them as 'GOOD' unconditionally. Then the label extraction tool can be manually tweaked to extract the labels from this small stack of disks.
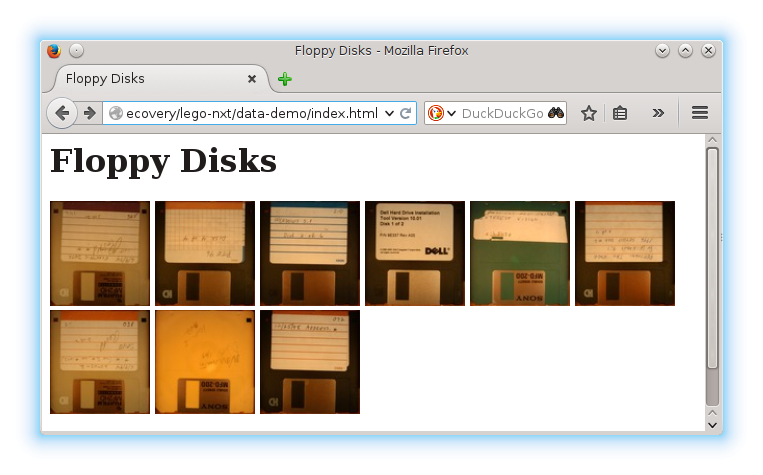
Once the disks have been successfully photographed and all available data extracted, an html-based index can be created. That process creates one page containing thumbnails of the front of the disks.

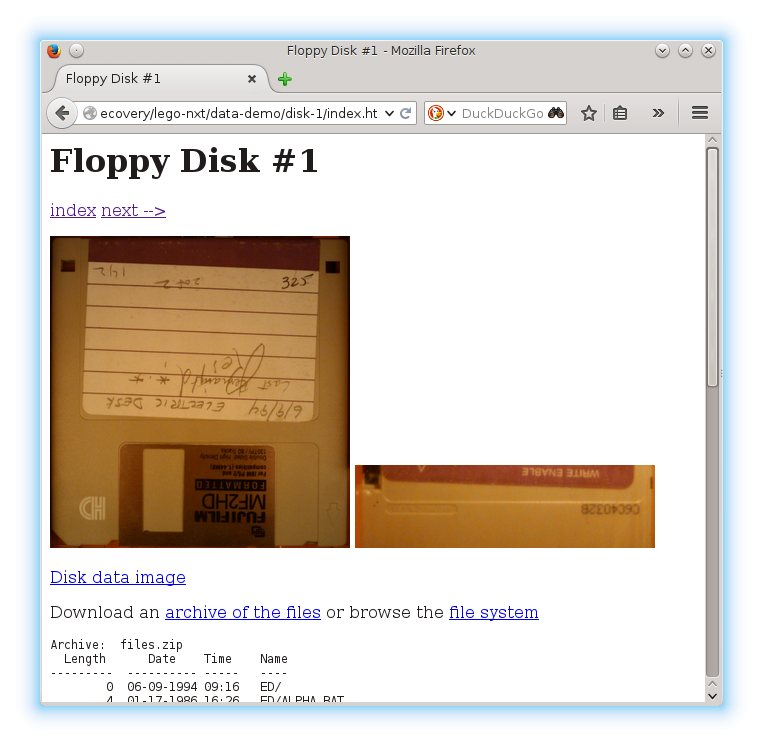
Each thumbnail links to a page for a disk giving ready access to:
- a full-resolution picture of the extracted front label
- a full-resolution picture of the extracted back label
- a zip file containing the files from the disk
- a browsable file tree of the files from the disk
- an image of the data on the disk
- a log of the data extracted from the disk
- the un-processed picture of the front of the disk
- the un-processed picture of the back of the disk

The data image of the disk can be mounted for access to the original filesystem, or forensic analysis tools can be used on it to extract deleted files or do deeper analysis of data affected by read errors. The log of the data extracted includes information describing which bytes were read successfully, which had errors, and which were not directly attempted. The latter may occur due to time limits placed on the data extraction process. Since a single bad byte may take ~4 seconds to return from the read operation, and there may be 1474560 bytes on a disk, if every byte were bad you could spend 10 weeks on a single disk, and recover nothing. The data recovery software (also written in Python) therefore prioritizes the sections of the disk that are most likely to contain the most good data. This means that in practice everything that can be read off the disk will be read off in less than 20 minutes. For a thorough run, I will generally configure the data extraction software to give up if it has not successfully read any data in the past 30 minutes (it's only machine time, after all). At that point, the odds of any more bytes being readable are quite low.
So what does the machine look like in action?
(Also posted to YouTube.)
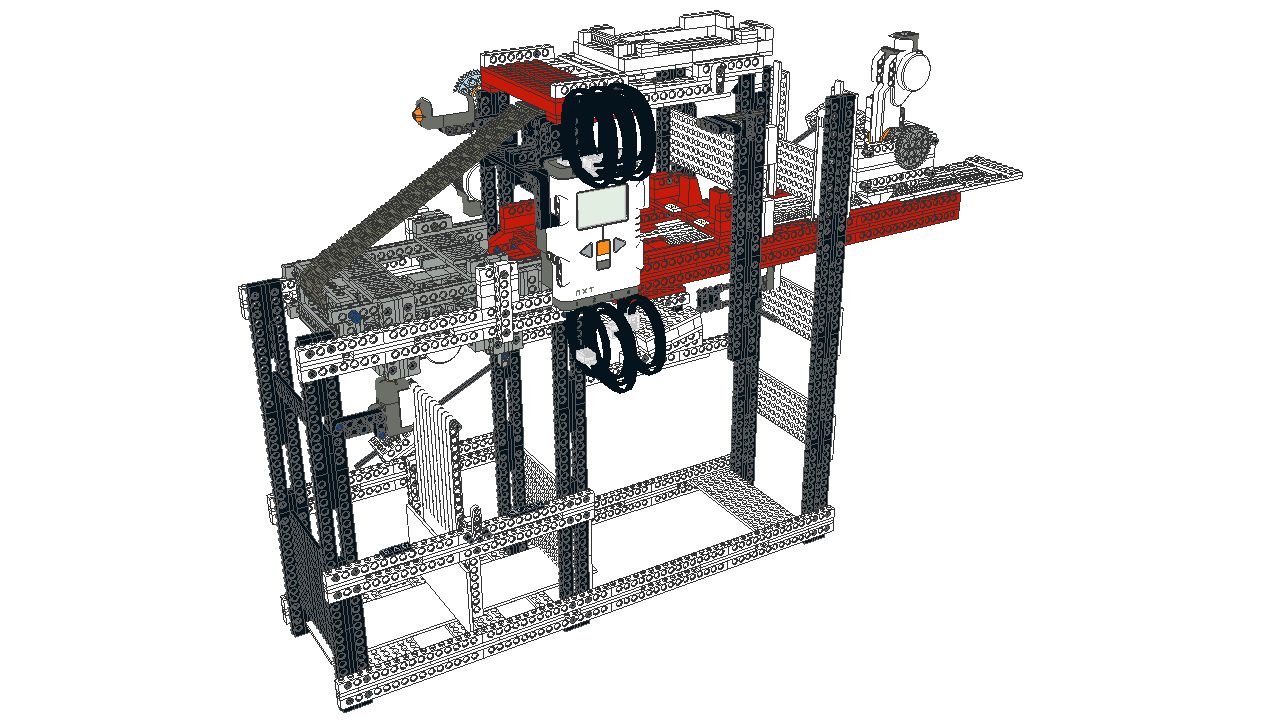
Part of the reason I didn't disassemble the machine while it collected dust for 4.5 years was that I knew I would not be able to reproduce it should I have need of it again in the future. Doing a full rebuild of the machine allowed me to simplify the build dramatically. That made it feasible to create an Ldraw model of it using LeoCAD.

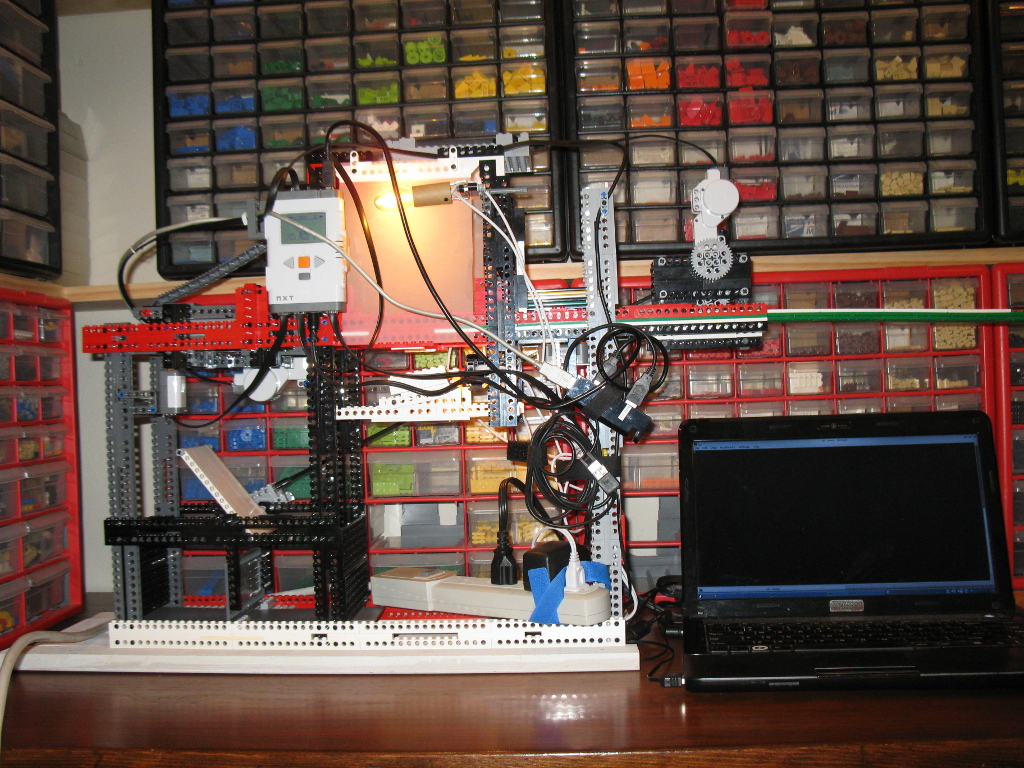
Rebuilding the frame with an eye to modeling it in the computer yielded a significantly simpler support mechanism, and one that proved to be more rigid as well. To address the variations of different platforms and tables, I screwed a pair of 1x2 boards together with some 5" sections of 1x4 using a pocket hole jig. The nice thing about the 5" gap between the 1x2 boards is that the Lego bricks are 5/16" wide, so 16 studs fit neatly within that gap. The vertical legs actually extend slightly below the top of the 1x2's, and the bottom horizontal frame rests on top of the boards. This keeps the machine from sliding around on the wooden frame, and makes for a consistent, sturdy platform which improves the machine's reliability.
The increase in stability and decrease in parts required also allowed me to increase the height of the machine itself to accommodate the inclusion of the disk baffle and egress bins.
What about a Mark III?
Uhm, no.
I have processed all 590 disks in my possession (where did the additional 150 come from?), and will be having these disks shredded. That said, the Mark II is not a flawlessly perfect machine. Were I to build a third machine, increasing the height a bit further to make the disk bins more easily accessible would be a worthwhile improvement. Likewise, the disk magazine feeding the machine is a little awkward to load with the cables crossing over it, and could use some improvement so that the weight of a tall stack of disks does not impede the proper function of the pushrod.
So, no, I'm not building a Mark III. Unless you or someone you know happen to have a thousand 3.5" floppy disks you need archived, and are willing to pay me well to do it. But who still has important 3.5" floppy disks lying around these days? I sure don't. (Well, not anymore, anyway.)
Previously: the Mark I
Update: the Mark III
Attachments (7)
- floppy-machine-on-desk.jpg (480.7 KB) - added by retracile 11 years ago.
-
floppy-machine-colorized.png
(95.8 KB) -
added by retracile 11 years ago.
rendering of digital model
-
example-index-snapshot.png
(174.0 KB) -
added by retracile 11 years ago.
index of floppies screenshot
-
example-disk-index-snapshot.png
(253.9 KB) -
added by retracile 11 years ago.
single disk screenshot
-
floppy-disk-machine-video.webm
(31.8 MB) -
added by retracile 11 years ago.
video (webm)
-
floppy-disk-machine-video.mp4
(61.7 MB) -
added by retracile 11 years ago.
video (mp4)
-
floppy-disk-machine-video.ogv
(77.3 MB) -
added by retracile 11 years ago.
video (ogv)
Comments
No comments.